
Thank you for purchasing LD-B20C.
To fully enjoy the benefits of this product and ensure safety, please read the manual carefully and set up the device as instructed steps.If any problems are found during the operation process, either way listed below can be used as online technical support.
Send emails to after_service@radiolink.com.cn, and we will answer your question at the earliest.
If purchased from an approved dealer or distributor, you can contact them directly for support.
All manuals are available on the RadioLink official website www.radiolink.com.cn.
SAFETY PRECAUTIONS
Please do not fly in the rain! Rain or moisture may cause flight instability or even loss of control. Never fly if there is lightning. It is recommended to fly in conditions with good weather (No rain, fog, lightning, or wind).
When flying, you must strictly abide by local laws and regulations and fly safely! Do not fly in no-fly areas such as airports, military bases, etc.
Please fly in an open field away from crowds and buildings.
Do not perform any operation under the condition of drinking, fatigue, or other poor mental state. Please operate in strict accordance with the product manual.
Please be cautious when flying near electromagnetic interference sources, including but not limited to: high-voltage power lines, high-voltage transmission stations, mobile phone base stations and TV broadcast signal towers. When flying in the above-mentioned places, the wireless transmission performance of the remote control may be affected by interference. If there is too much interference, the signal transmission of the remote control and the receiver may be interrupted, resulting in a crash.
Please be sure to install the propeller according to the instructions in the manual to avoid installing the reverse propellers and causing a crash.
After the flight, be sure the disarm is successful. Please unplug the battery until the propellers stops.
When connecting the flight controller to Mission Planner or calibrating the ESC, please make sure that the propellers are not installed on the aircraft.
When taking off, please turn on the transmitter first and then the aircraft; After finishing the flight, unplug the aircraft battery first and then power off the transmitter.
When arming with success, make sure to stay a certain distance away from the aircraft to ensure safety. Please gently push the throttle when start the flight.
WARNING
This product is not a toy and is NOT suitable for children under the age of 14. Adults should keep the product out of the reach of children and exercise caution when operating this product in the presence of children. Water or moisture may enter the mini drone and the transmitter through gaps of electronics and cause model instability, even out of control. If flying in the wet weather (such as game) is inevitable, always use plastic bags or waterproof cloth to cover the transmitter.
This device complies with part 15 of the FCC Rules. Operation is subject to the following two conditions:
This device may not cause harmful interference, and prevents external wireless interference, including interference that may cause undesired operation.
Any Changes or modifications not expressly approved by the party responsible for compliance could void the user's authority to operate the equipment.
Packing List
Name | Details | PNP Version | RTF Version |
Fuselage | LD-B20C Drone (Blue/Red) | 1 | 1 |
Transmitter | RadioLink T8S | 1 | |
Receiver | RadioLink R16SM | 1 | |
FC/ESC | LD-B20 AIO 40A 3-4S | 1 | 1 |
Motor | SZ-SPEED 1404-4600KV Motor | 4 | 4 |
Propeller | Gemfan D2.5 Propeller | 4 | 4 |
Battery | Gensace 3S 680mah 30C Lipo Battery | 1 | 1 |
Charger | G.T. POWER A3 Charger (2S-3S) | 1 | 1 |
Cable | Type-C cable | 1 | 1 |
Hex Wrench | 1.5mm Hex Wrench | 1 | 1 |
Transmitter accessory | T8S Throttle Return Accessory | 1 | |
Package Box | Package Box | 1 | 1 |
Note: T8S is used as an example in the manual. Users can select other RadioLink transmitters to control the drone. If T12D transmitter is used, enter Transmitter Setting--MODEL menu. Select the model named "LD-B20C", which provides the default parameters of LD-B20C and allows users to directly control the LD-B20C drone. (Please update the firmware of T12D to V1.9.6 or above)
Parameters
Weight | 200g with battery, 150g without battery |
Diameter | 200mm |
Material | Carbon Fiber (Frame), Plastic (Ball Shells, Battery Case) |
Signal input supported | CRSF、ELRS、SBUS |
Working Modes | Alt-Hold mode , Stabilize mode, Turtle mode |
Flight Time | 5-6 minutes |
Low Battery Alarm | 11.1V by default. When the battery voltage is lower than 11.1V, T8S will make “DDD” sounds as a unit to warn. |
LED Strip | With a tail LED strip which supports 7 colors, and the strip can be turned off |
Theory of Flight
Transmitter
The two joysticks of T8S correspond to the four basic channels, respectively.
Note: All of the following are based onT8S Mode 2 (Throttle on the left stick).
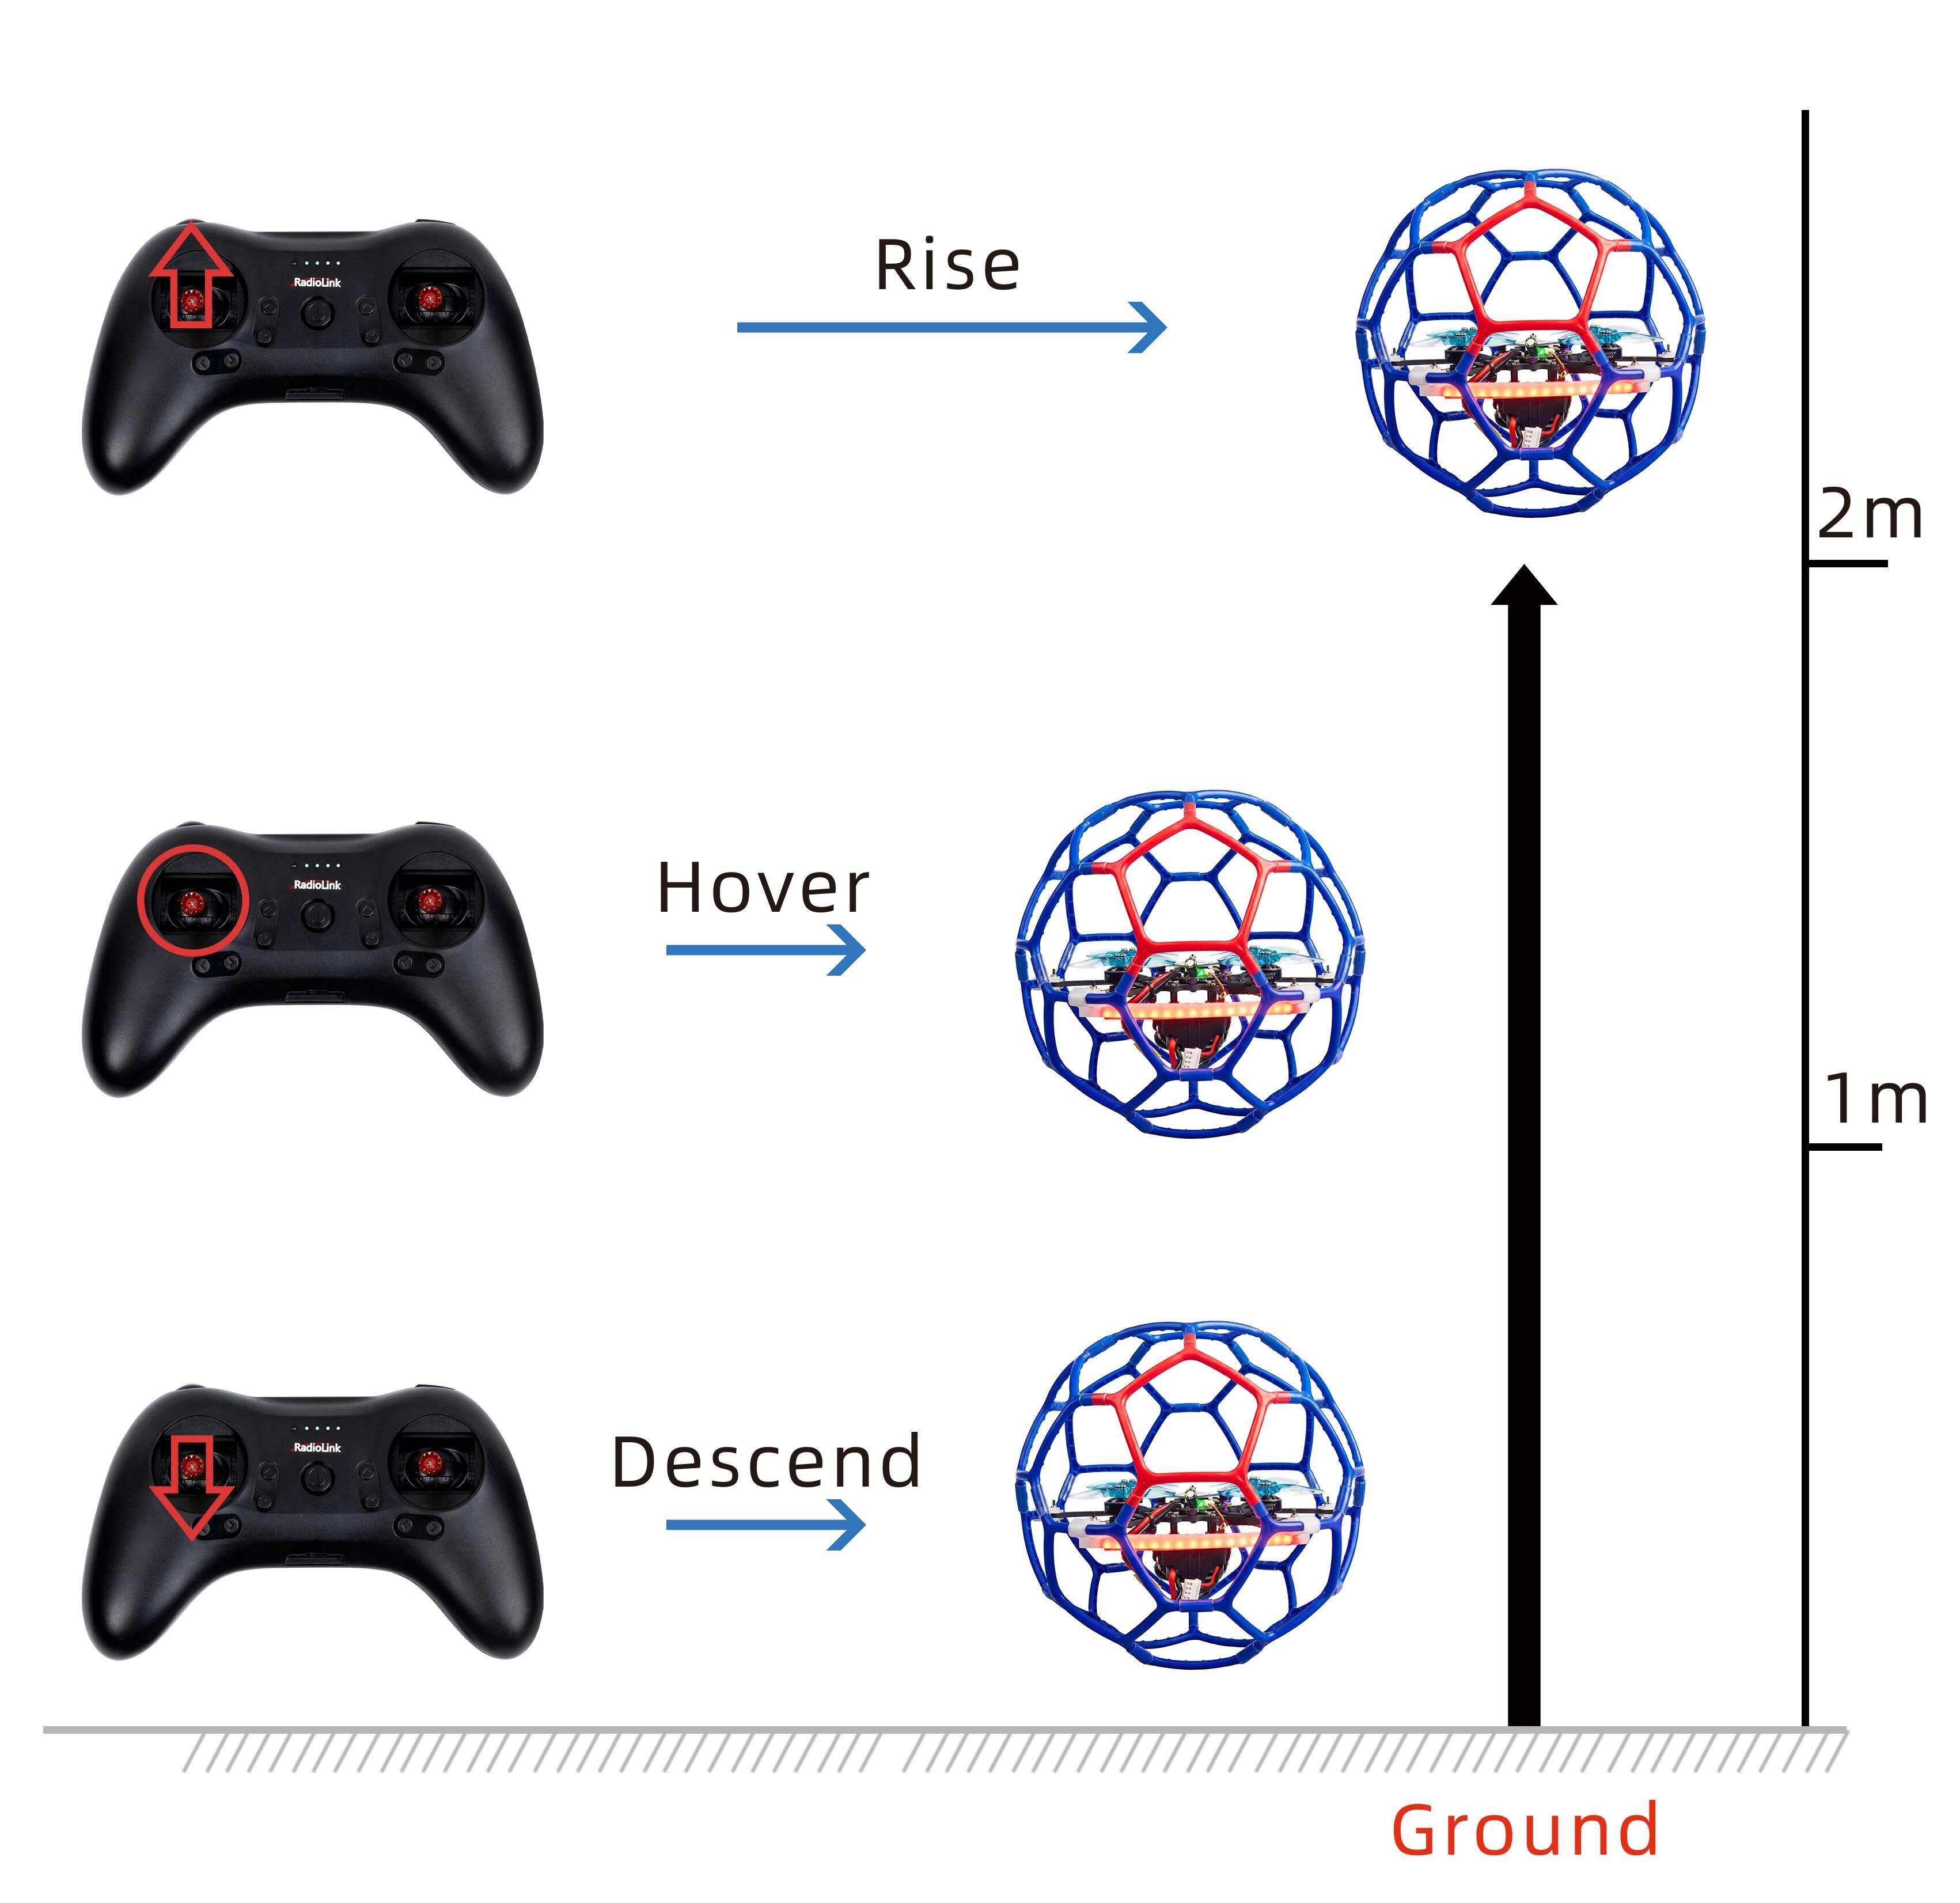
Left joystick
Make the LD-B20C rise or descend by toggling the left stick (THROTTLE) vertically upward or downward and turn clockwise or anticlockwise by toggling the left stick (YAW) to the left or right.
Right joystick
Make the LD-B20C fly forward or backward by toggling the right stick (PITCH) vertically upward or downward and to left or right by toggling the right stick (ROLL) to the left or right.

MODE 2
Joysticks & Flight Movements
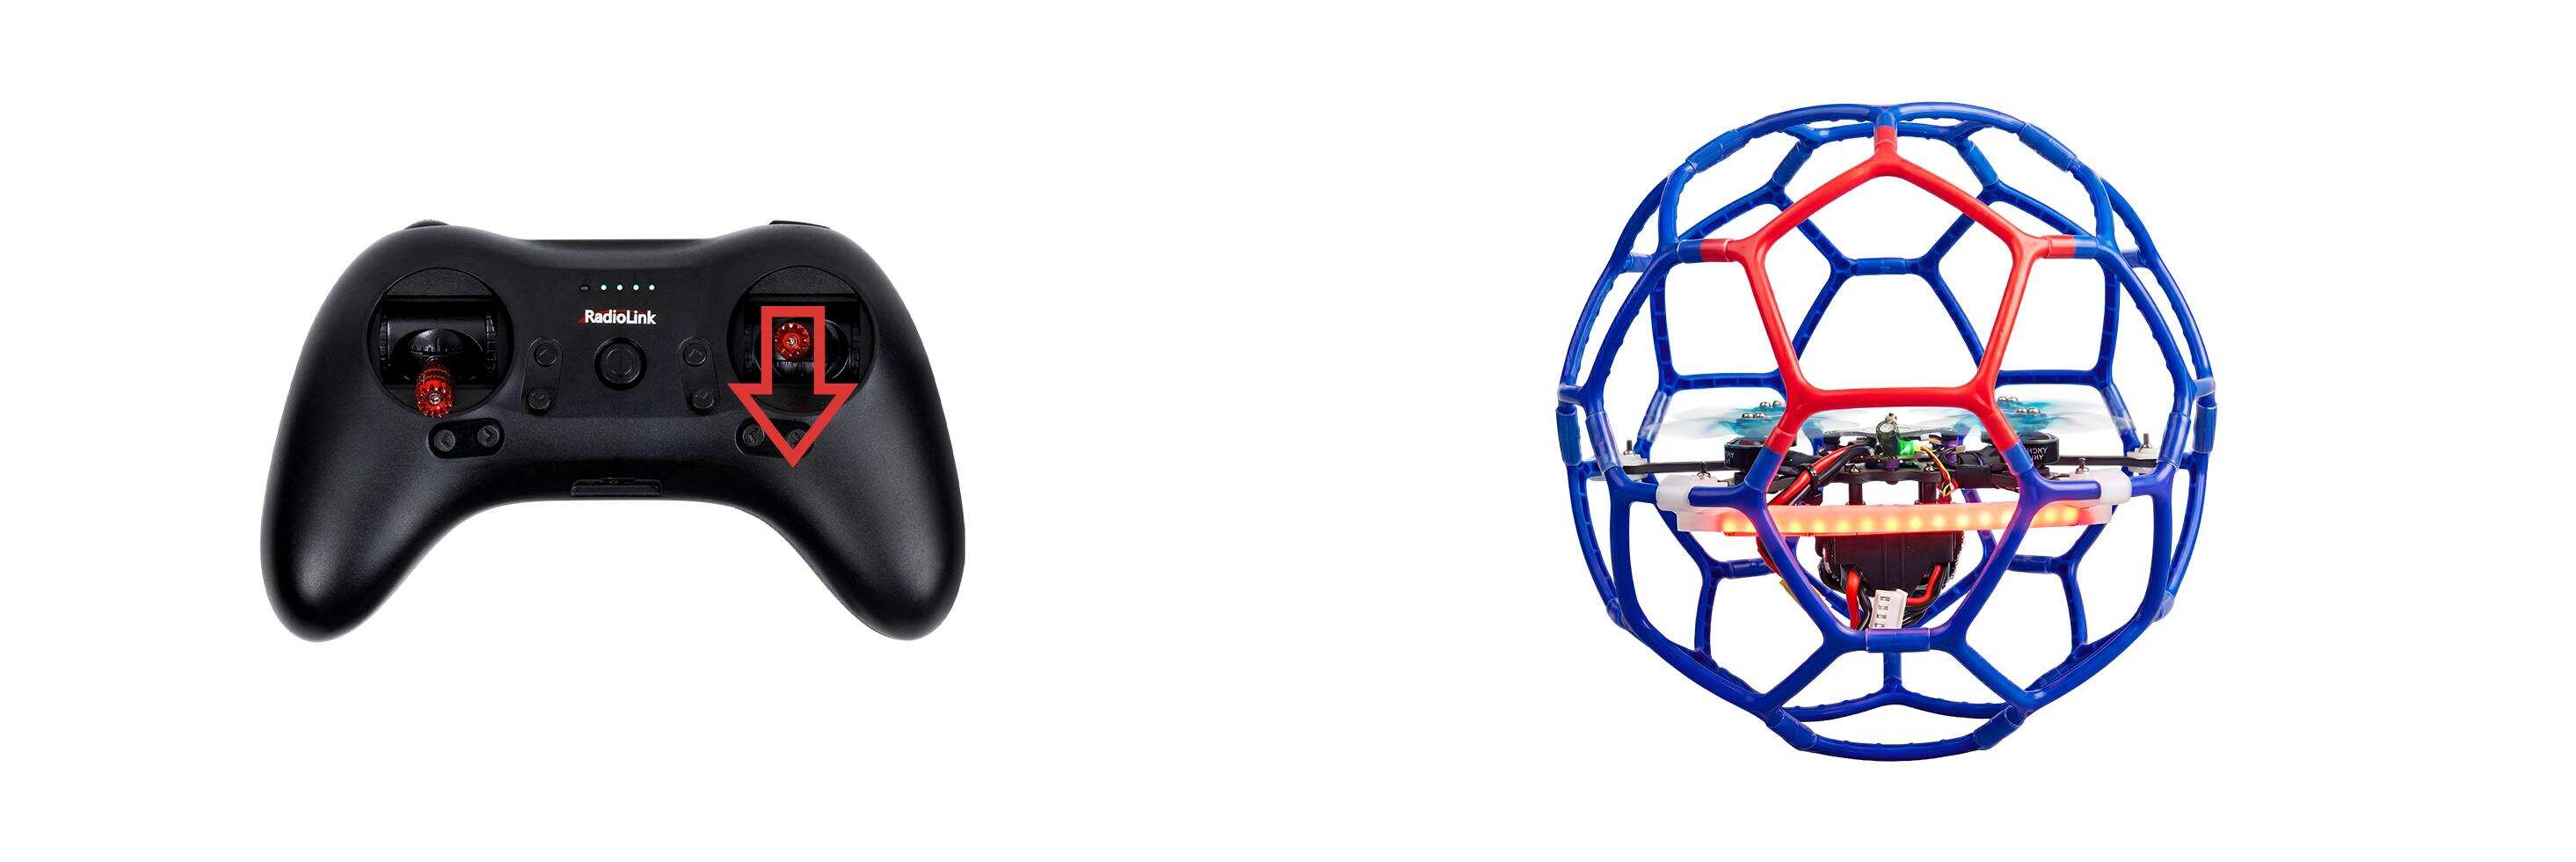
A. Throttle: Rise/ Descend/Hover(Note: Take T8S mode 2 as an example)
Toggle the throttle stick (on the left) vertically upward, and LD-B20C will rise and toggle the throttle vertically downward, then LD-B20C descends.
B. Yaw: Clockwise/Anticlockwise
Toggle the yaw stick (on the left) to the left and LD-B20C will turn anticlockwise and toggle the yaw stick to the right, then LD-B20C turns clockwise.
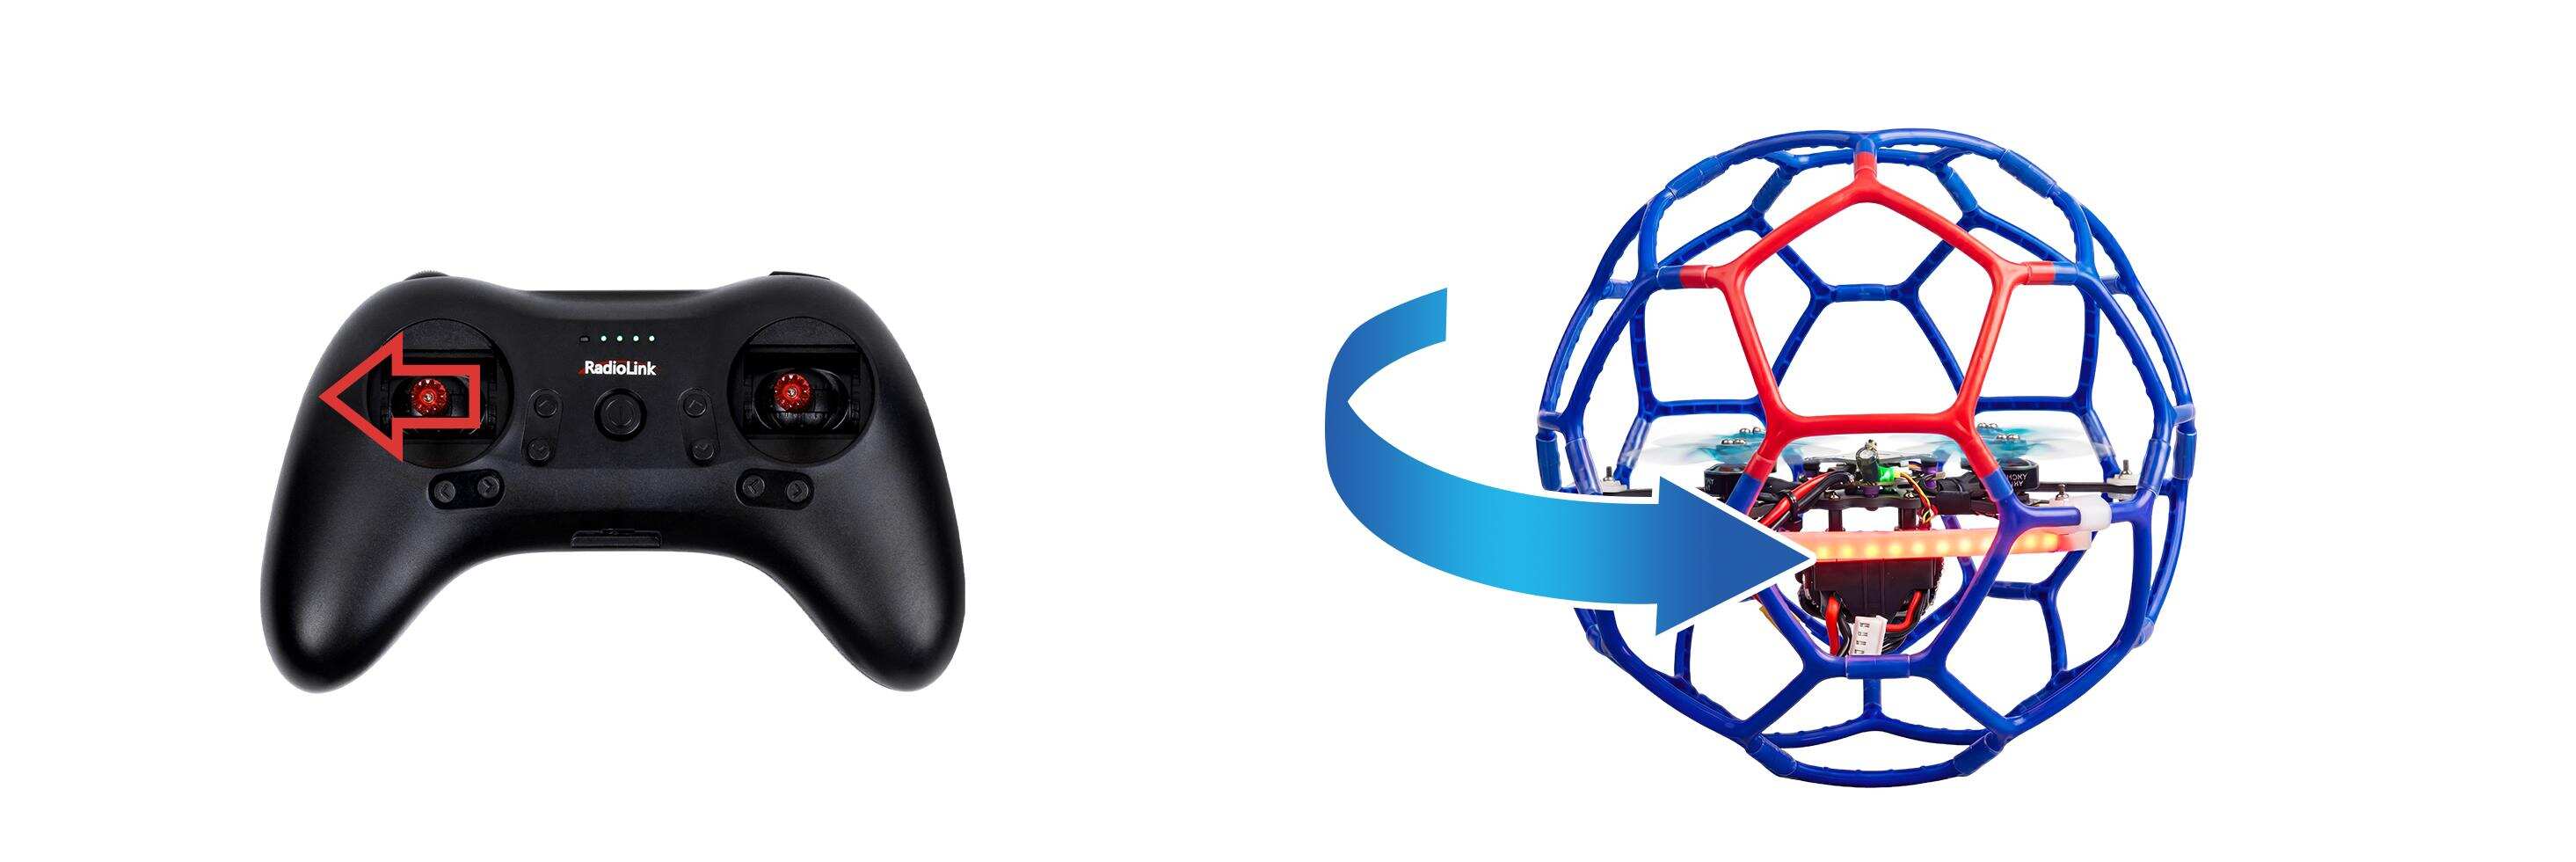
Yaw stick to the left, LD-B20C turns anticlockwise
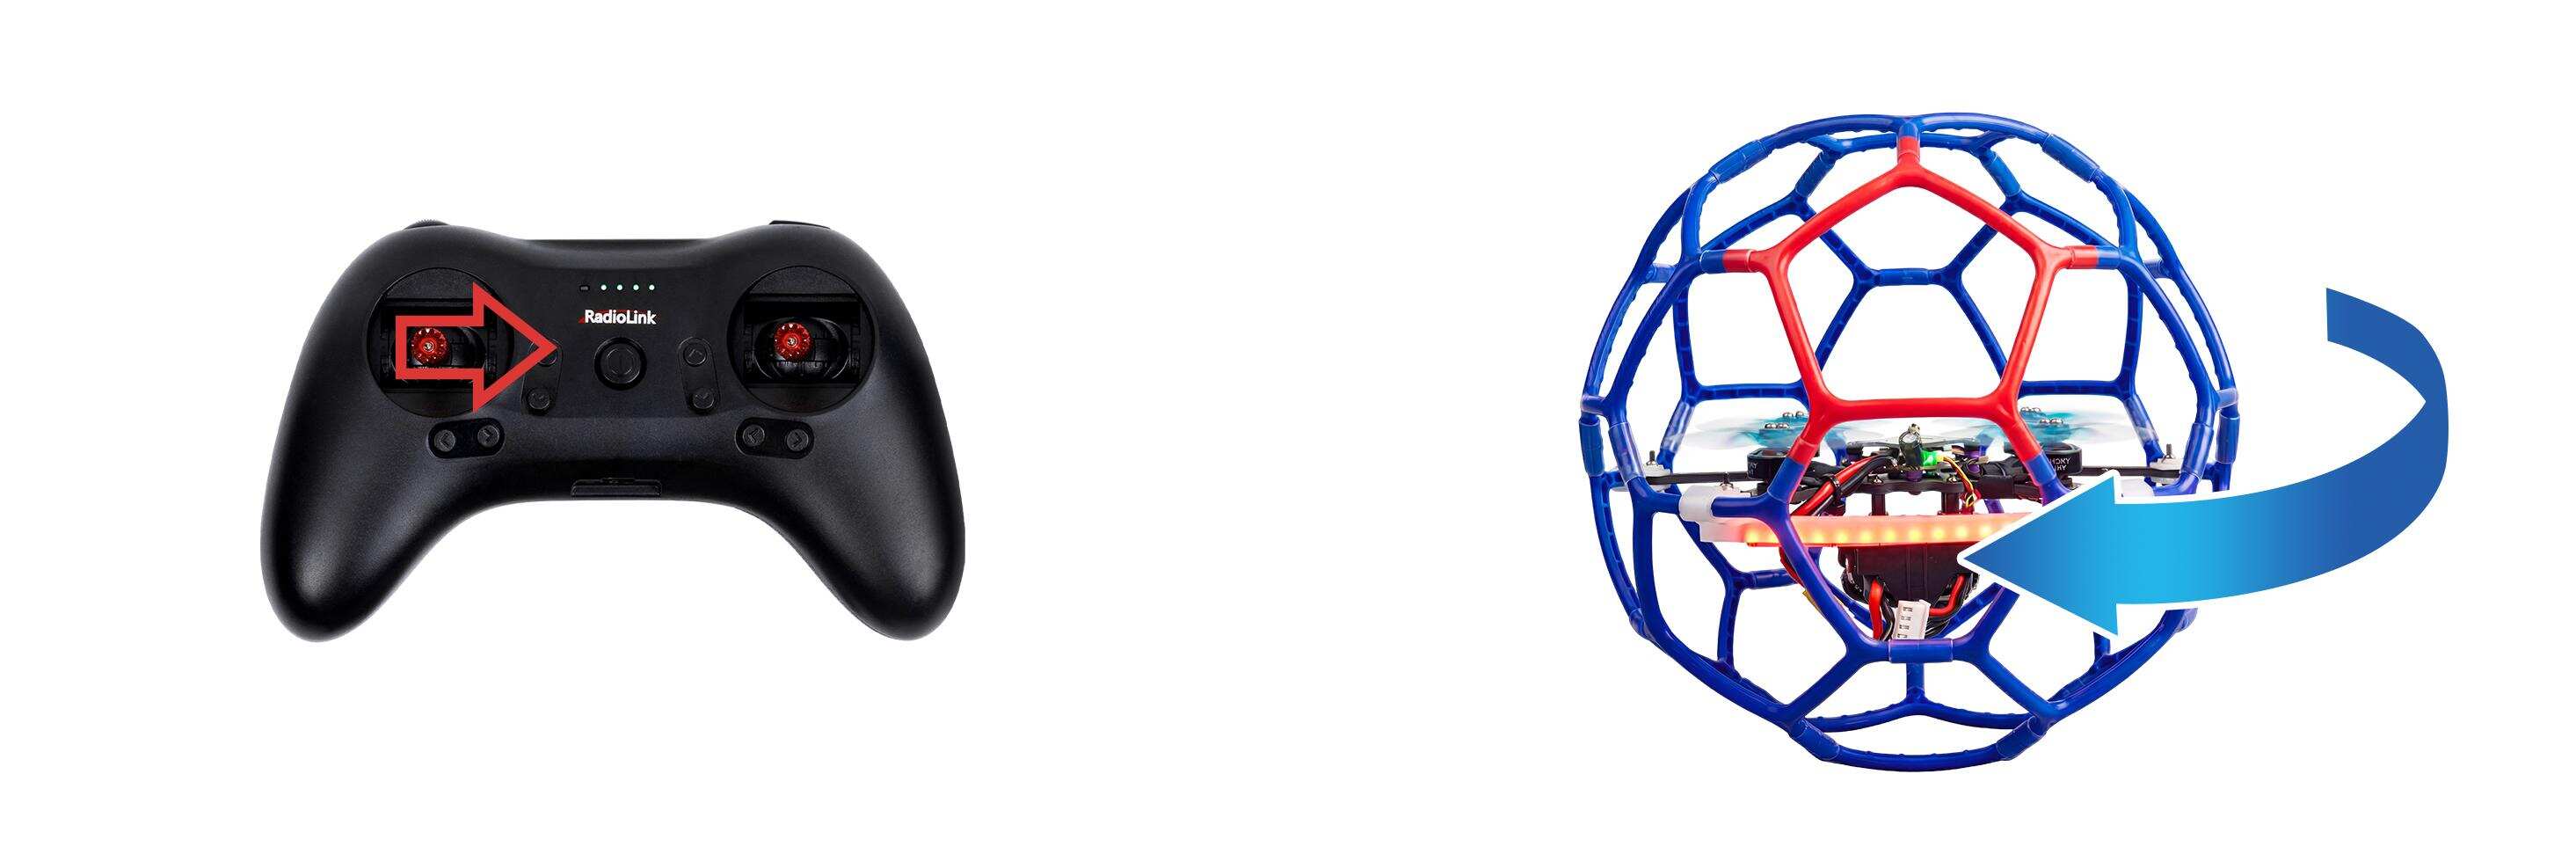
Yaw stick to the right, LD-B20C turns clockwise
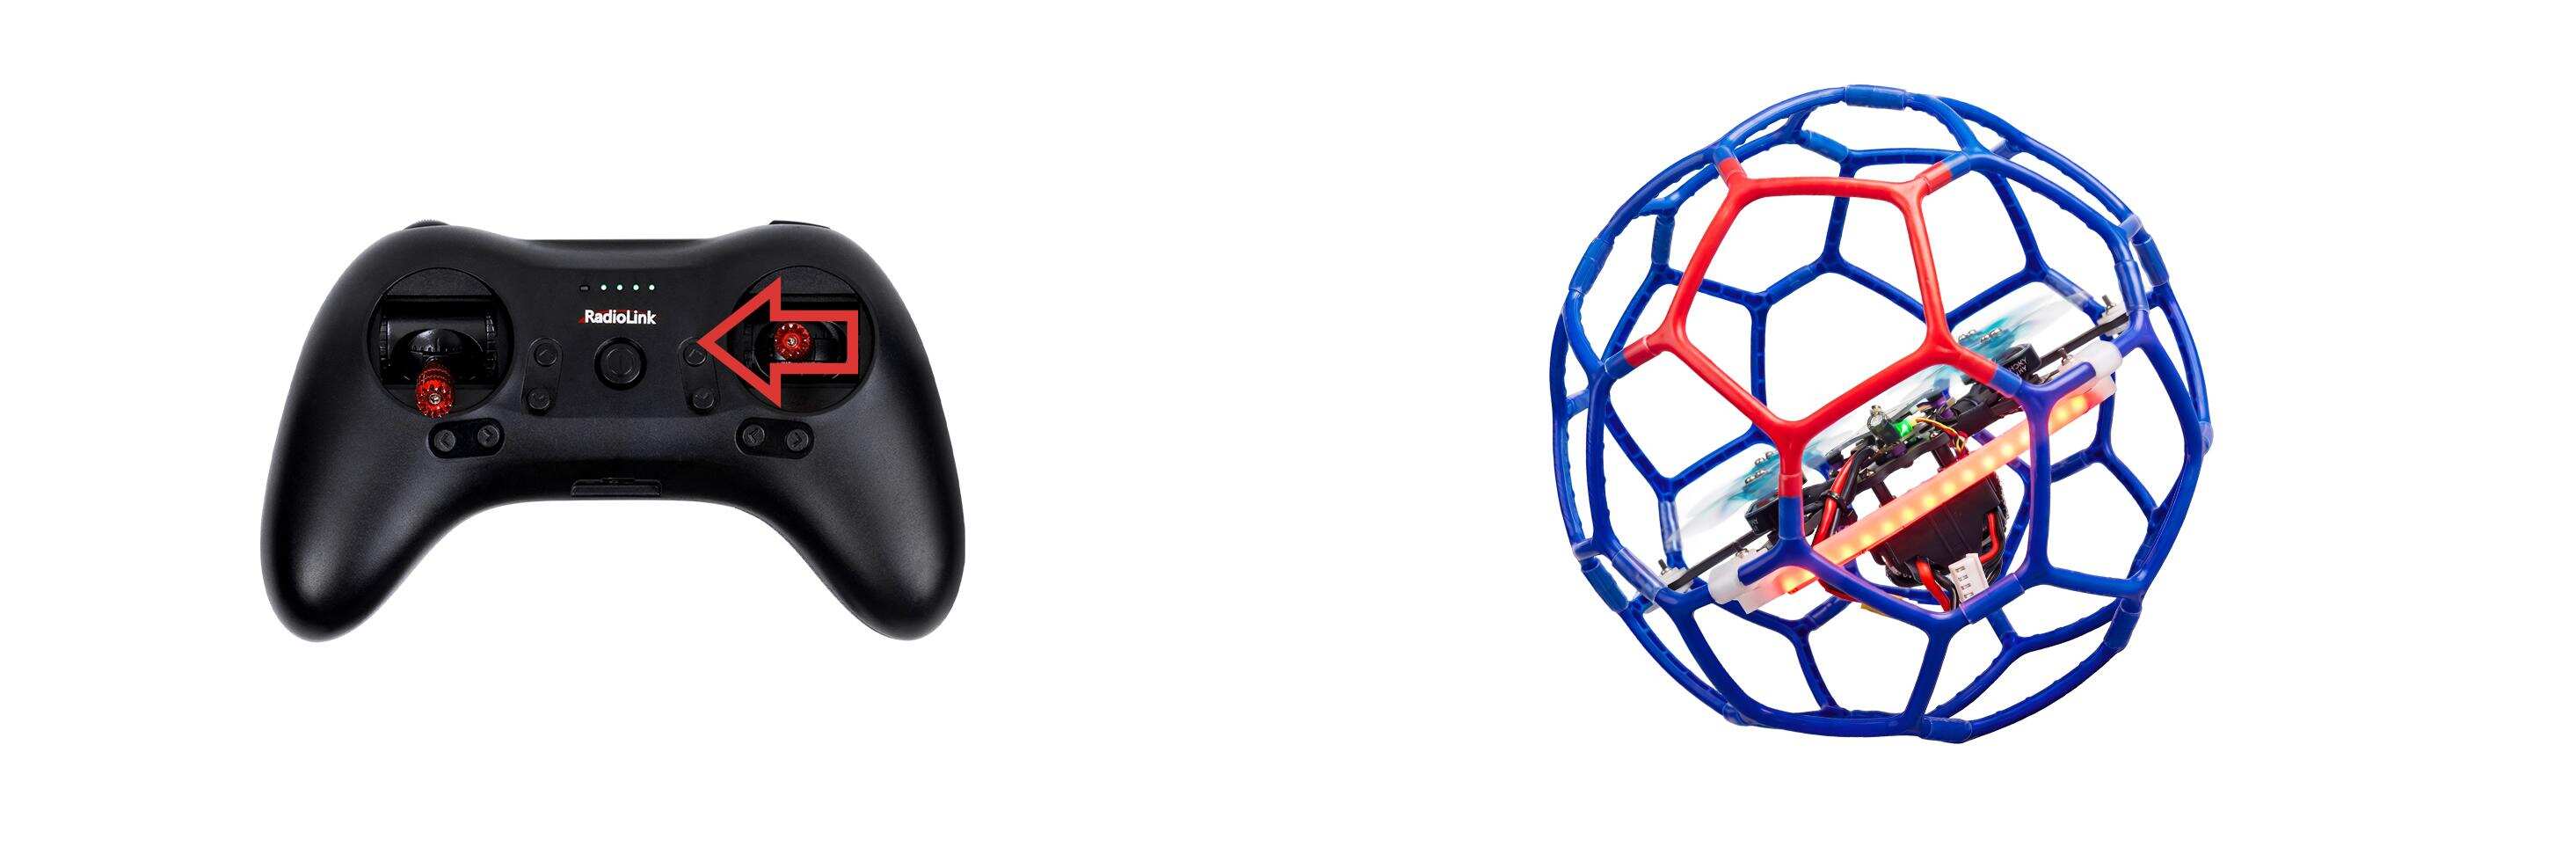
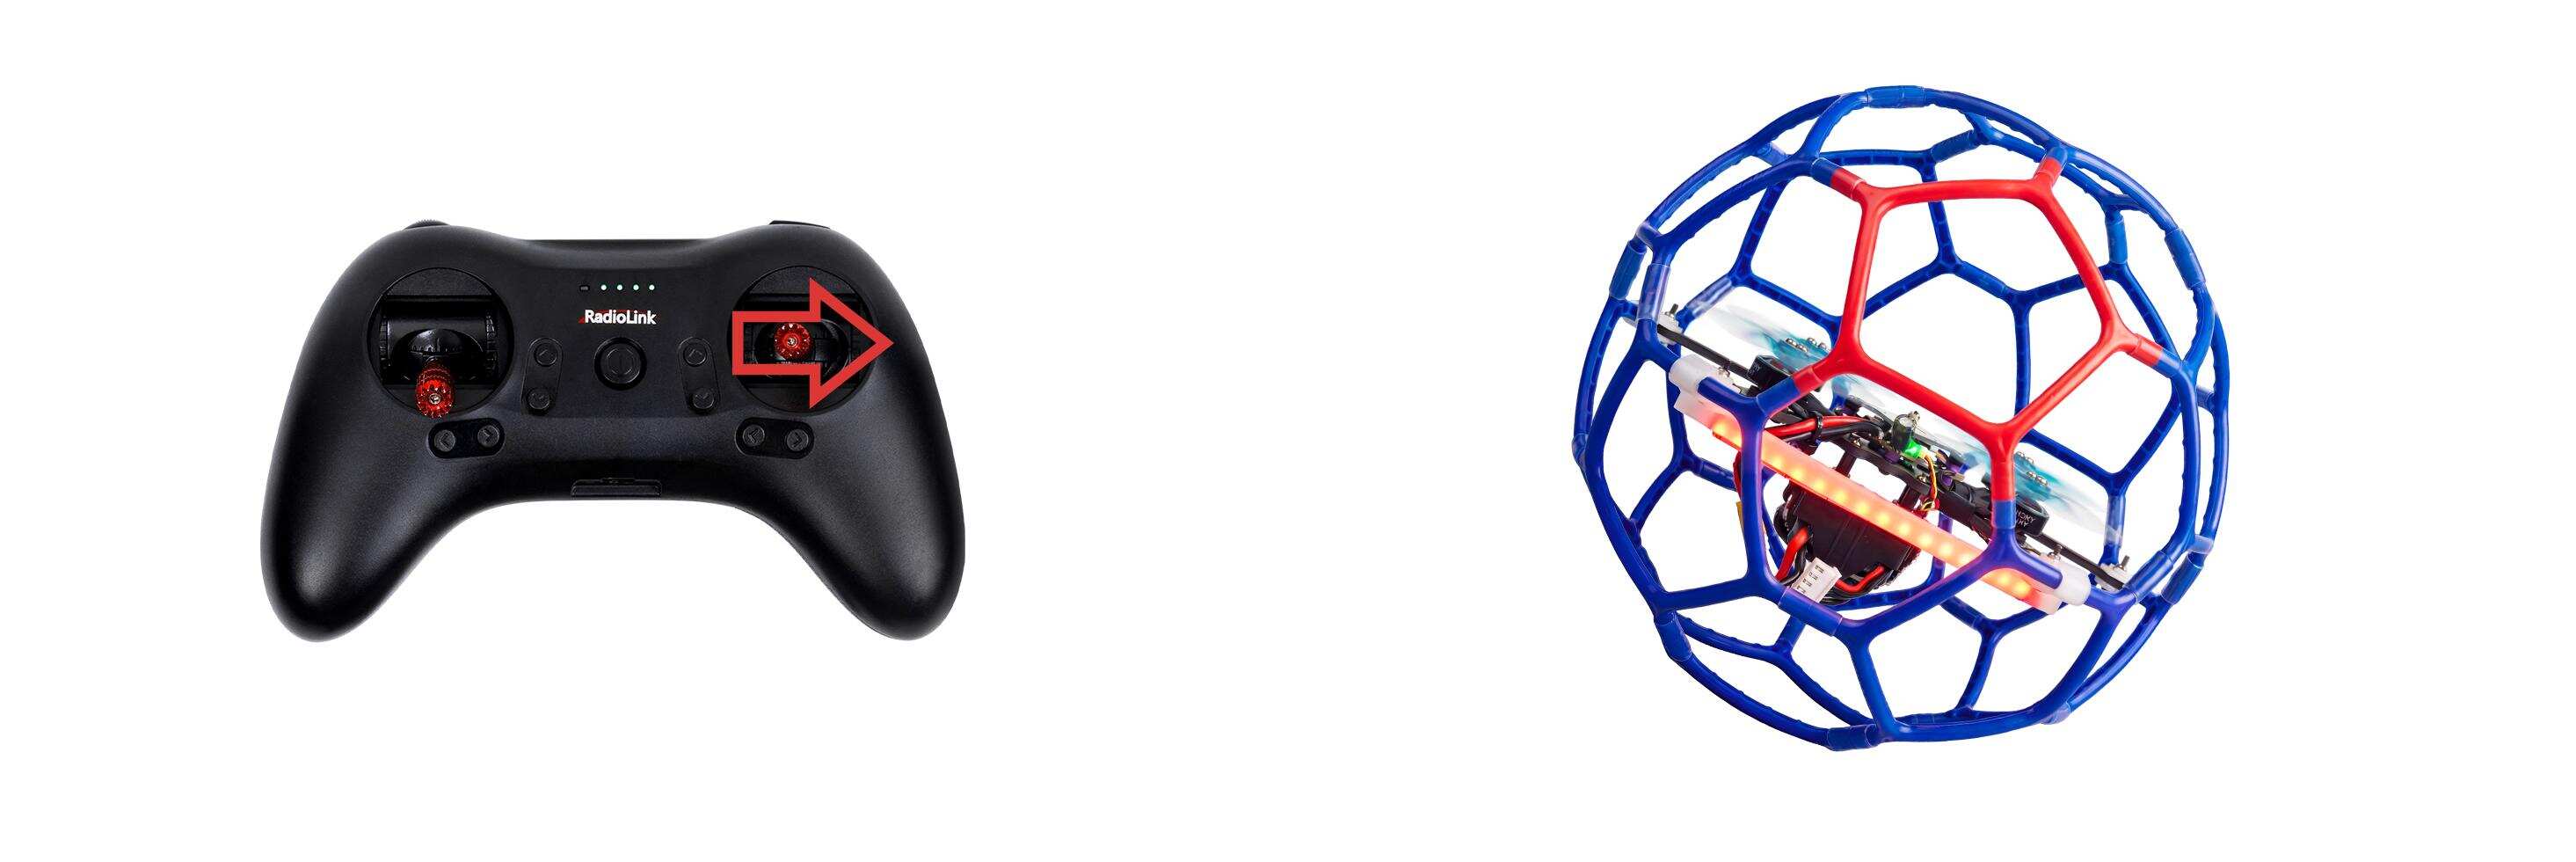
C. Pitch: Forward/Backward
Toggle the pitch stick (on the right) vertically upward and LD-B20C will fly forward and toggle the pitch stick vertically downward, then LD-B20C flies backwards.
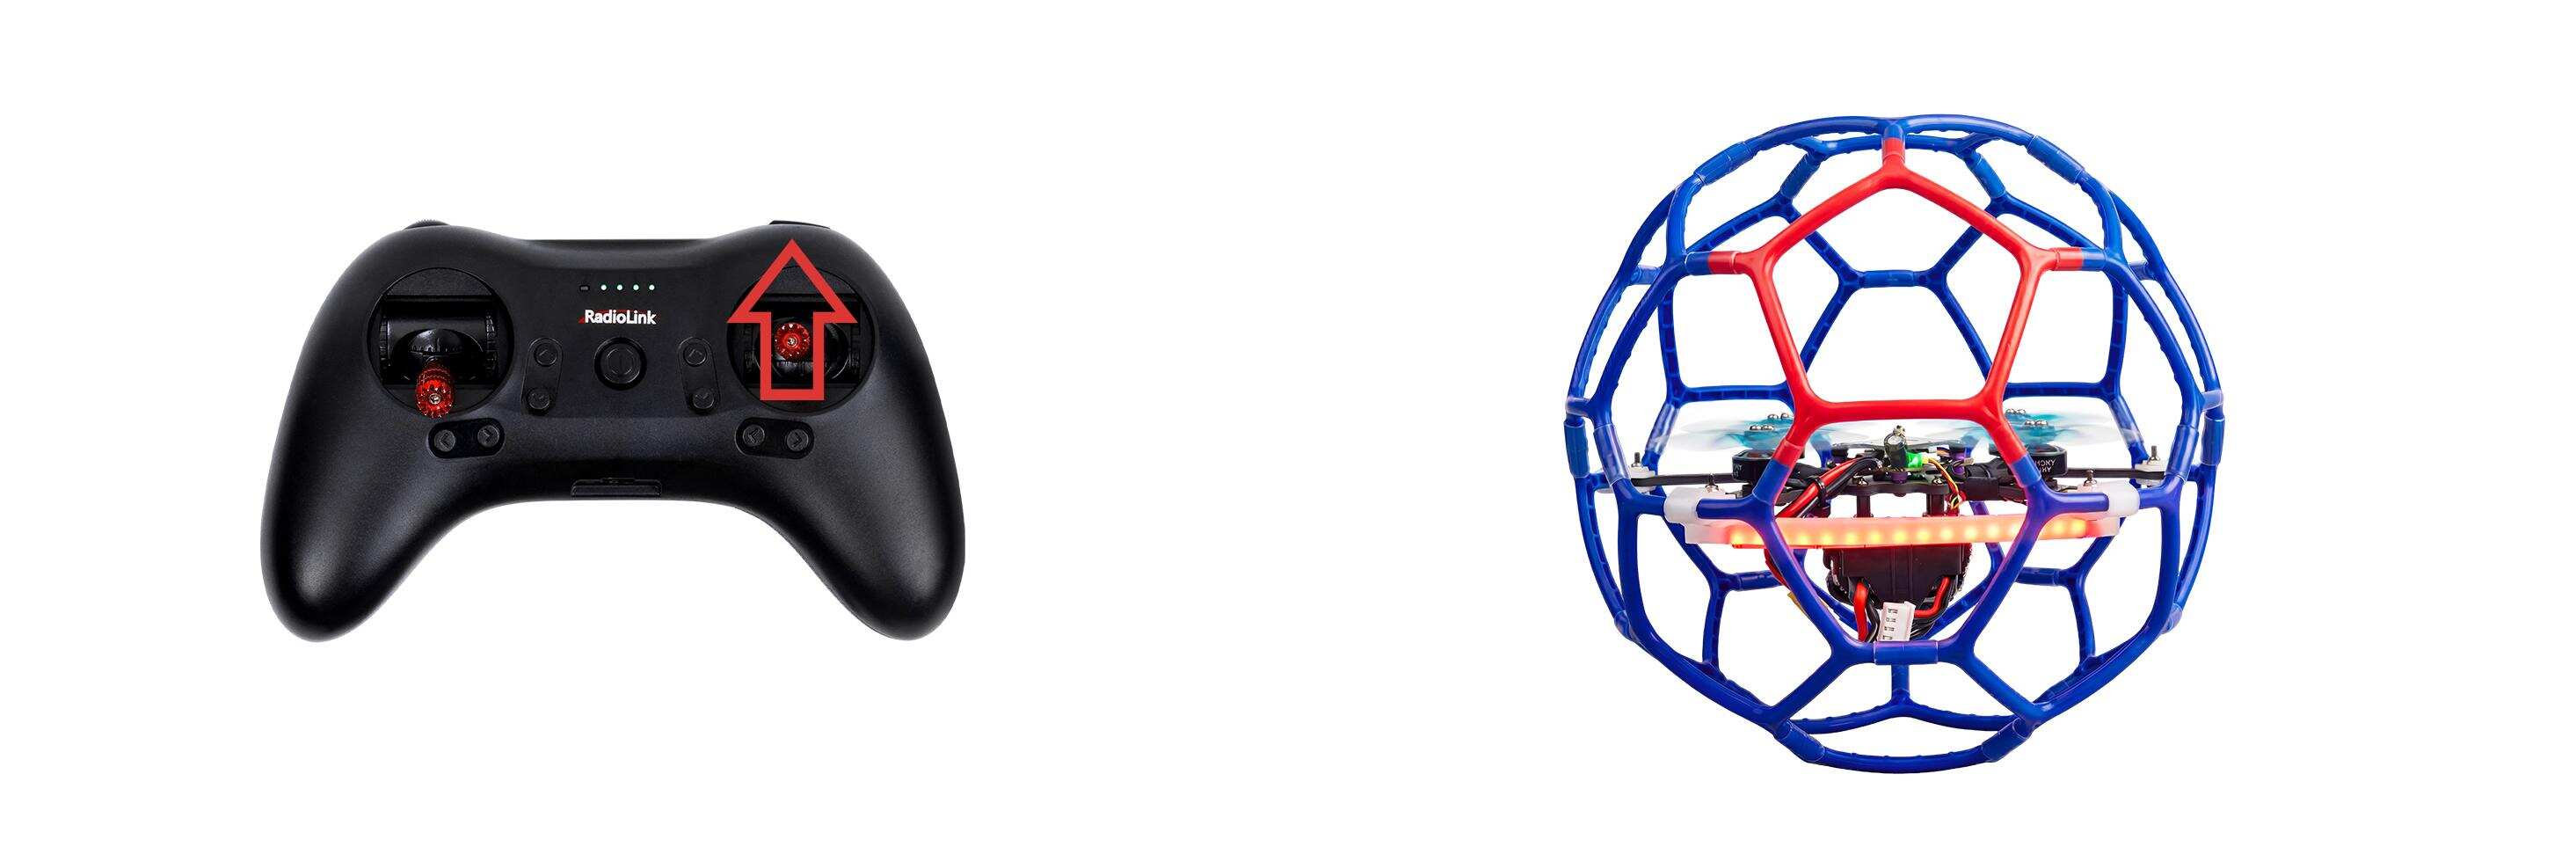
Pitch stick upward, LD-B20C moves forward
Pitch stick downward, LD-B20C moves backward
D. Roll: Right/Left
Toggle the roll stick (on the right) to the left and LD-B20C will fly to the left side and toggle the roll stick to the right, then LD-B20C will fly to the right side.
Roll stick to left, LD-B20C fly to the left side
Roll stick to right, LD-B20C fly to the right side
Flight Controller Channel Introduction
Channel | Introduction |
CH1 | Roll |
CH2 | Pitch |
CH3 | Throttle |
CH4 | Yaw |
CH5 | Alt-Hold mode, Stabilize mode |
CH6 | LED strip switch |
CH7 | Disarm/Arm |
CH8 | Turtle mode |
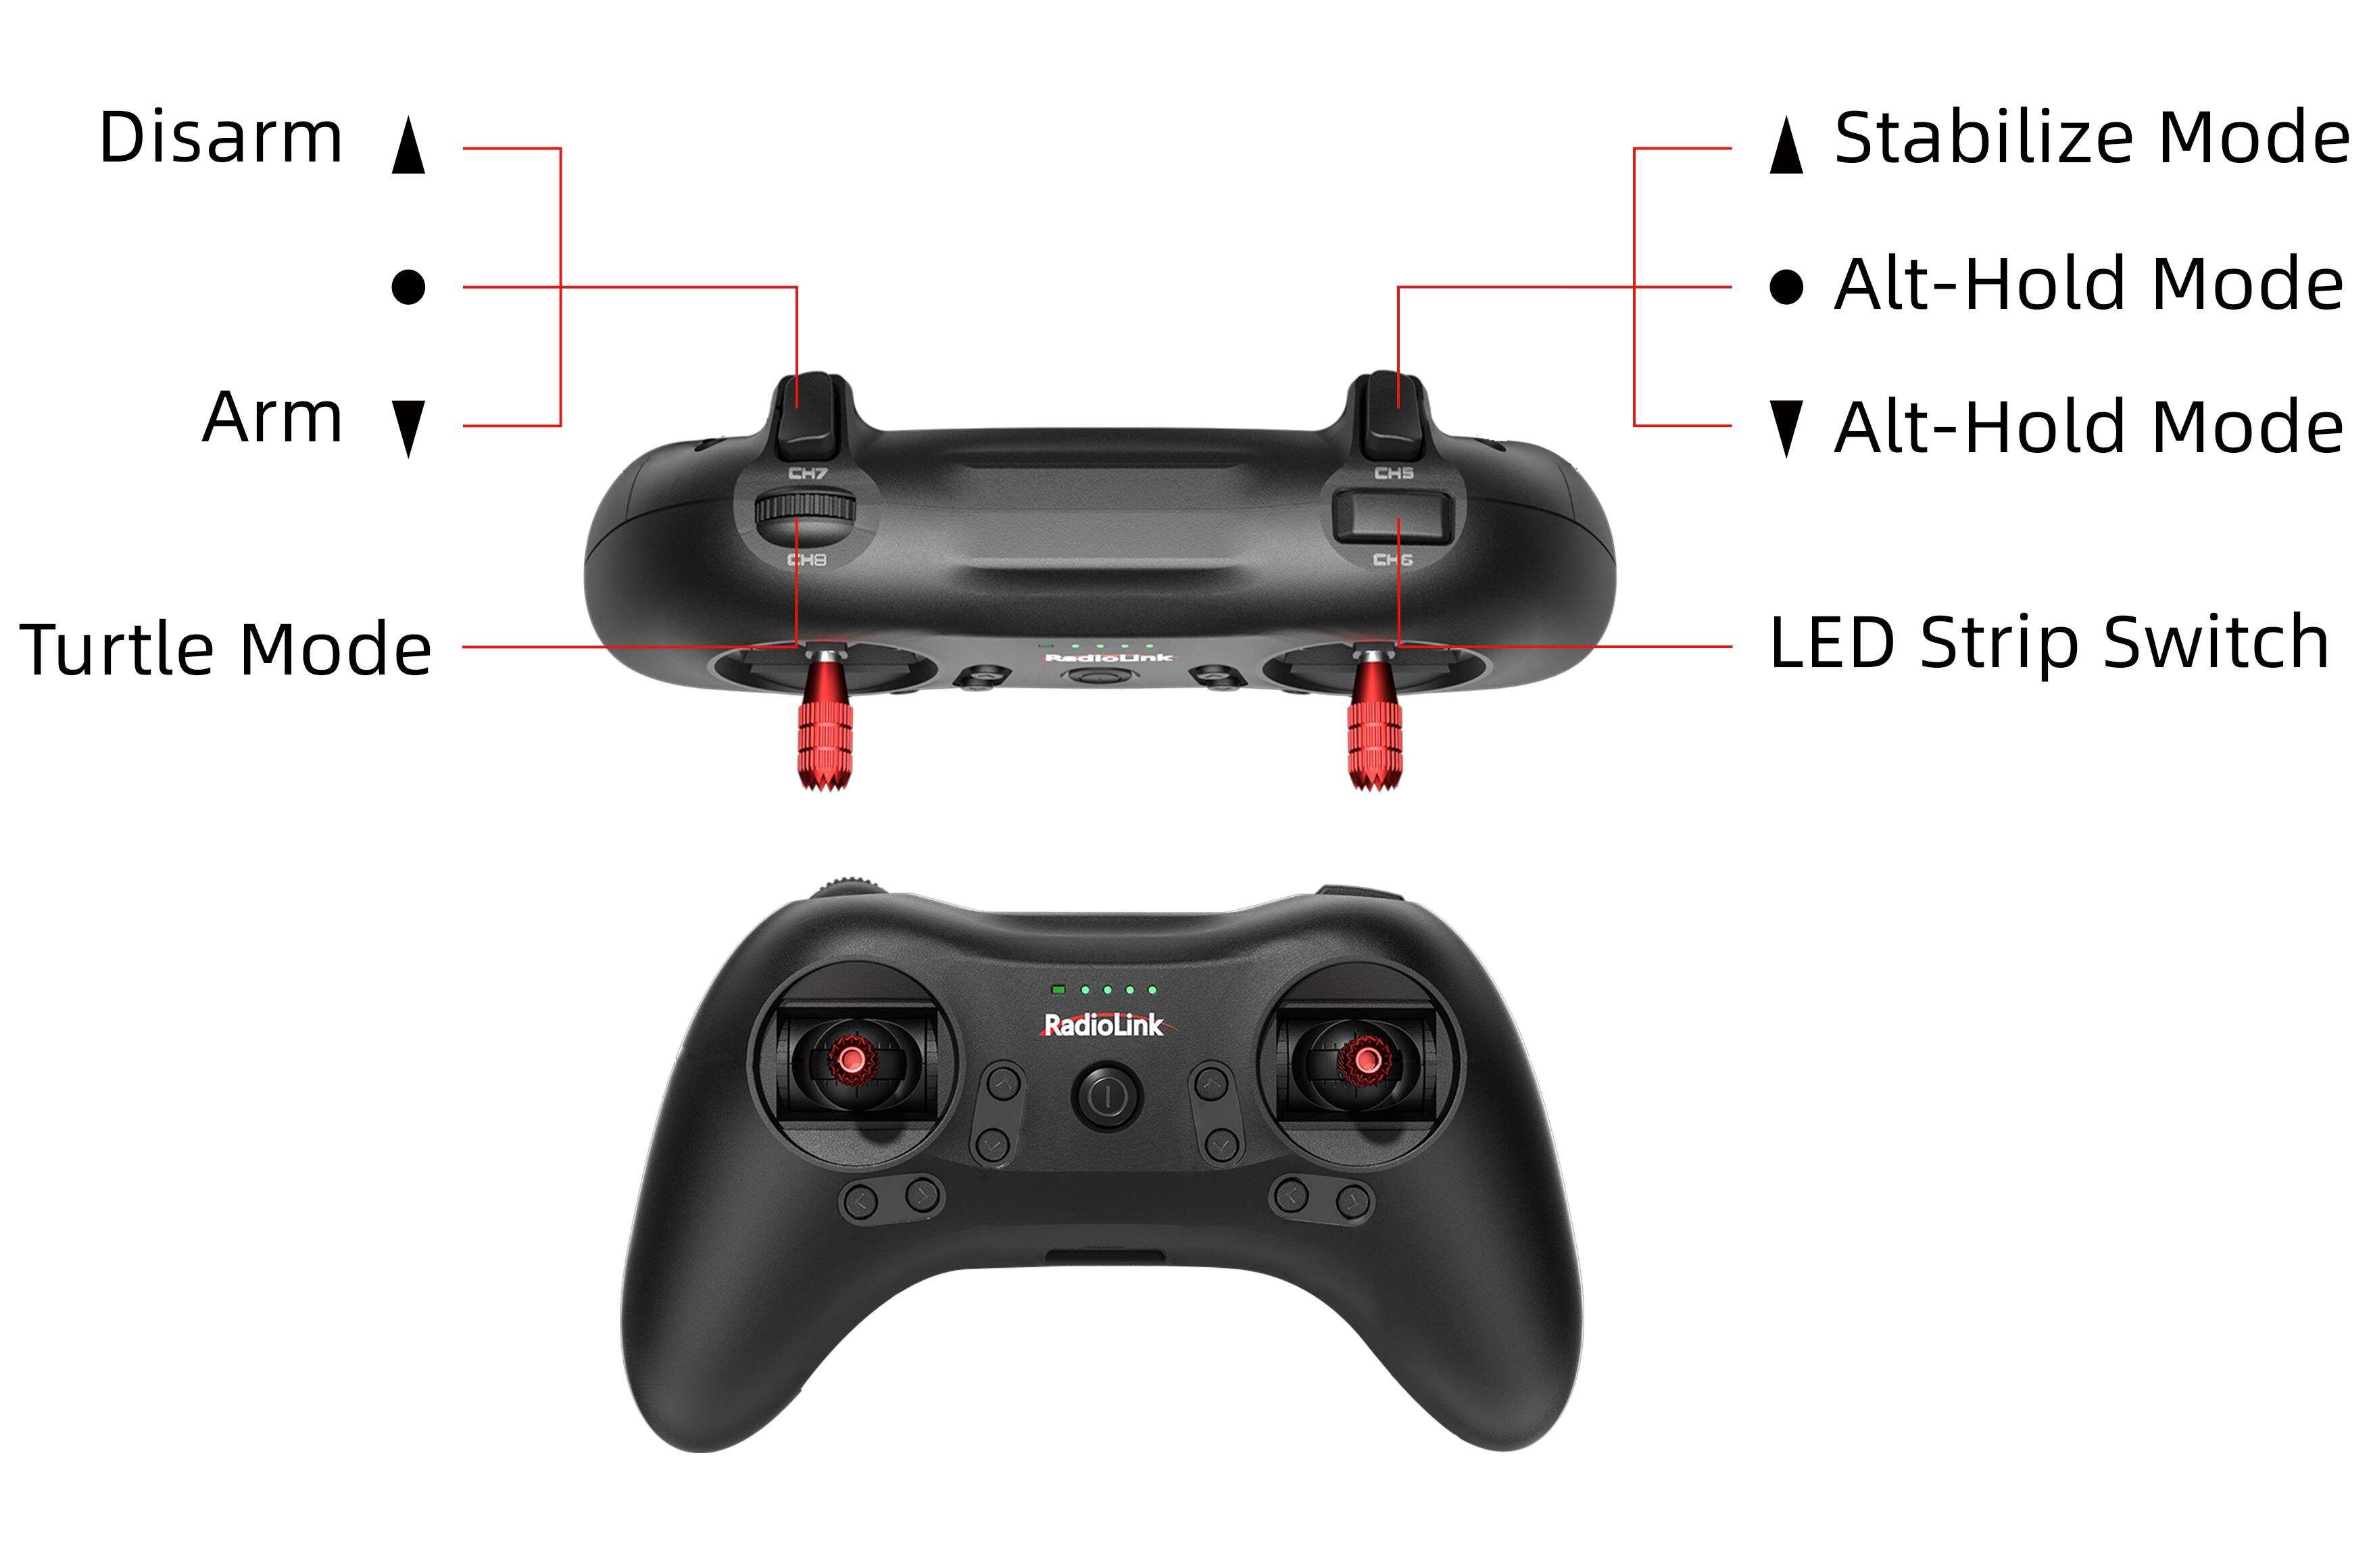
Transmitter Switch Introduction
LD-B20C comes with RadioLink T8S transmitter. Here is the introduction of the switches of T8S:
CH5: Push it up or keep it in the middle to select Alt-Hold mode. Push it down to select stabilize mode. Corresponding to CH5 of the flight controller.
CH6: LED strip switch. Corresponding to CH6 of the flight controller.
CH7: Push it up to arm the drone. Push it down to disarm the drone. NULL in the middle. Corresponding to CH7 of the flight controller.
CH8: Turn CH8 knob-switch fully clockwise to activate the turtle mode. Turn CH8 knob-switch fully counterclockwise to turn off the turtle mode. Corresponding to CH8 of the flight controller.
If LD-B20C comes with RadioLink T12D transmitter, here are the default settings of the switches of T12D:
SWC: Push it up to select stabilize mode. Push it down or keep it in the middle to select Alt-Hold mode. Corresponding to CH5 of the flight controller.
SWB: Push SWB to the lowest position, wait for one second, and then push it up to the highest position to switch the color of the LED strip. Corresponding to CH6 of the flight controller.
SWA: Push it up to disarm the drone. Push it down to arm the drone. NULL in the middle. Corresponding to CH7 of the flight controller.
SWD: Push it up to turn off turtle mode. Push it down to turn on turtle mode. Corresponding to CH8 of the flight controller.
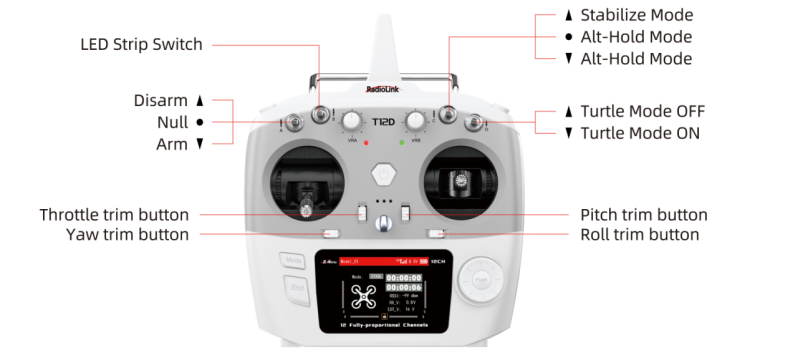
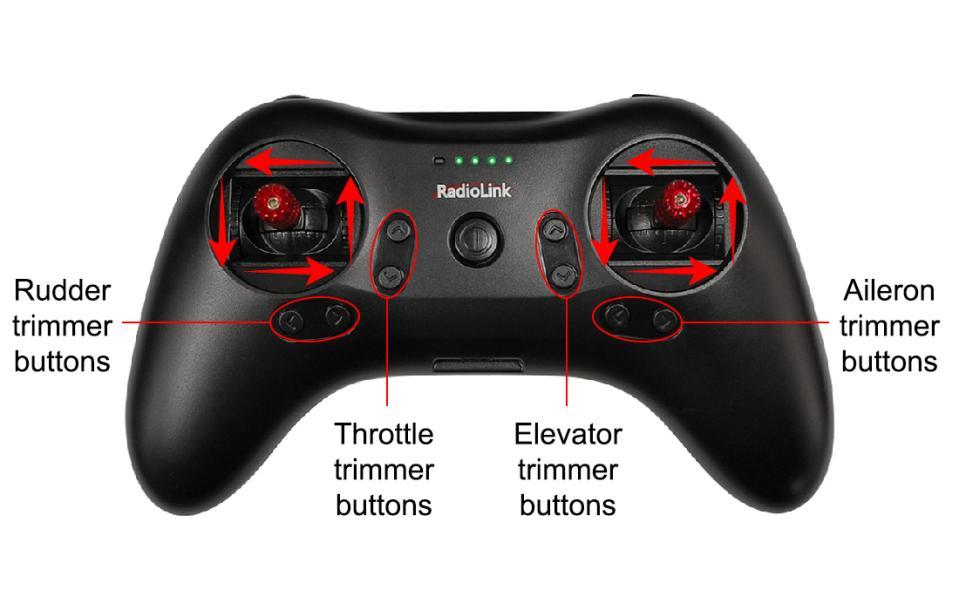
When the trim values on the screen of T12D are not 0, please adjust the trim values to 0 by using the four trim buttons (as shown above). For more details, please refer to the detailed manual of T12D: https://www.radiolink.com.cn/t12d_manual
Arm and Disarm LD-B20C
Arm LD-B20C
Power on LD-B20C with the 3S lipo battery that comes with it. After powering it up, place LD-B20C on the ground for self-checking. LD-B20C needs to remain stationary during the self-checking process. The motor will emit a piece of music during the self-checking. When you hear a short music, the self-checking is complete.
Make sure the throttle is at the lowest position. Push CH7 switch up to arm the drone, and the propellers start to rotate at idle speed indicates arm successful. For security reasons, LD-B20C will be disarmed automatically if there is not any operation of the throttle for 10 seconds. Please arm LD-B20C again when the flight is ready.
Note: The throttle stick must be in the lowest position when arming.

LD-B20C propellers start to rotate at idle speed indicates arm successful
Disarm LD-B20C
When the flight is finished,push CH7 switch down to disarm LD-B20C. The propellers stop rotating indicates disarm successful.
Note: During the flight, the motors/propellers will stop immediately if CH7 switch is pushed down. Please pay attention to avoid hitting people and damaging valuables.
LD-B20C propellers stop rotating indicates disarm successful
Three Working Modes
Alt-Hold Mode
After arming LD-B20C, push throttle lightly to start the motor. If the throttle is pushed above the midpoint, the drone will climb steadily upwards. If it is pushed below the midpoint, it will descend. To take off from the ground, push the throttle stick above the midpoint. When the drone climbs or descends to a suitable height, push the throttle stick to the midpoint, and the drone will maintain its current altitude.
Stabilize Mode
The basic operation such as Rise/Descend/Forward/Backward/left/right of Stabilize mode is the same as Alt-Hold mode. In Stabilize mode, the throttle corresponds to the drone power. The more the throttle stick is pushed up, the greater the climbing power. The flight control no longer assists in altitude setting. If you want the drone to maintain the same altitude, the pilot needs to practice for a period of time to achieve it through flight operations.
Turtle Mode
When the drone is hit or flips over at any angle due to operation error, you can enable the turtle mode to rotate one side of the motor to flip the fuselage back to normal.
Put throttle to the lowest position. Then turn CH8 knob-switch fully clockwise to activate the turtle mode. After turtle mode is turned on, push up the throttle stick a little bit. Move the roll or pitch stick to flip the drone. After the drone flips back to the level, put down the throttle stick to the lowest position. Turn CH8 knob-switch fully counterclockwise to turn off the turtle mode. Then arm LD-B20C and take off.
Note: When turning on/off the turtle mode, the throttle stick must be at the lowest point. Otherwise you cannot turn on/off the turtle mode.
LED Strip Switch
LD-B20C has a tail LED strip, which allows you to switch the light color when the drone is disarmed. Here are the using methods of the LED strip switch:
Color Switch | Press and hold the CH6 button on T8S for 1 second to switch the 7 colors of the LED strip, including red, green, blue, yellow, purple, cyan, white and flashing seven-color lights. | If the LED light cannot be switched after pressing and holding the CH6 button for 1 second, you need to switch the port for the LED strip. Press and hold the CH6 button on T8S for 5 seconds and release. Then you can press and hold the CH6 button for 1 second to switch the LED light. |
LED Light ON/OFF | When the LED lights are off, press and hold the CH6 button for 1 second to turn on the lights. | |
Port Switch | Press and hold the CH6 button for 5 seconds to switch the port of the LED strip. The flight controller of the drone comes with 2 ports for the LED strip, which supports at most two LED strips. The LED strip is connected to LED strip port 1 by default. |
Low Battery Alarm
LD-B20CRTF version comes with a RadioLink R16SM receiver. R16SM supports model battery telemetry function. During the flight, the battery voltage of the drone can be viewed on the Parameter Adjustment APP of T8Stransmitter. The alarm voltage for the power battery is 11.1V for T8S by default. When the battery voltage is lower than 11.1V, T8S will make “DDD” sounds as a unit to warn. Please land the drone in time to replace the battery. If you continue to fly, the drone will automatically land when the voltage reaches 9.9V. During the landing process, the yaw, pitch and roll can be controlled, and it can also be disarmed directly. After landing, please disconnect the power and replace the battery in time to avoid over-discharge of the battery.
Note: You want to modify the alarm voltage on the Parameter Adjustment APP of T8S. For more details, please refer to the detailed manual of T8S: https://www.radiolink.com.cn/t8s_manual
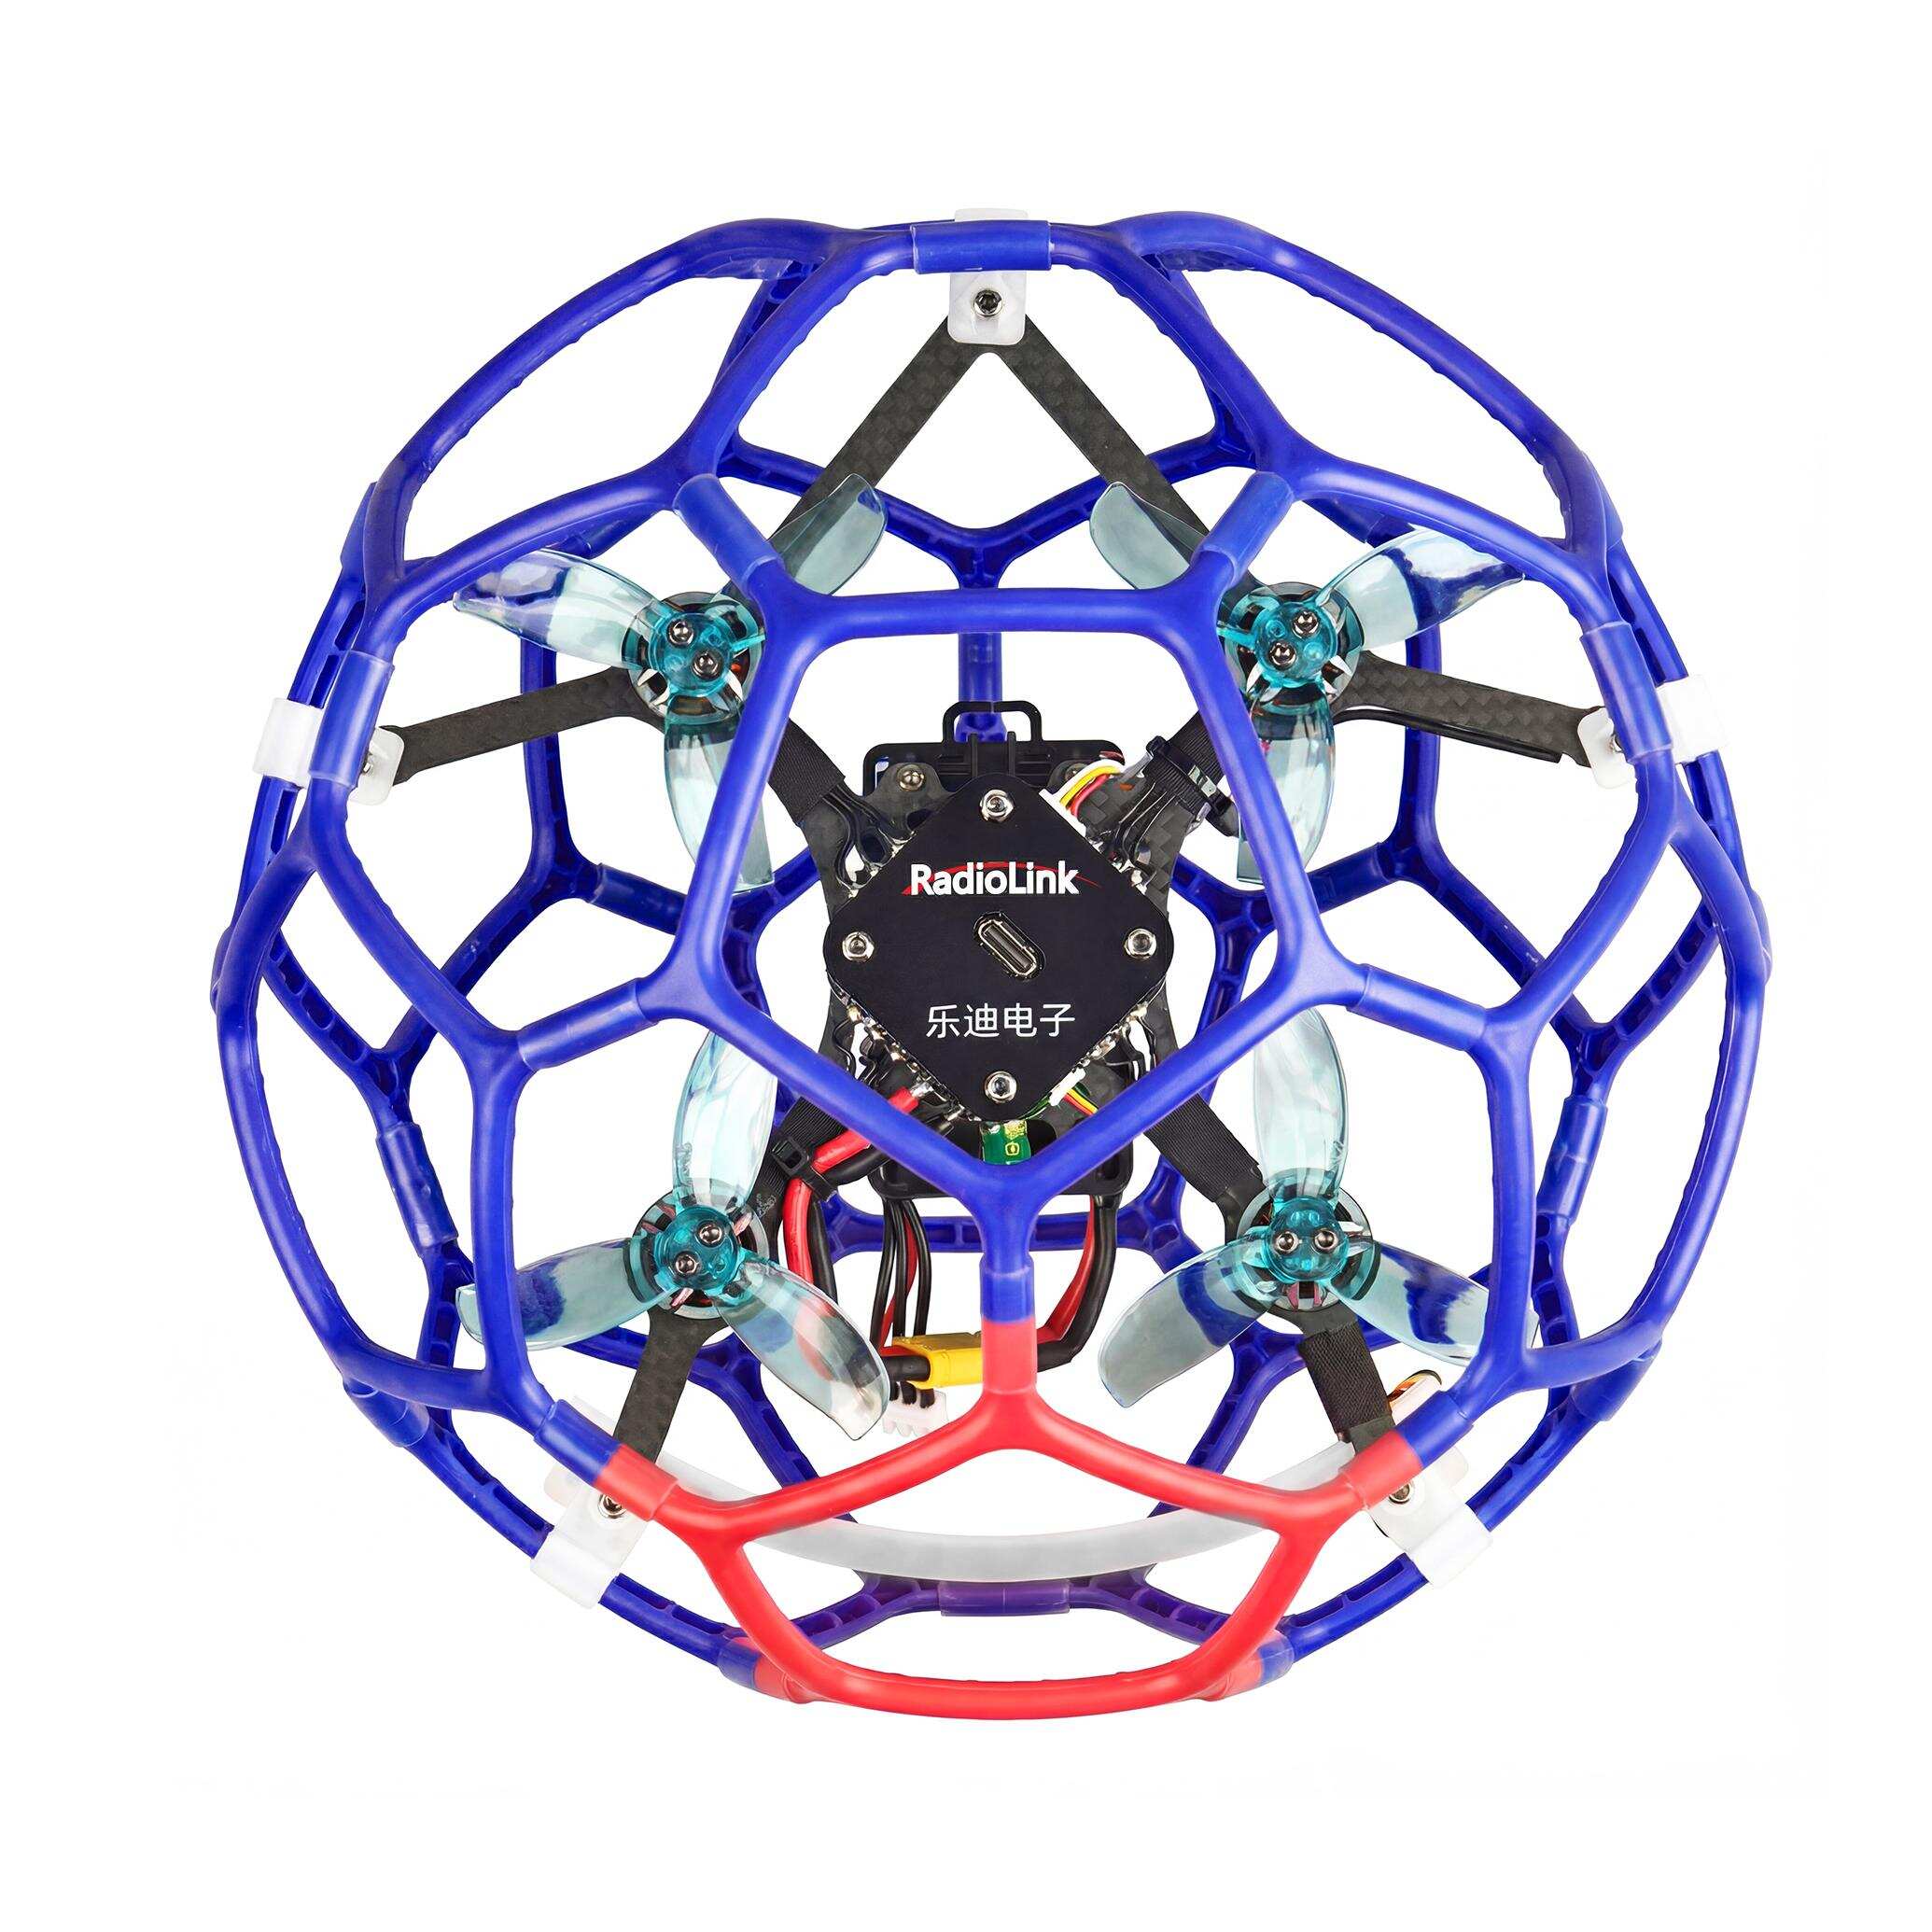
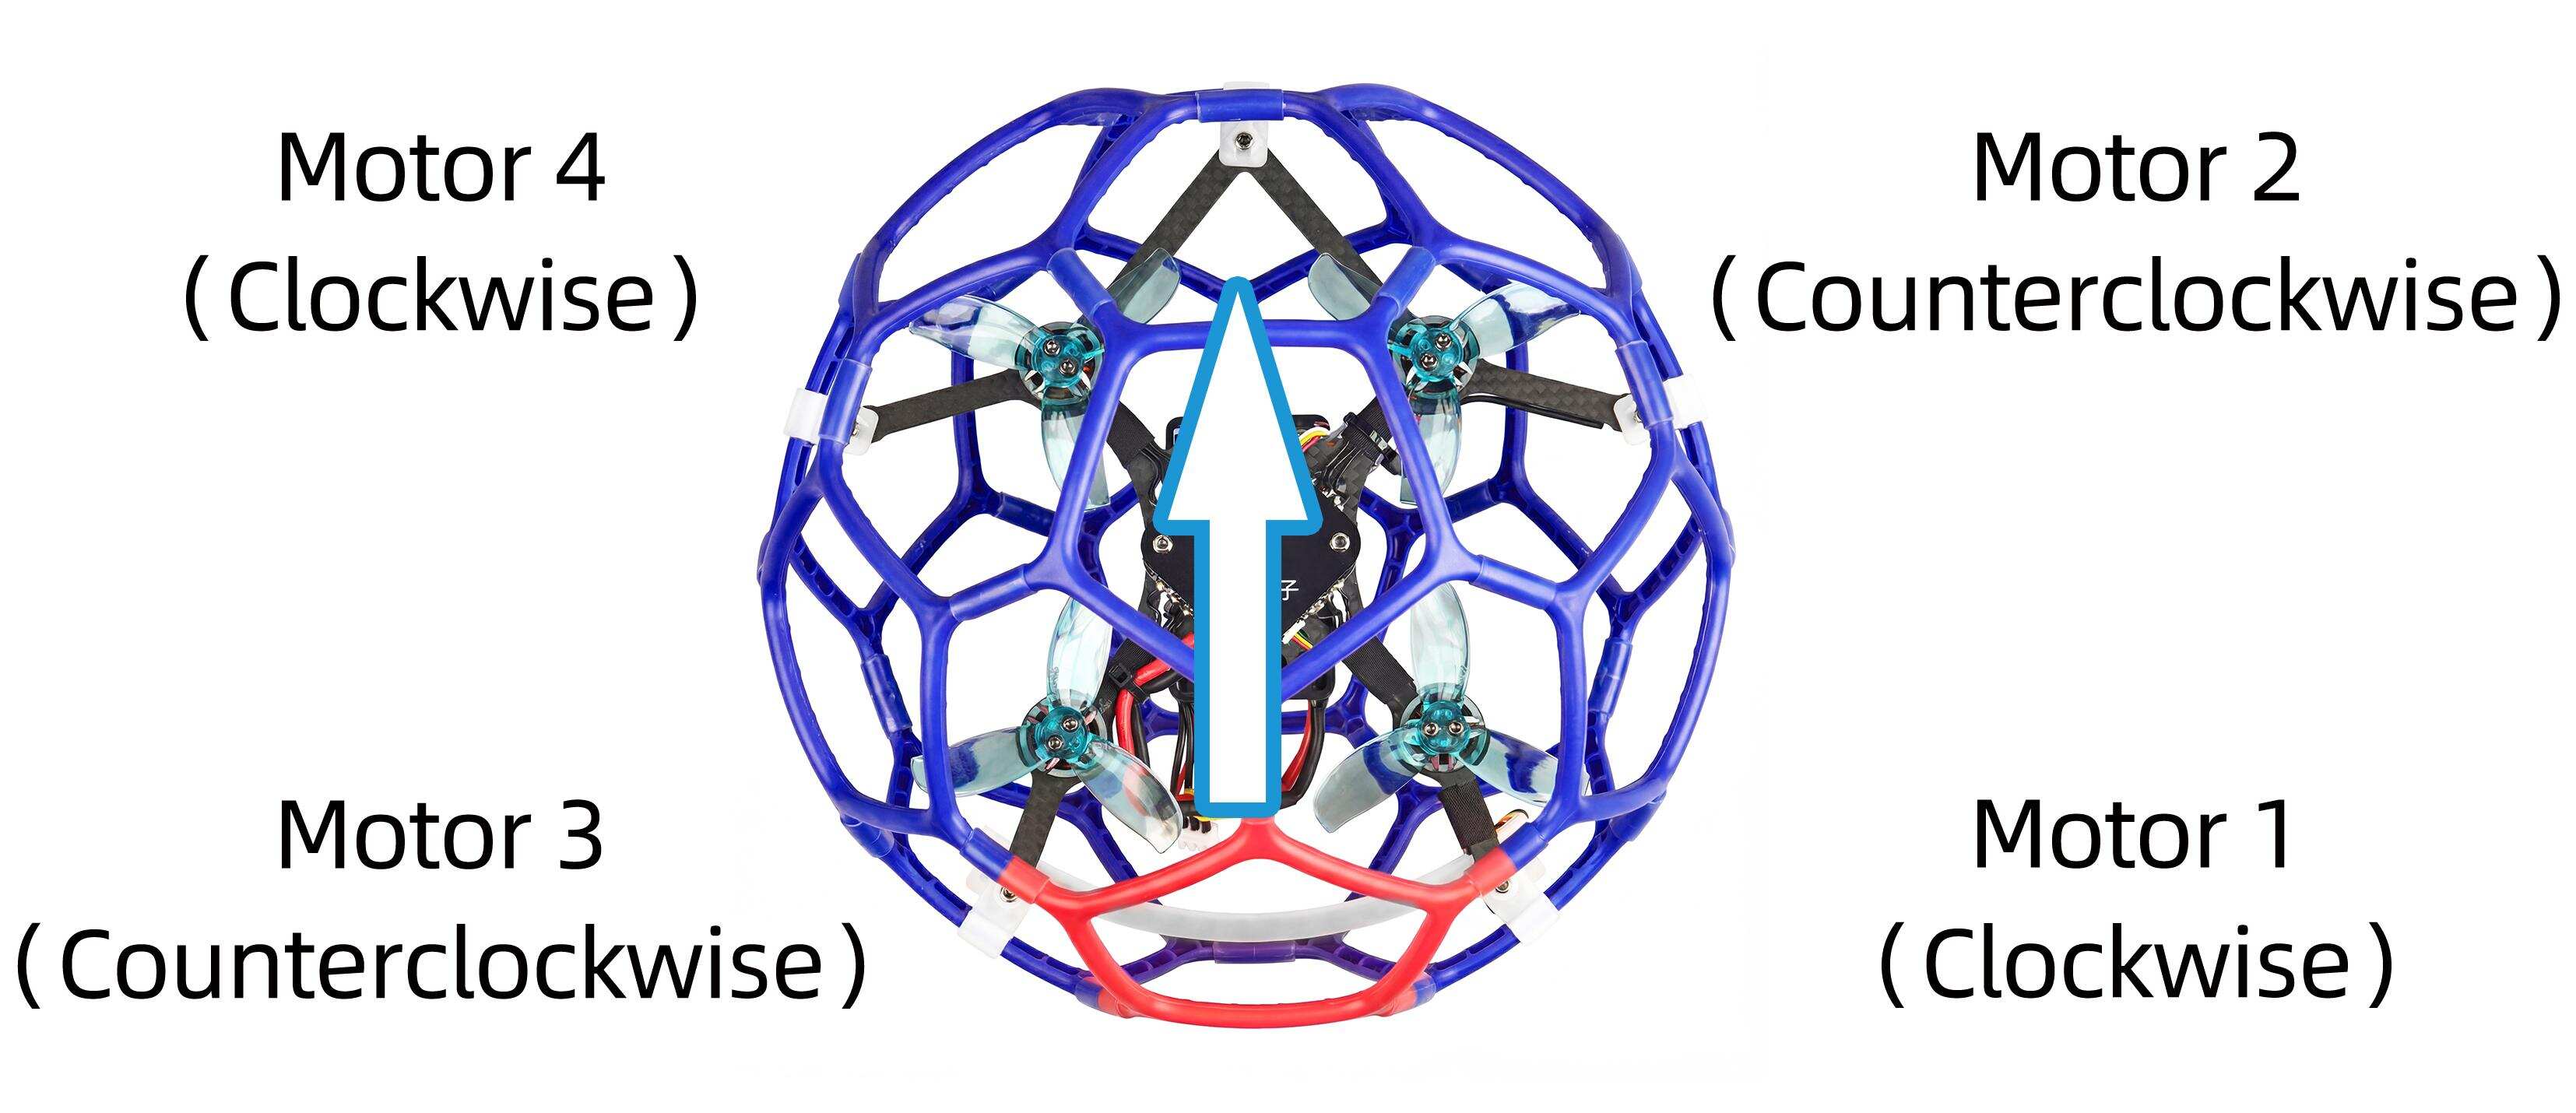
Motor and Propeller Installation
To make the drone fly, motors usually rotate clockwise (CW)/counterclockwise (CCW) with the propellers.It is very important to make sure about the rotation direction as below when installing motors. Otherwise, the drone would fail to take off.
Motor and propeller installation can be skipped as LD-B20C is already assembled by factory default. If any of the motors is worn out and needs to be replaced, it is essential to identify the correct motor/propeller rotation. Please follow the below picture to install the motor and propeller.
Binding (R16SM)
LD-B20CRTF version comes with T8S transmitter and R16SM receiver (as shown below).

If it is the RTF version purchased, there is no need to bind because the binding between the transmitter and R16SM receiver is complete by factory default. In addition to T8S, R16SM is also compatible with T16D/T12D/T8FB. If you want to change the transmitter, binding between the transmitter and receiver needs to done first.
Here are the binding steps for RadioLink transmitter and receiver:
① Place the transmitter and receiver(installed on LD-B20C) close to each other within 50 centimeters.
② Power on the transmitter and the receiver.
③ There is a black binding button on the side of the receiver. Press it for more than 1 second. When the LED starts flashing, meaning binding process has started. Note: If there are multiple devices of the same model in the same location, it is recommended to turn off the other devices first, and then binding them.
④ The binding is complete when the LED is always on means the binding is complete.
Note: Please always make sure the LED of R16SM is blue, meaning CRSFprotocol. If the LED is red (SBUS working mode), please press the binding button once to change it to blue.
For transmitter and receiver from other brands, please refer to its detailed manual for binding steps.
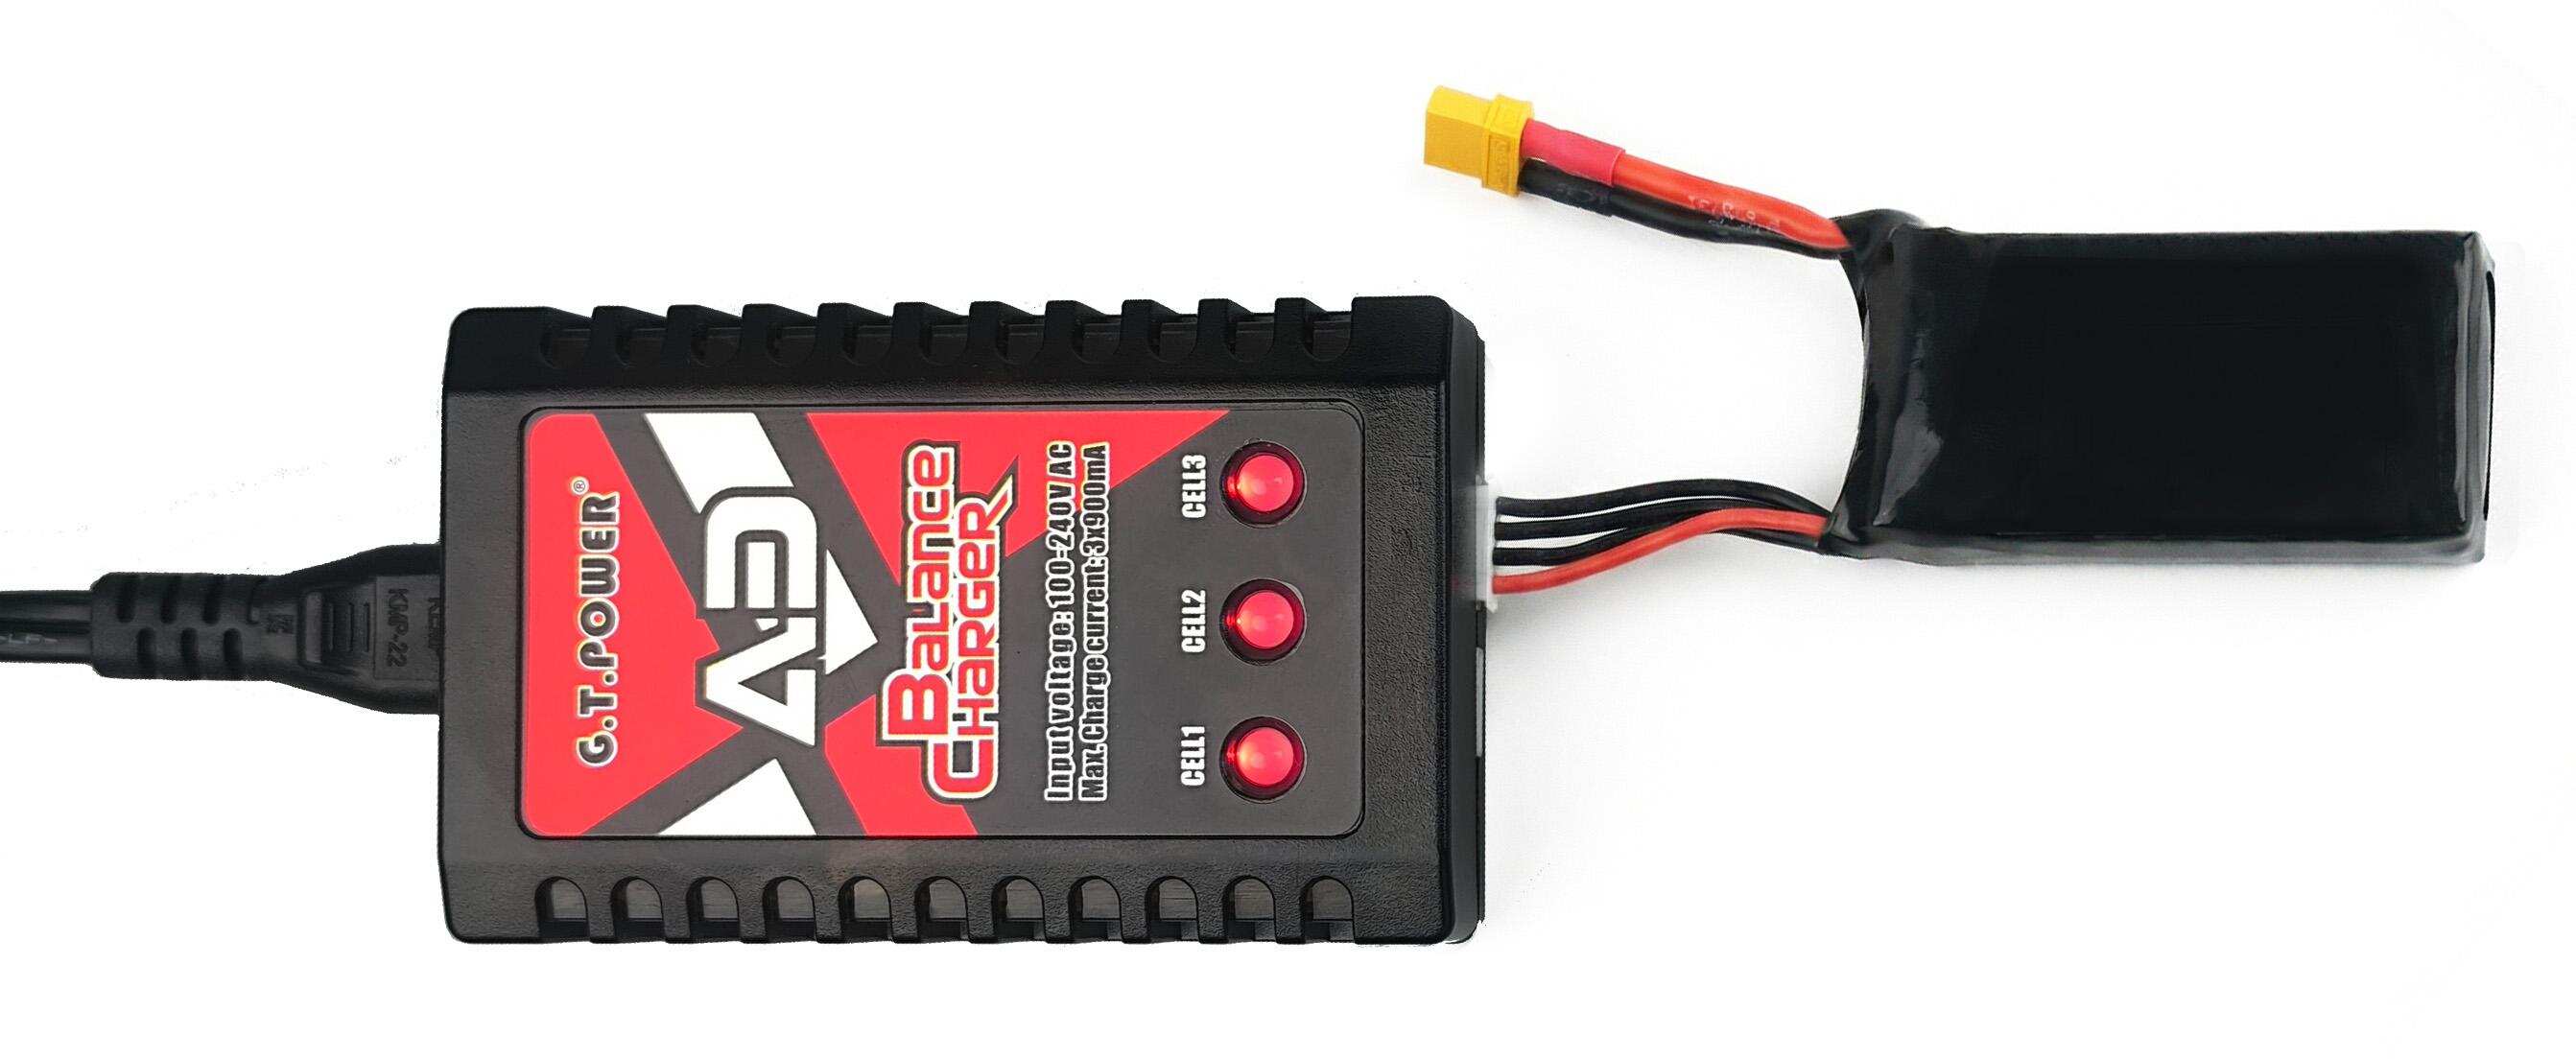
Charger
LD-B20Cis packed with G.T. POWER A3 charger to charge the battery.
Parameters:
Input voltage: 100-240V AC Max. Charge current: 900mA*3
Battery supported: 2S-3S lipo battery
Using methods:
Connect the balance head of the battery to the charger, and then connect the charger to a power source to start charging. Red lights on the charger indicates charging is in progress, and greens light indicates charging is complete. Here is the connection for the charger and battery:
T8S Joystick Calibration
If LD-B20Cveers in one direction after takeoff without operating the joystick, please try calibrating the joystick of the transmitter. Here are the joystick calibration methods for T8S transmitter:
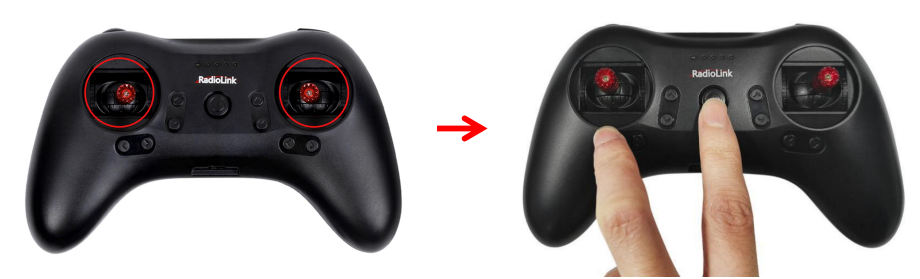
When the transmitter is power-off,toggle both sticks at the central point. Press rudder trimmer button (The first button on the left) and turn on transmitter at the same time. Four green LED indicators will start flashing and T8S is ready to be calibrated.
Range Calibration: Move the left and right joysticks to the top left, bottom left, bottom right, and top right corners. Then put the two joysticks back to the central point.
Central Point Calibration: When the joysticks are placed in the central point, press rudder trimmer button (The second button on the left), there will be DD sound. Fourflashing LED indicators turn solid green means stick calibration is complete.

Level Calibration
Level calibration has been doneby factory default. You can flyit directly without calibration. If you have dismantled the frame or the flight controller, you need to calibrate level. The installation direction of the flight controller must be the same as the factory installation direction, otherwise it will be out of control after arming. The drone must be powered off during level calibration. Here are the steps of level calibration:
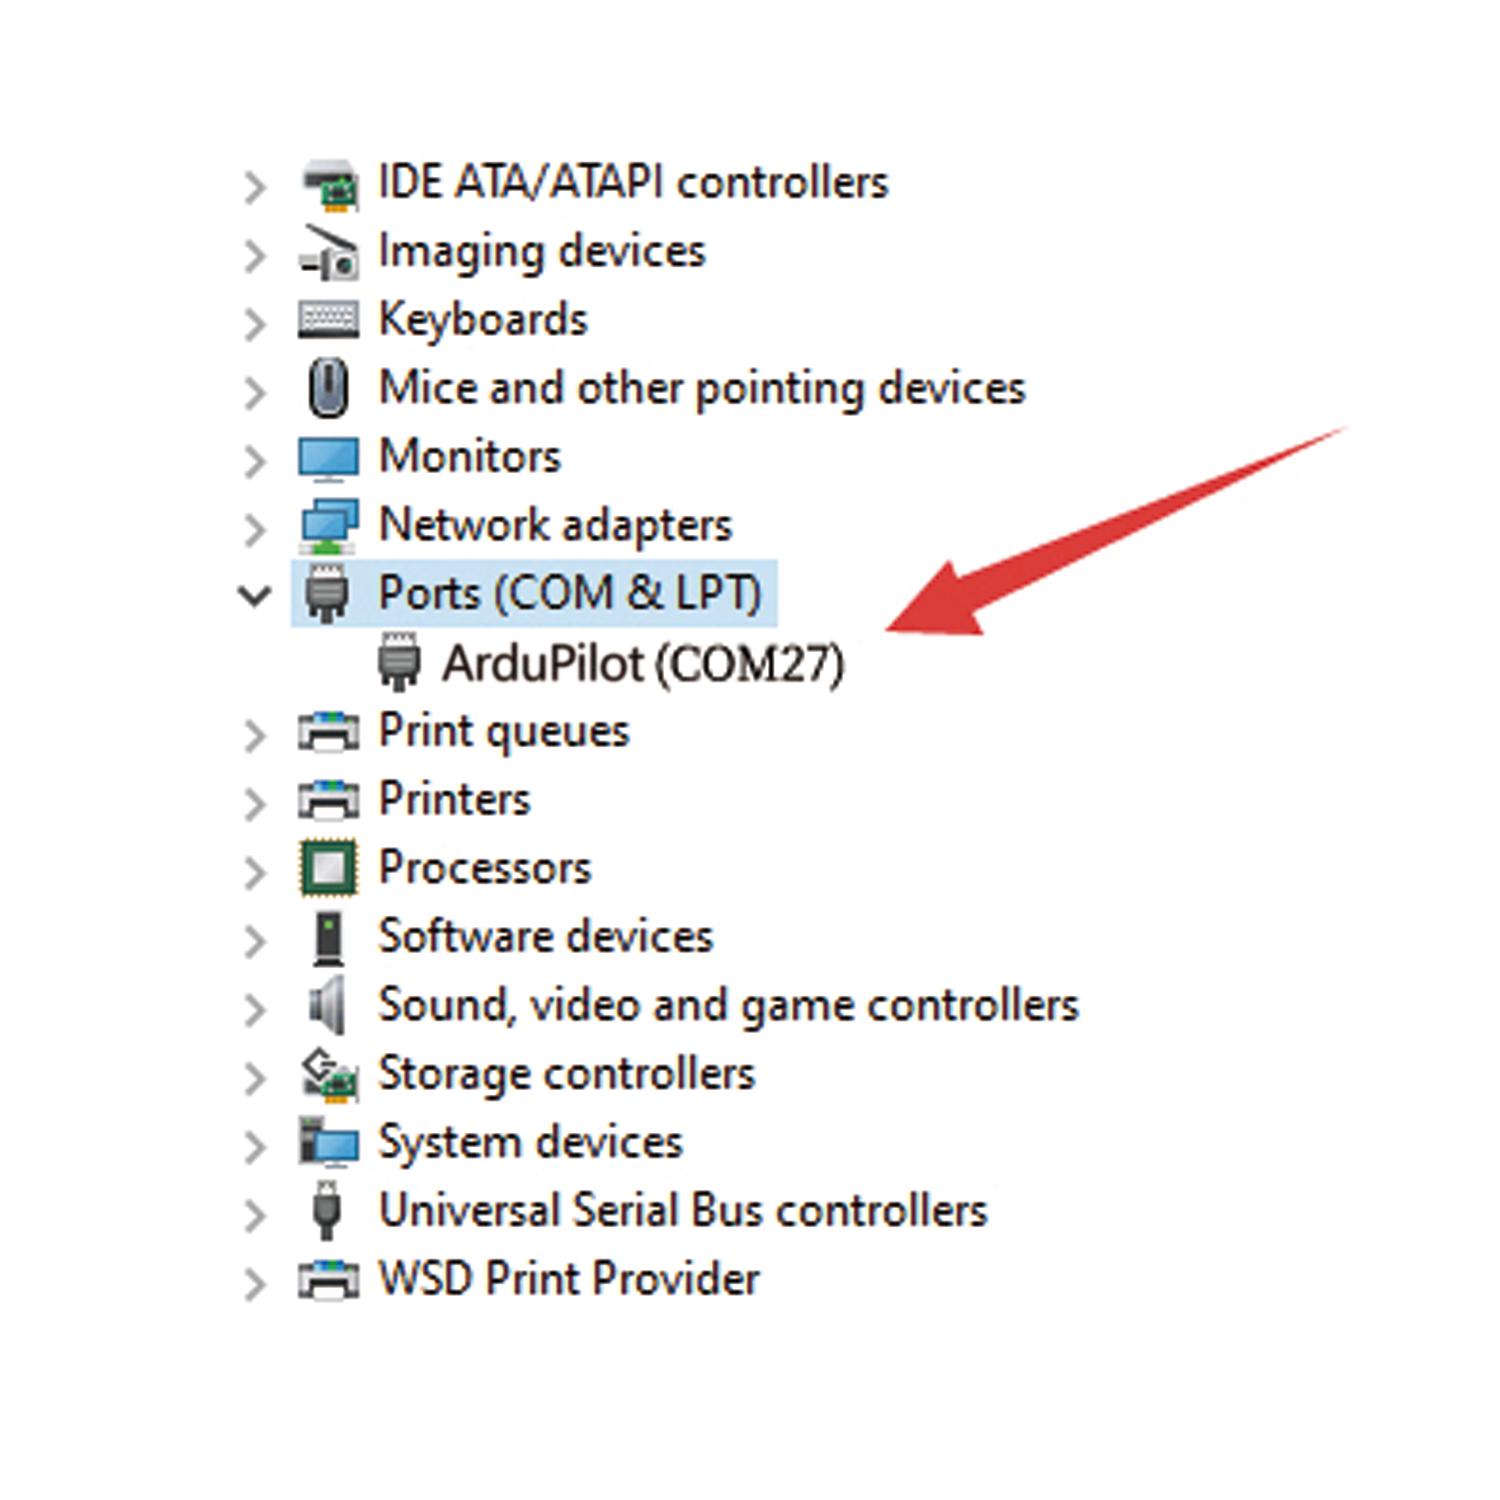
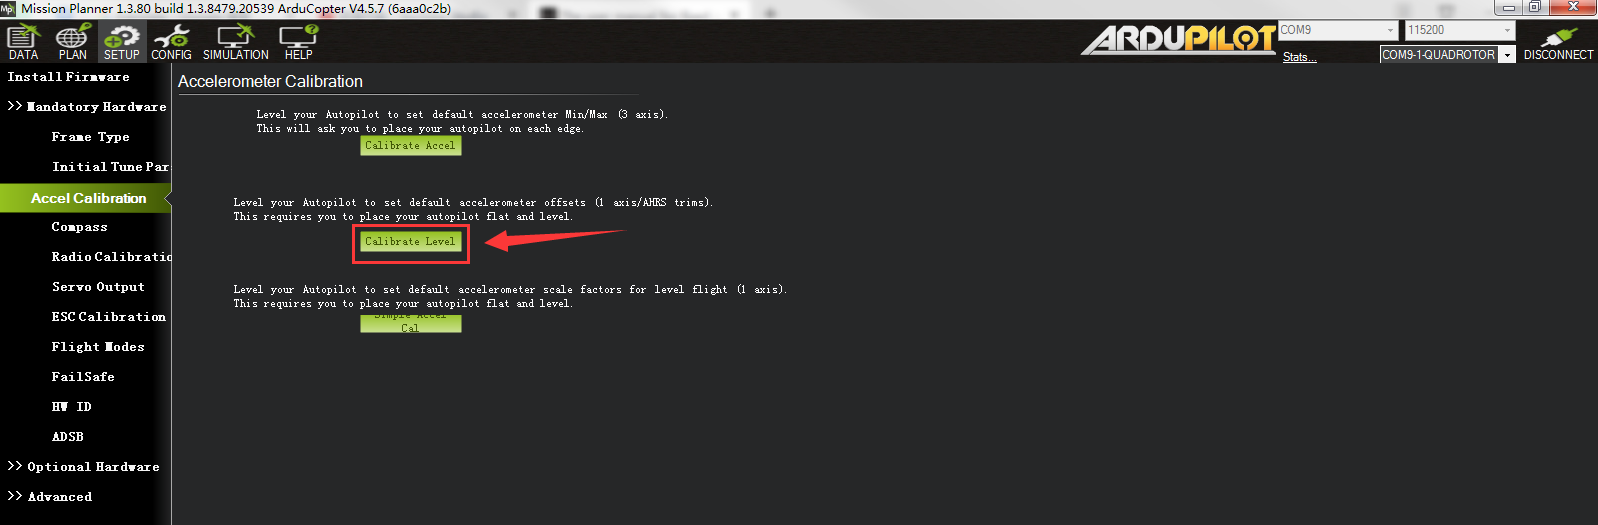
Connects the flight controller to the computer via a Type_C cable. Open Mission Planner (The flight controller supports RadioLink Mission Planner, ArduPilot Mission Planner and QGroundControl. RadioLink Mission Planner is used as an example.) Select the COM port of the flight controller. The baud rate is 115200.And click "Connect" to connect the flight controller to Mission Planner.
Note: Ports varies from different computers. Please select the correct port to connect. Connection may fail with several ports in use. Please remove the other connections, or enter Device Manager to view the port of the flight controller of LD-B20C, just as below:
After they are connected, click Setup-- Mandatory Hardware-- Accel Calibration. Put LD-B20C on a level surface. Then click Calibrate Level to start the calibration, and wait for about two seconds until the word "Complete" appears, indicating that the level calibration is complete.
The Receiver Connection for LD-B20C PNP
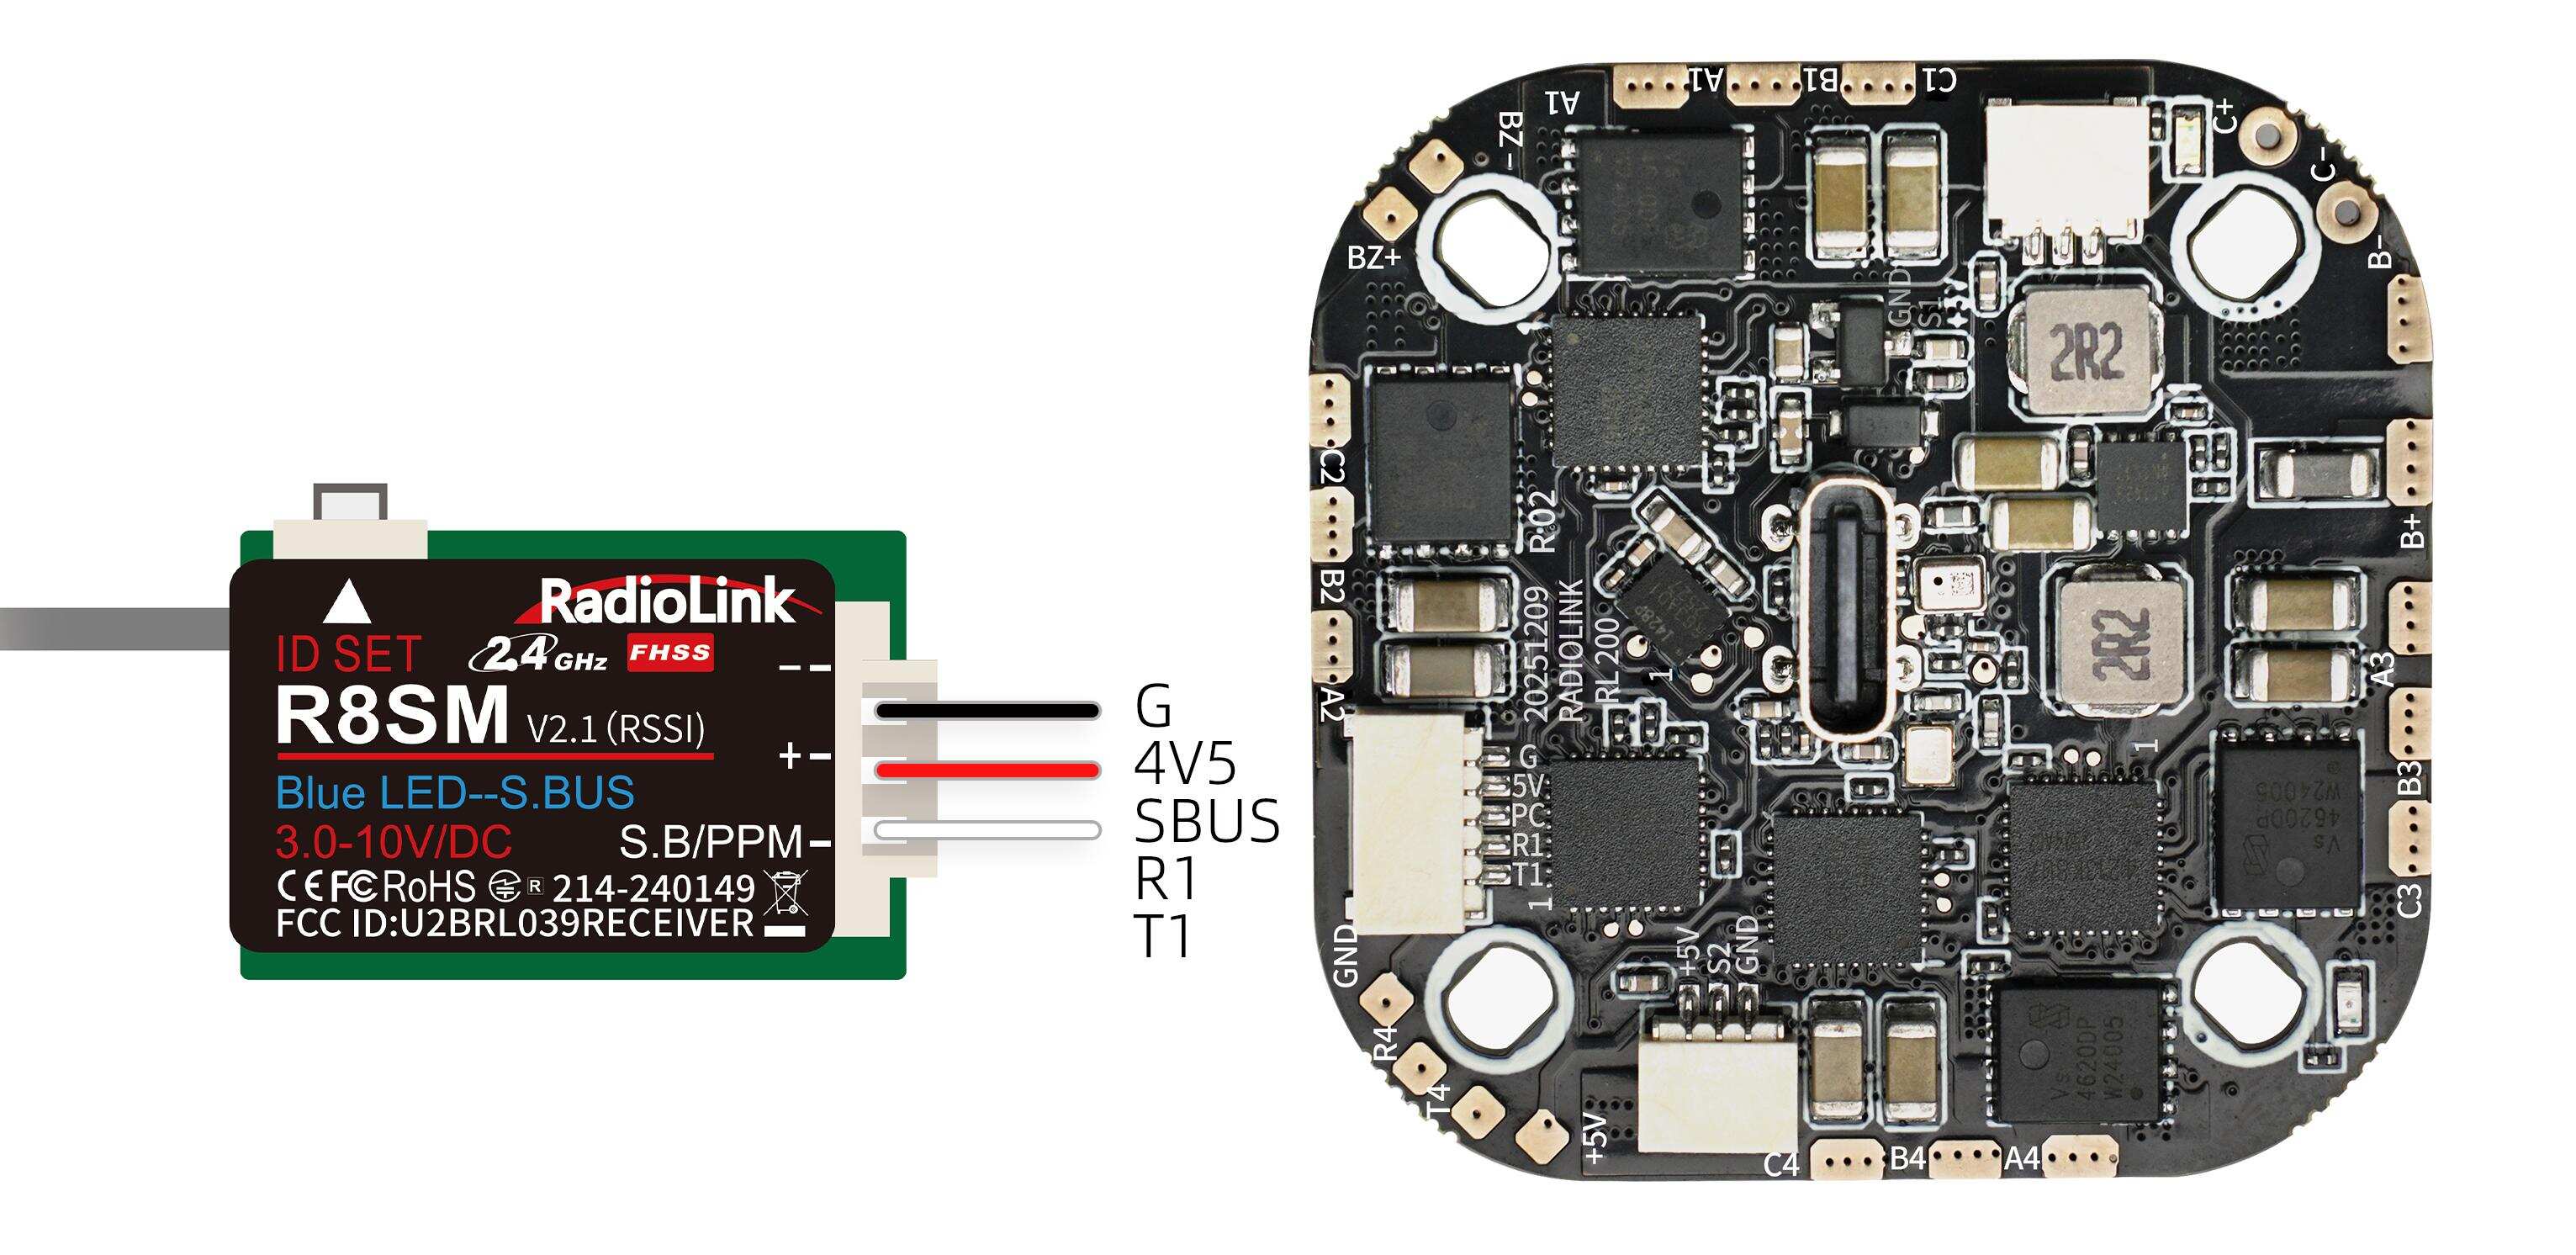
For LD-B20C PNP version, uses need to prepare the transmitter and receiver. The receiver needs to connect to the flight controller. Here is the socket introduction of the flight controller of LD-B20C:

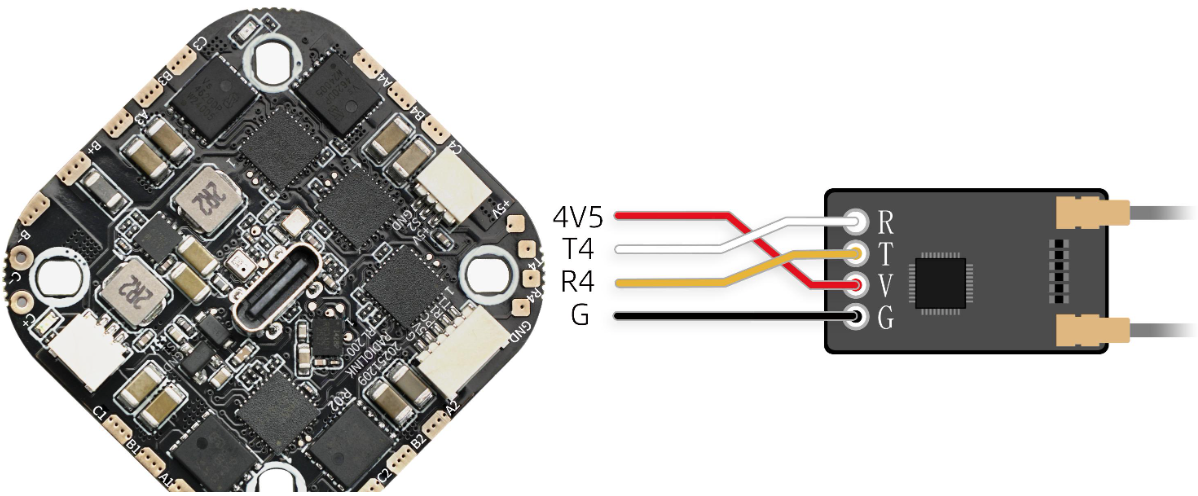
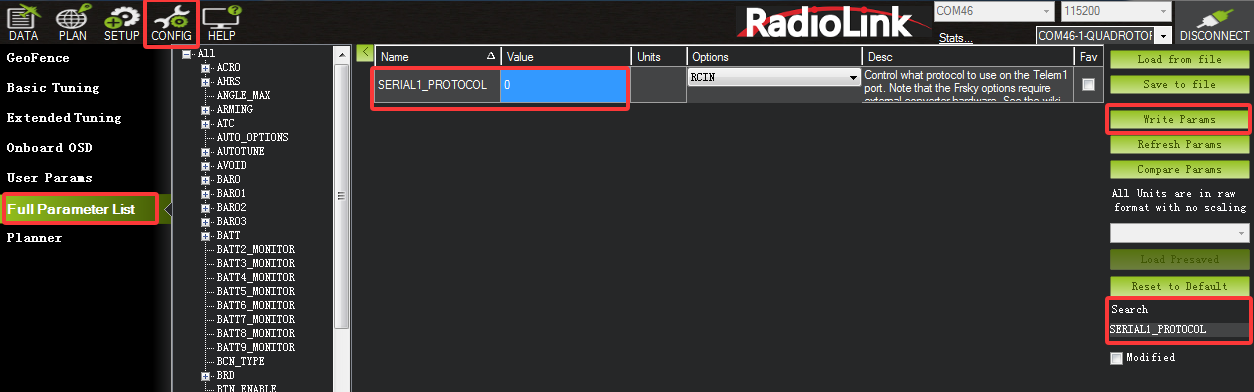
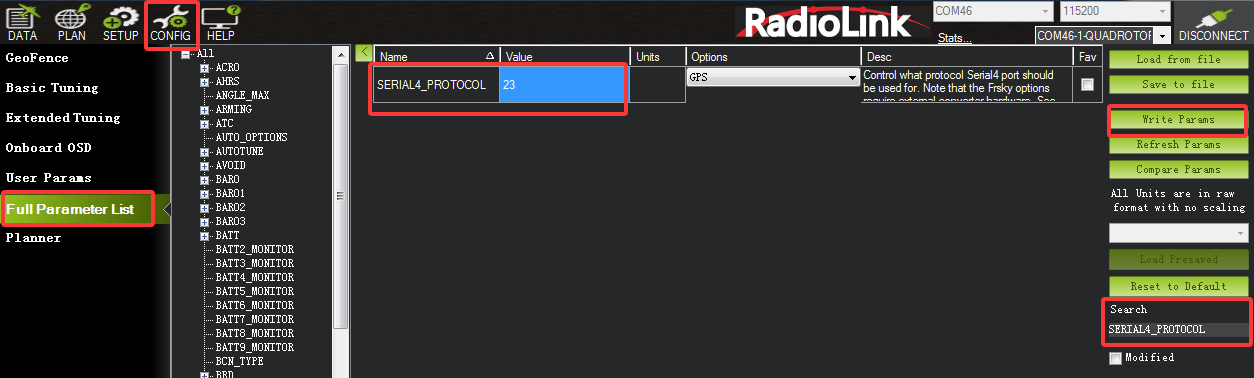
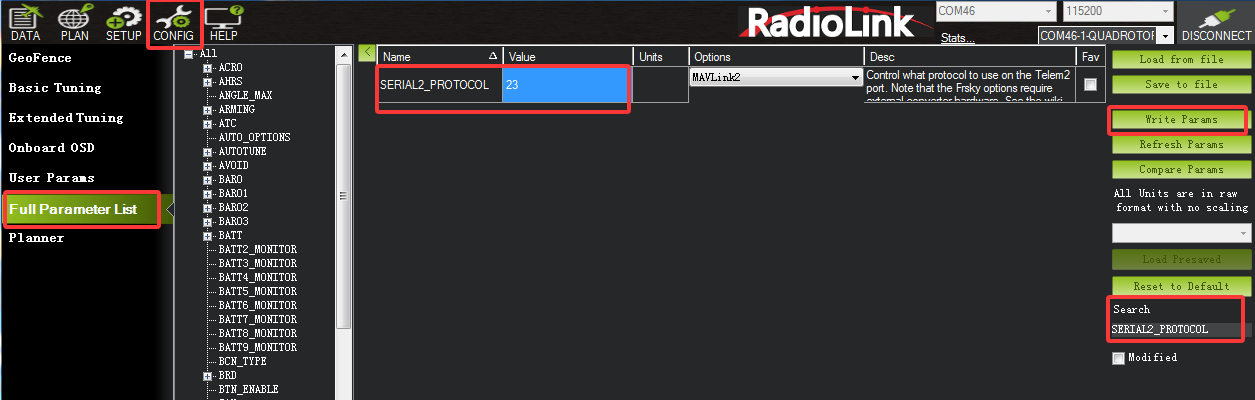
If ELRS receiver is used with LD-B20C, you can solder ELRS receiver to the serial 4 pad on the flight controller (as shown below). Please connect the flight controller to Mission Planner. Click CONFIG--Full Parameter List. Search for SERIAL1_PROTOCOL. Change the value of SERIAL1_PROTOCOL from 23 to 0, and then set the value of SERIAL4_PROTOCOL to 23. Then click Write Params. The steps are shown below:
If SBUS receiver is used with LD-B20C, please connect SBUS receiver to the SBUS signal port of the flight controller (as shown below. RadioLink R8SM receiver is used as an example).
Please connect the flight controller to Mission Planner. Click CONFIG--Full Parameter List. Search for SERIAL1_PROTOCOL. Change the value of SERIAL1_PROTOCOL from 23 to 0. Then search for SERIAL2_PROTOCOL. Change the value of SERIAL2_PROTOCOL to 23. Then click Write Params. The steps are shown below:
Radio Calibration
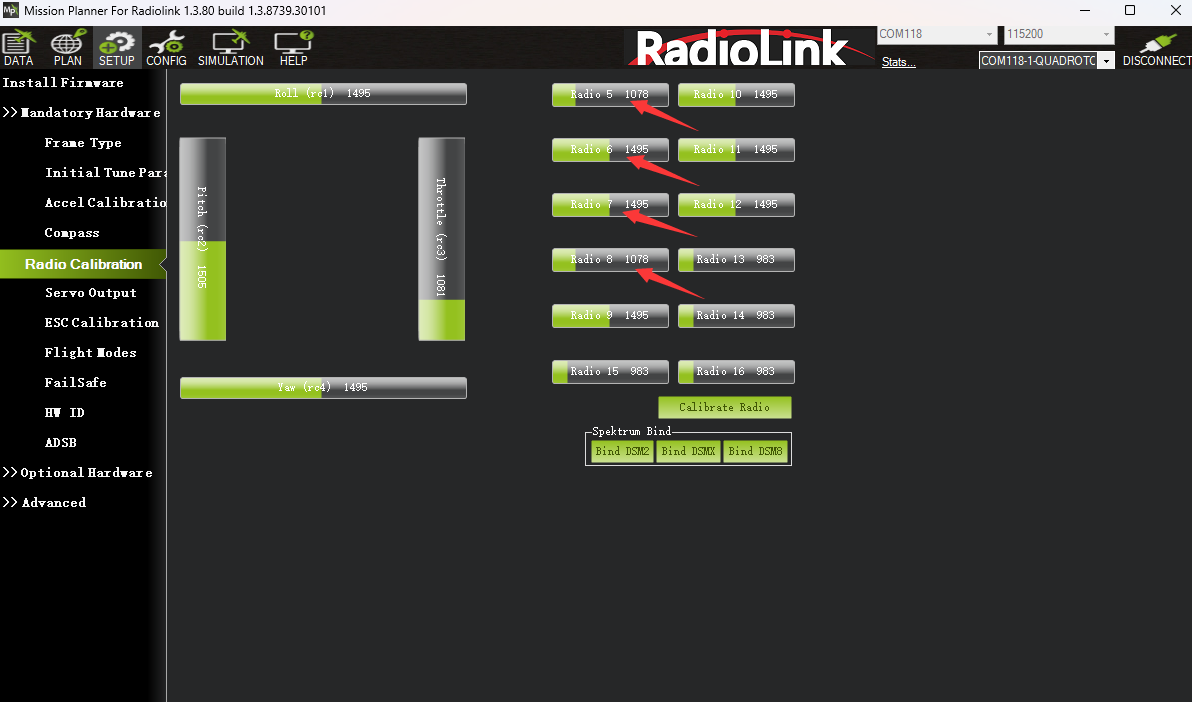
For LD-B20C PNP version, uses need to calibrate the radio in Mission Planner. Connect the receiver to the flight controller, and connect the flight controller to Mission Planner. Click SETUP—Mandatory Hardware—Radio Calibration—Calibrate Radio. Move all RC sticks and switches to their extreme positions so the red bars hit the maximum and minimum limits. Then save the radio calibration data.
Note:
(1) Do not power on the drone with batteries when calibrating the radio in Mission Planner to avoid the motors spinning rapidly when the arming switch is toggled.
When the flight controller is powered on with a Type-C cable, it is normal that the motors will spin slowly when the arming switch is toggled.

Note: LD-B20C PNP version does not come with transmitter or transmitter. Users need to set the transmitter switch of channel 5 to channel 8 according to the below channel values and servo output of the transmitter:
Introduction | Channel | Channel Values/Servo Output |
Flight mode | CH5 | Stabilize mode: Channel value <1362us (servo output -100%) |
LED strip switch | CH6 | Press and hold the CH6 button for 1 second to switch the color or turn on/off the light. Press and hold the CH6 button for 5 seconds to switch the port of the LED strip. (A rebound switch is suggested for CH6) |
Disarm/Arm | CH7 | Disarm: Channel value <1750us (servo output -100%) |
Turtle mode | CH8 | Turtle mode: Channel value >1750us (servo output +100% or 100%) |
Users can view the channel value in Mission Planner-- Radio Calibration interface (as shown above). Toggle the corresponding transmitter switch. If the corresponding channel value is within the range in the table above, you can switch to the corresponding mode or arm the drone.
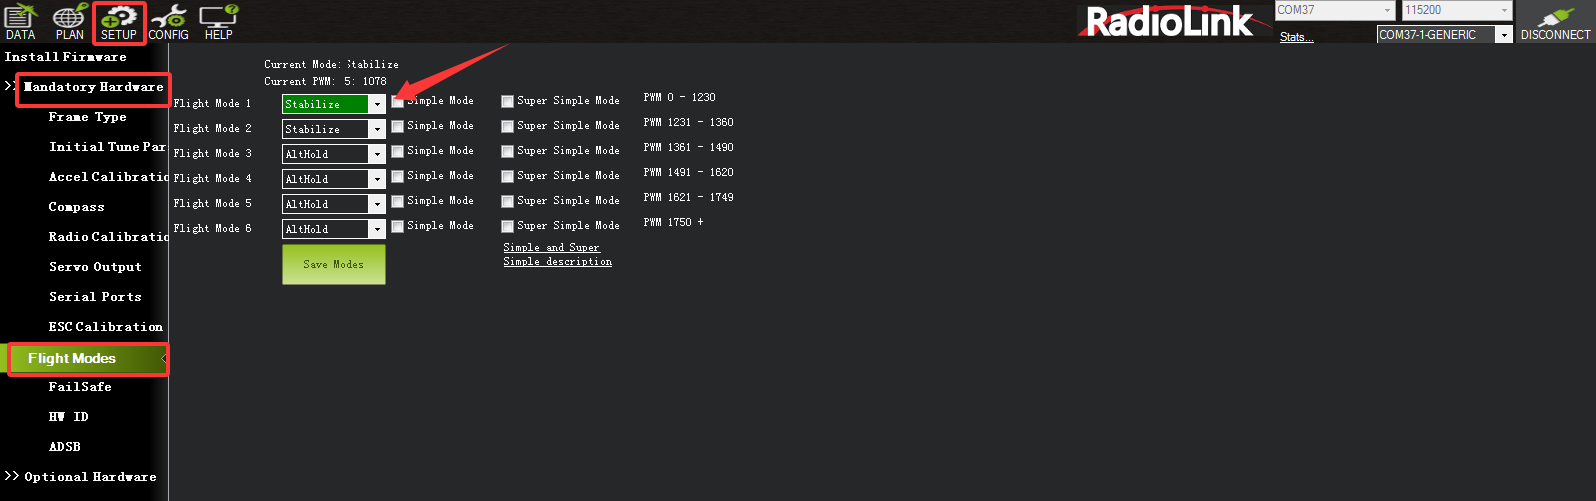
Flight mode settings can be modified. Click SETUP—Mandatory Hardware—Flight Mode. Then toggle the switch of channel 5 on the transmitter. The green bar indicates the flight mode for that switch. Click the drop-down arrow to select the desired flight mode (Note: only Stabilize and AltHold modes can be selected. Other flight modes are not supported). Then save the modes.
Troubleshooting
Problems | Solutions |
Unable to arm the drone. | The battery voltage is low. Please charge the battery and try again. Note: If the drone cannot be armed because the user has set the wrong parameters in Mission Planner, please enter Full Parameter List. Click "Reset to Default", and then calibrate the accelerometer to solve it. No need to re-flash the firmware or save the files. |
The aircraft rolls after taking off. | The propellers or motors may be installed in wrong direction. Please adjust them and try again. |
There is an abnormal sound after the aircraft is armed. | Arm the drone and turn the propeller by hand to check whether there are any objects or parts interfering with the propeller. Remove the objects. |
The aircraft shakes after it is armed. | Check whether the propeller is intact. If not, please replace the propeller. |
The aircraft sways after takeoff. | Connect the flight controller to Mission Planner and operate level calibration. |
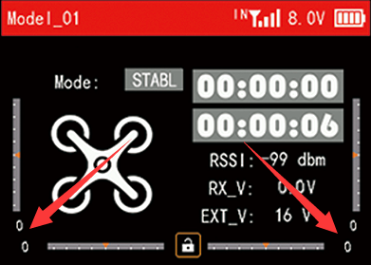
After taking off, the aircraft deflects in one direction. | Turn the trim button to set the trim value to 0. For more details, please refer to the manual of the transmitter. |
Thank you again for choosing RadioLink products.