
Notes
① Make sure your plane is power off.
② Make sure the Instructor transmitter and Student transmitter setup the same Model Type.
③ Make sure the Instructor transmitter and Student transmitter have not connecting other planes.
Setup Steps
In this user manual will let AT9S and T8FB as an example, AT9S as the instructor transmitter and T8FB as the student transmitter)
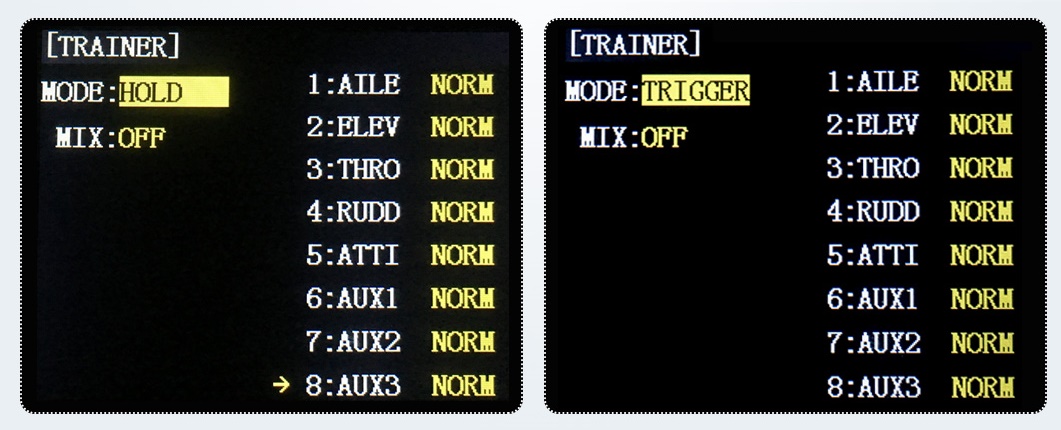
① Instructor transmitter: choose “BASIC MENU”--“TRAINER” function--change “MIX: INH” to “MIX: OFF”(the setting steps of AT9/AT9S/AT10/AT10II are the same)
Pay attention: The Trainer Function of AT9S is Innovative Dual Mode (If you want to use dual mode, you have to upgrade your AT9S to firmware V1.7.8 or later firmware version)
Traditional HOLD Mode
You must always keep pushing the trainer switch (SWH) to make the drone controlled by instructor transmitter. If you loosen the SWH, it will switch to controlled by student transmitter.
Brand New ALT Mode
HOLD mode will make the instructor tired after a long-time course. You just need to push the trainer switch (SWH) once to make the drone controlled by instructor transmitter (do not need to push the SWH all the time to turn on the trainer function). Push the SWH once again to switch to make the drone controlled by student transmitter.
The main interface shows “TRAINER” and the red LED blinking when trainer function turns on, the red LED always on when trainer function turns off.
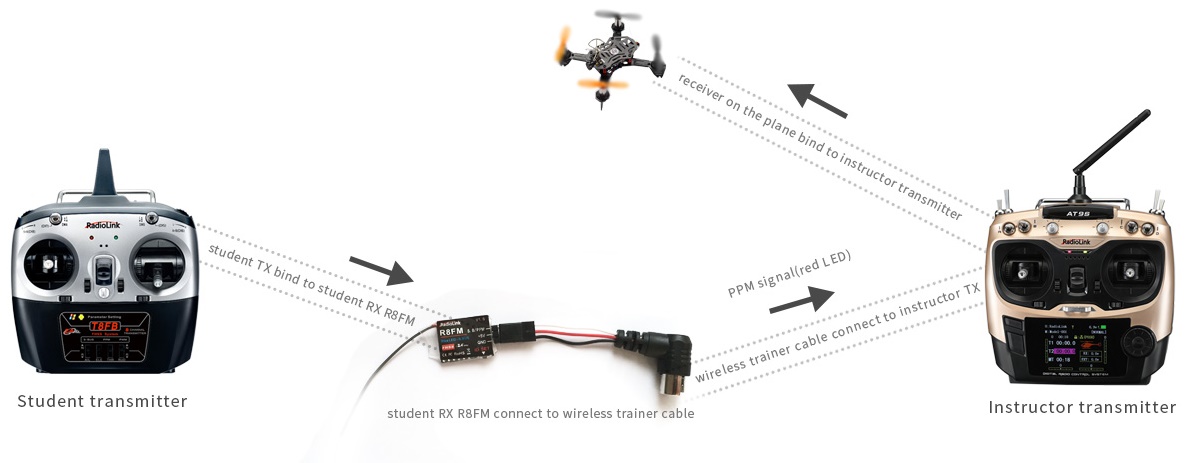
② Teacher transmitter AT9S bind to teacher receiver R9DS(teacher receiver mount on your plane), power off the transmitter when after bind successful.
③ Power on student transmitter T8FB and bind to the receiver R8FM (Pay attention: student receiver must support PPM signal).
④ Connect student receiver R8FM to the trainer cable (pay attention the positive and negative, black wire is negative), and connect the trainer cable to the simulate port of teacher transmitter, and then turn on both teacher transmitter and student transmitter, setup the trainer function as step one, the SWH is the switch for trainer function, put it up or down to make trainer function on or off.

Confirm the Trainer Function
Power on teacher transmitter and receiver and student transmitter and receiver, push SWH (do not loosen), you can find out that TRAINER MIX: ON, that means trainer function is working, and student transmitter can control the teacher receiver which mount on the planes or drones. When you lose SWH, trainer function off, student transmitter cannot control the planes or drones.
After make sure the trainer function work normal, you can use them for teaching.
Specification
① Input voltage: 4V-12V
② Supported Signal: PPM
Note: the wireless trainer cable only supports 10 channels PPM signals. Please setup the "CH-SELECT: 12CH" to "CH-SELECT: 10CH" in SYSTEM menu if both of your instructor transmitter and student transmitter are AT9/AT9S/AT9S Pro/AT10II.
③ Compatible receivers: all receivers with PPM signal supported(Radiolink R6DS, R6DSM, R12DSM; R8EF, R8FM, R8F, R8SM, R7FG)
④ Output voltage: 5V
⑤ Current: 200mA(Attention: since the output voltage of trainer cable is limited to 5V and the power is limited to 200mA, it just supports power for receiver, cannot power for servo or image transmission or any other equipment)