
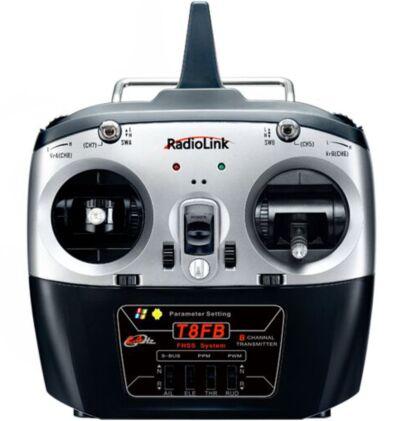
T8FB
Instruction Manual
Adaptable to Fixed-wing/Glider/Multirotor/Car/Boat/Robot
(FHSS)
CE FCC RoHS
Technical updates and additional programming examples available at www.radiolink.com
Thank you for choosing RadioLink 2.4 GHz 8CH remote controller --T8FB .
With easy parameter setting via APP on Android mobile phone or software on computer, T8FB is easy enough for beginners and is adaptable to multiple model types of fixed-wing, glider, multirotor, car, boat and robot.
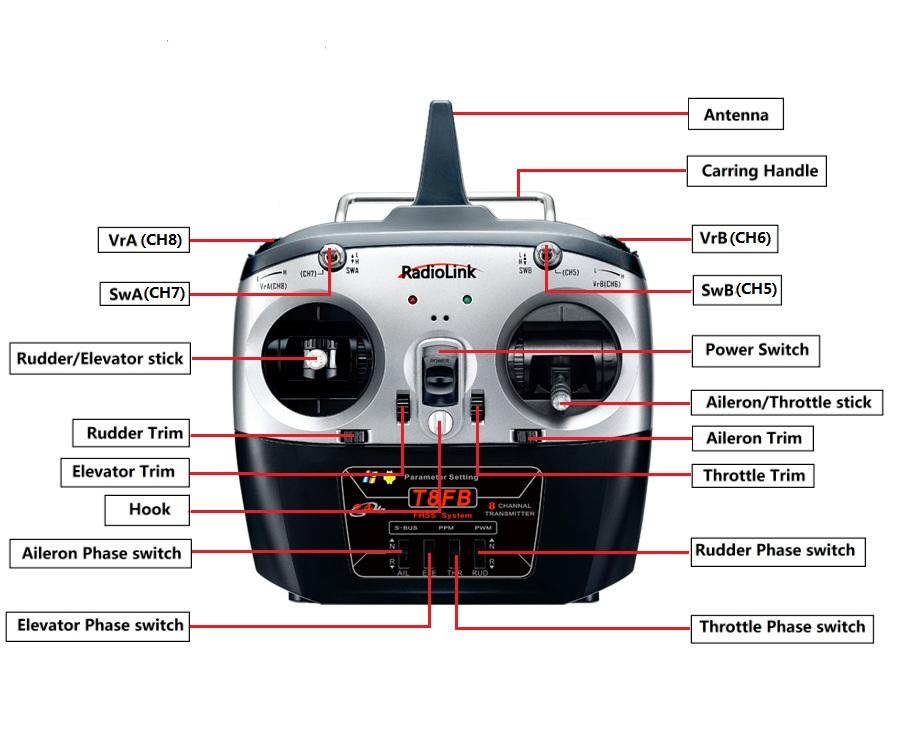
Note The phases of the 4 channels can be easily changed by prodding the corresponding phase switches instead of modifying the parameter data in the software/APP.
Note 2S/3S/4S LiPo or 4 pieces of NiMH battery is applicable to T8FB and the voltage alarm will automatically set basing on the used battery. If the alarm is triggered, continuous D sounds will be heard.
Never operate your model during adverse weather conditions. Poor visibility can cause disorientation and loss of control of your model.
Never use this product in a crowd and illegal area and strictly comply with the local regulations.
Always ensure the trim levers at 0 and battery properly charged before connecting the receiver.
Always check all servos and their connections prior to each run.
Always be sure about turning off the receiver before the transmitter.
This product is not a toy and is NOT suitable for children under the age of 14. Adults should keep the product out of the reach of children and exercise caution when operating this product in the presence of children.
Water or moisture may enter the transmitter inside through gaps in the antenna or joystick and cause model instability, even out of control. If running in the wet weather (such as game) is inevitable, always use plastic bags or waterproof cloth to cover the transmitter.
This device complies with part 15 of the FCC Rules. Operation is subject to the following two conditions:
(1) This device may not cause harmful interference and
(2) This device must accept any interference received, including interference that may cause undesired operation.
Any Changes or modifications not expressly approved by the party responsible for compliance could void the user's authority to operate the equipment.
Receiver R8EF (Standard Pack)
The standard receiver packed with T8FB is R8EF, 2.4G 8-channel receiver with SBUS, PPM and PWM signal
output supported.
Two signal working modes:
(1) PWM signal output working mode
Receiver indicator is RED with all 8 channels output PWM signal.
SBUS&PPM signal output working mode
Receiver indicator is Blue (Purple) with 8 channels output in total. Channel 1 is SBUS signal while channel 2 PPM signal and channel 3 to 8 PWM signal.
Signal Switch between SBUS&PPM and PWM
Short press the binding button on the receiver twice within 1 second to switch the SBUS/PPM signal to PWM signal. When the RED LED is on, signal output is PWM. When both RED and BLUE/PURPLE LED are on, signal output is SBUS&PPM&PWM.
Binding
1. Put the transmitter and the receiver close to each other (about 50 centimeters).
2. Power on T8FB and receiver R8EF. The RED LED will start flashing slowly.
3. There is a black binding button (ID SET) on the side of receiver. Press the button for more than 1 second and release, the RED (by default, could be Purple for SBUS&PPM signal output) LED will flash, meaning binding process is ongoing.
4. When the LED stops flashing and is always on, binding is complete. If not succeed, the led will keep flashing slowly to notify, repeat the above steps.
Note Since RadioLink radio control systems are not open sourced, that RadioLink transmitters are ONLY compatible with RadioLink receivers.
Note of receiver usage:
Keep antennas as straight as possible, or the effective control range will reduce.
Big models may contain metal parts that influence signal emission. In this case. antennas should be positioned at both sides of the model to ensure the best signal status in all circumstances.
Antennas should be kept away from metal conductor and carbon fiber at least half inch away and no over bending.
Keep antennas away from motor, ESC or other possible interference sources.
Sponge or foam material is advised to use to prevent vibration when installing receiver.
Receiver contains some electronic components of high-precision. Be careful to avoid strong vibration and high temperature.
Special vibration-proof material for R/C like foam or rubber cloth is used to pack to protect receiver. Keeping the receiver in a well-sealed plastic bag can avoid humidity and dust, which would possibly make the receiver out of control.
T8FB Parameters Setup via Android Mobile APP
T8FB with USB port makes parameters setup via android smart-phone APP by easily connecting an OTG end (Optional USB and Type-C) and a USB cable packed.
Visit www.radiolink.com to download the Android APP.
Connect your T8FB and your Android smart-phone as picture below
3. Turn on the transmitter T8FB and click icon “RadioLink T8FB” to open, notice will pop out when connect with success. Click OK.
Note For different smart-phone ( e.g. OPPO R9s), OTG function needs to be activated first (settings - Other settings - OTG Connection)
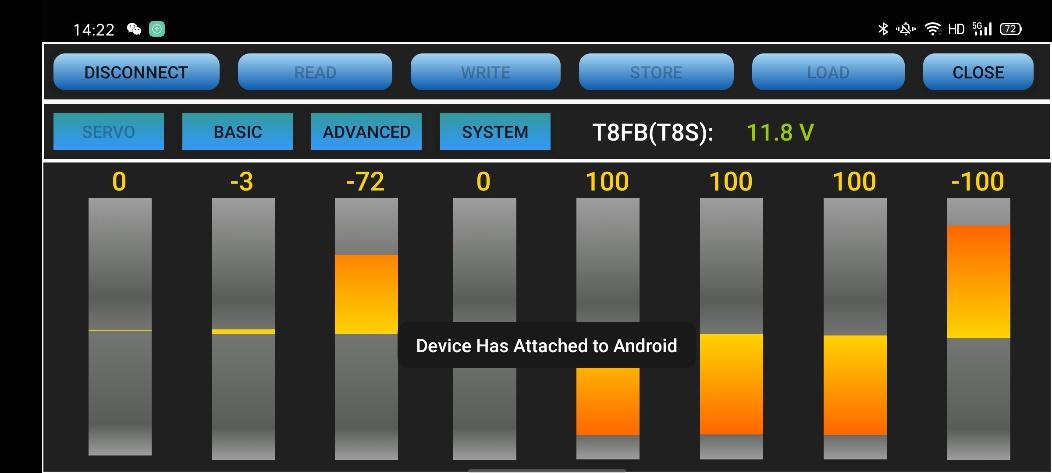
There are 6 function keys on the top of the parameter setup interface.
(DIS)CONNECT: When APP is opened on the mobile and T8FB is powered on, click CONNECT to make connection. If not succeed, click DISCONNECT then make sure the APP is closed at the back stage then CONNECT again. Every time open the APP, the data displayed are the ones last time disconnected.
READ: Click READ, four D sounds will be heard and the APP starts reading the data in T8FB. The current data of the T8FB won’t display on the APP until clicking READ.
WRITE: Click to update the changed data into the T8FB and one D sound mean the modified data have been written in T8FB. If no D sound means update failure, please reconnect T8FB to the App and re-write. Click WRITE each time parameter is modified to make sure it’s well input to the T8FB.
STORE: Click to save the APP data as a file in the mobile.
LOAD: Click LOAD and a pop out of ‘Model Select’ will display and user can either create a new file or select among the saved files.
CLOSE: Click CLOSE to exit.
Note There is T8FB voltage displaying on each menu.
Always remember to click WRITE to input the newly modified data into T8FB.
More detailed instructions about setup menu, please refer to the e-manual downloaded from .
Parameters Setup via Computer
Connect the computer and the T8FB with an android USB data cable.
Open the parameter setup software in the downloaded file,
then power on T8FB.
Choose Port Number (COM port should be automatically identified when connected, otherwise right click THIS PC
to check Device Manager), setting baud rate: 115200, 8-1-None
(8 data bits, 1 stop bit, no parity check), click OPEN to connect. These parameters are on the right of the software interface.
 Note: When click OPEN to connect, the SETTING parts mentioned above will turn grey and can’t be changed and PARAMETERS of the connected T8FB includes TX-ALARM/STK-MODE/FIRMWARE VERSION, at bottom right will be displayed
READ: T8FB data will be read and displayed on computer when click “READ” and two D sounds will be heard.
LOAD: The data file in TXT format saved in the computer will be loaded in the software.
UPDATE: Modify the data as wish or load the data which is saved as file then click “UPDATE” to change the parameter in T8FB. (two LEDs will flash once with one D sound).
SAVE: The data read or set will be saved as TXT file in the computer. This is very helpful if there are several sets of radio data need to be saved or if one set of parameters need to be copied in different radios.
Note Always remember to click UPDATE to input the newly modified data into T8FB.
More detailed instructions about setup menu, please refer to the e-manual downloaded from .
Firmware Upgrade
The current firmware version of T8FB can also be checked at the bottom of the SYSTEM menu in the APP or bottom right of the software. Firmware will be updated from time to time and is available at .
Note The version at the bottom left of the SYSTEM menu in the APP and bottom right of software is the firmware version. The version on the right of the APP is the application version.
Driver Installation: Select the correct driver depending on the computer system.
Connect T8FB with computer via an android USB data cable.
Open the software to upgrade T8FB firmware and choose the correct COM port.
Click CONNECT and press the power button once quickly within 1 second. When “DISCONNECT” in RED turns to “CONNECT” in GREEN, it means it’s connected with success.
Click“APROM” and choose the firmware.
Click “START” and the process bar becomes GREEN. When the green bar goes to the end and shows PASS, the firmware is upgraded with success.
When update with success, close the software and T8FB will make three D sounds.
Note More instructions about detailed steps, please refer to the e-manual downloaded from .
Size:173*102*206mm (6.81”*4.02”*8.11”)
Weight: 363g (12.8oz)
Channel: 8CH
Control Range: 2km (1.24 Miles) in the air
Operating Current: <80(±5) mA
Operating Voltage: 4.8 - 18.0V
ACPR: >36dbm
Frequency: 2.4Ghz ISM Band(2400.0MHz--2483.5MHz)
Modulation Mode: GFSK
Bandwidth: 400KHz
Spread Spectrum: FHSS 67CH pseudo random frequency
Hopping
Low Voltage Alarm: Yes (can be customized on 2S-4S battery)
Adaptable Models: Fixed-wing, Glider, Multirotor
Car, Boat, Robot
Compatible Receiver: R8EF(Std), R8FM, R8SM, R8F, R7FG, R6FG,
R6F,R4FGM, R4F
Battery Tray Dimension: 114.5*35.5*24mm (4.5”*1.4”*0.94”)
Model Memory: Unlimited (depends on the device memory)
For more after-sales service:
Please start from to download the electronic detailed manual.
Or send mail to:
Thank you again for choosing our product.