
R12DSE Introduction
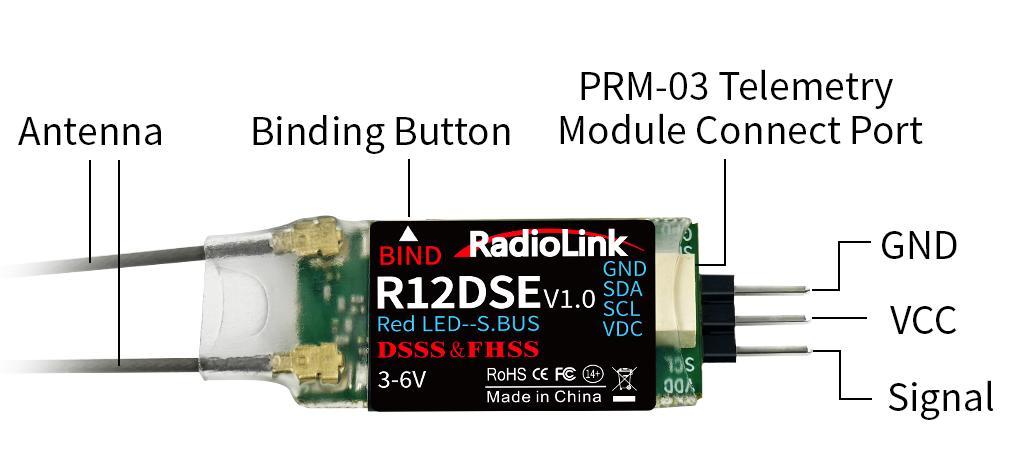
RadioLink R12DSE is a mini 12-channel receiver with 4000 meters control distance. R12DSE has a built-in data transmission function, the signal strength and receiver voltage information will display on the screen of the transmitter, and RSSI value will display on the RECEIVE menu without any external sensors. When R12DSE paired with Telemetry Module PRM-03 and flight controller, more telemetry information will be displayed on the screen. R12DSE supports signal output of PPM and SBUS and is compatible with RadioLink transmitters AT10II, AT10, AT9S Pro, AT9S, AT9.
Binding
Each receiver has an individual ID code and must bind with transmitter before using. When the binding is done, the ID code will be stored in the transmitter and there is no need to rebind. Therefore, when a new R12DSE is purchased, binding needs to be done in order to work with transmitter.
Binding steps:
- Place the transmitter and R12DSE receiver more than 30 centimeters apart.
- Power on the transmitter and R12DSE.
- Press the binding button on the side of the receiver for more than 1s and the LED indicator of the receiver will flash, meaning the binding process has begun.
- When the LED indicator stops flashing, binding is complete.
- Test the model servo to make sure it can be operated by the transmitter.
When the transmitter and receiver are powered on, the LED indicator of R12DSE flashes slowly means there is no binding or the receiver loses signal during flight.
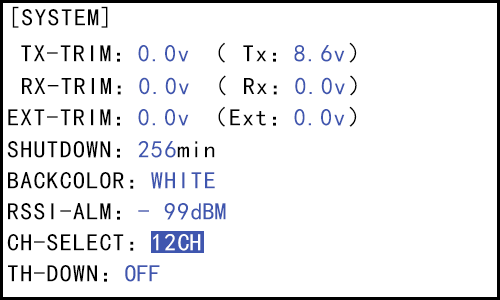
Note: Since R12DSE is a 12-channel receiver, when using it with RadioLink AT9S Pro/AT10II transmitters, please enter BASIC MENU -- SYSTEM. Set CH-SELECT to 12CH (as shown on the right). If it is selected as 10CH, the servo will vibrate.
Working Modes
There are two signal working modes of R12DSE.
Purple/Blue LED, SBUS signal, 12 channels totally.
Red LED, PPM signal, 12 channels totally
SBUS and PPM signal switch:
Short press the binding button twice within 1 second, the signal is changed from SBUS to PPM (or from PPM to SBUS). The red LED indicates the PPM and purple/blue LED indicates SBUS.
Note of Antenna Installation
In order to maximize the signal transmission, it is greatly advised that
- Keep antennas as straight as possible, or the effective control range will reduce.
- The two antennas should be placed at 90 degrees to each other (As shown on the right).

- Big models may contain metal parts that influence signal emission. In this case. antennas should be positioned at both sides of the model to ensure the best signal status in all circumstances.
- Antennas should be kept away from metal conductor and carbon fiber at least half inch away and no over bending.
- Keep antennas away from motor, ESC or other possible interference sources.
- Sponge or foam material is advised to use to prevent vibration when installing receiver.
- Receiver contains some electronic components of high-precision. Be careful to avoid strong vibration and high temperature.
- Special vibration-proof material for R/C like foam or rubber cloth is used to pack to protect receiver. Keeping the receiver in a well sealed plastic bag can avoid humidity and dust, which would possibly make the receiver out of control.
Real-time Built-In Telemetry
R12DSE has a built-in telemetry function. The telemetry range is 4000 meters, the same with the control range.
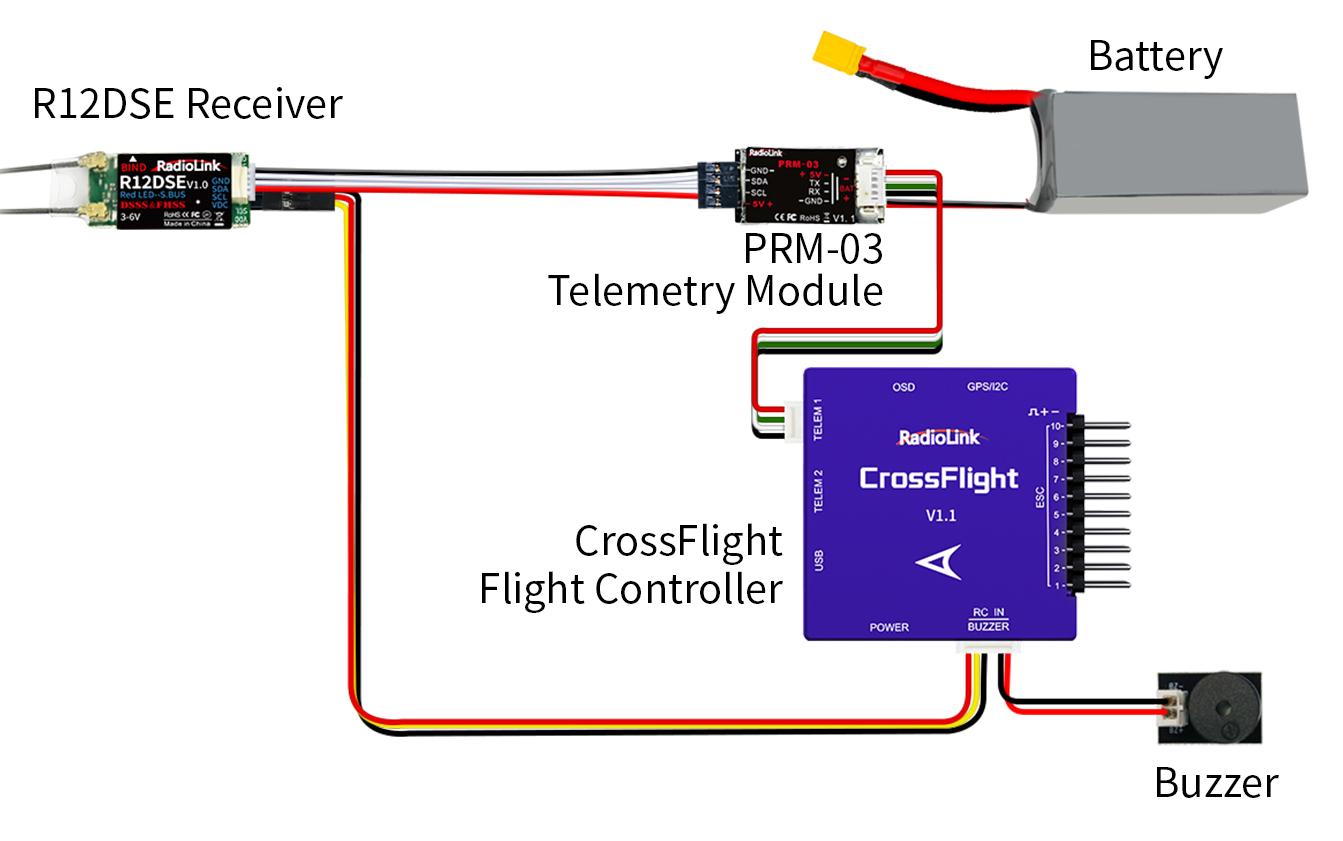
The signal strength and receiver voltage information will display on the main screen of AT10II, AT10, AT9S Pro, AT9S, AT9, and RSSI value will display on the RECEIVE menu without any external sensors. When R12DSE is connected with Telemetry Module PRM-03 and flight controller PIX6, PIXHAWK, CrossRace Pro, CrossRace, CrossFlight, Mini Pix, APM and TURBO PiX, model voltage, speed, rise, throttle, longitude, latitude, altitude, GPS, RSSI, flight mode, yaw, roll, pitch, and distance will display on the RECEIVE menu of AT10II, AT10, AT9S Pro, AT9S, AT9.
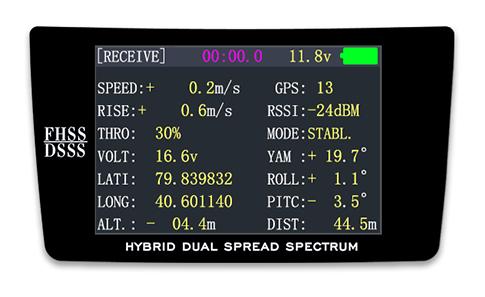
RECEIVE menu of the transmitter
Output RSSI Value from Receiver to FPV Monitor
RSSI Value can be output from Receiver to FPV Monitor, and real-time RSSI Telemetry is available when Racing/Driving/Sailing.
1、How to output RSSI value from receiver to FPV when the transmitter is AT9S Pro/AT9S/AT9/AT10II/AT10 and the flight controller is PIX6/PIXHAWK/CrossRace Pro/CrossRace/CrossFlight/Mini Pix/TURBO PiX?
https://www.radiolink.com/newsinfo/477916.html?templateId=148964
2、How to output the RSSI value from the receiver to FPV when the transmitter is AT9S Pro/AT9S/AT9/AT10II/AT10 and the flight controller is F4/F7/F722?
https://www.radiolink.com/newsinfo/477910.html?templateId=148964
R12DSE Specifications
Model name: R12DSE
Dimensions: L*W =30.5*16mm (1.2” *0.63”)
Antenna Length: 90mm (3.54”)
Weight: 2.5g(0.09oz)
Channel: 12 channels
Operating Voltage: 3-6V DC
Operating Current: 35mA@5V
Receiving Current: <32mA@5V
Telemetry Transmission Current: <125mA@5V
Signal: SBUS&PPM
Frequency: 2.4GHz ISM band(2400MHz~2483.5MHz)
Spread Spectrum: DSSS&FHSS
Reception Sensitivity: -97dBm
Power: 20dBm(100mW)
Channel Resolution: 4096 with regular jitter of 0.25us
Control Range: 4KM(2.49Miles) in the air (Maximum range tested in unobstructed areas free of interference and may vary depending on local regulations)
Compatible Models: Rotary Wing, Fixed-wing, Glider, Multicopter, Car, Boat, Robot work with flight controller
Real-time Telemetry: Real-time built-in telemetry of receiver voltage and RSSI value
Hardware Interface: 3-pin 2.54mm Pin / 4pin 1.0mm Socket
Compatible Transmitter: AT10II, AT10, AT9S Pro, AT9S, AT9
Thank you again for choosing RadioLink product.