
Part 2. Introduction of CB86-PLUS
2.1 Functions
High Precision. With precision of 0.001V, which is 10 times precise than the competing products of 0.01V.
With 8 charging/discharging ports. Each port is compatible with 1S~6S battery and the parameters of each port can be set individually.
With balance current of 6A, which is much higher than 0.5A of ordinary chargers and improves the charging efficiency of the battery.
Integrated Protection. After setting the parameters of charging and discharging, the charger will automatically scan the batteries of all ports and automatically start to take turns to charge or discharge.
Power supply self - adaptation. When the maximum output of the power supply cannot meet the charging power, the charger will automatically reduce the current to adapt to the maximum output of the power supply. The smooth power technology effectively solves the problem that some power supplies cannot start the rated power instantly.
Intelligent battery repair function, which is also called Repair charge. When the charger is connected to an over-discharged battery, the charger will automatically identify the over-discharged cell, and then automatically trigger the Repair charge mode to protect the cell. When the voltage of over-discharged cell rises to 3.0V, it will automatically charge according to the charging parameters you set, which greatly prolongs the life span of the battery.
Polarity control. When there's reversed polarity connection, the charger won't work which ensures protection to the charger.
Input over-voltage protection. If the input voltage of the power supply is too high, the charger will automatically recognize it and make sure the charger won't be damaged.
Power management adopts switch circuit, with most efficient individual PUSH-PULL design for each charging cell. There's no resistance consuming power when balance charging, which greatly decreases the heat. Operating current is as low as 135mA with charging efficiency up to 97%. The operating temperature remains 35°C no matter whether it is on standby mode or fully working mode.
Press one key to view all parameters of the battery at any time, such as: initial voltage, completed voltage, capacity analysis of each battery cell and internal resistance display, so that the battery charging voltage is more accurate.
Fast dynamic battery internal resistance display. Basic internal resistance display after ten seconds of charging, which can quickly judge the balance and discharge performance of the battery cell.
Support charging and discharging of different battery combinations such as 2pcs 3S batteries, 1pc 4S battery and 1pc 2S battery, 3pcs 2S batteries, 6pcs 1S batteries, which can be combined into 1pc 6S battery. It can also charge/discharge 6 cells of the assembled battery at the same time.
2.2 Specifications
Size: 188*104*57mm (7.4”* 4.09”* 2.24”)
Weight: 0.89kg
Input Voltage: DC10.5-15V
Supporting battery: 1S~6S battery, including lithium battery, lithium iron battery and high voltage lithium battery (8 ports available)
Working Modes: CHARGE/ DISCHARGE/ STORAGE/Repair charge
Charging Voltage: 3.5~4.35V
Note: It's advised to set 4.2V per cell for charging voltage of common lithium battery, 3.6V per cell for the cut-off voltage of lithium-iron battery, and 4.35V per cell for cut-off voltage of the high voltage lithium battery.
Charging Current: 0.3~6.0A
Balance Current: 0.3~6.0A (same as charging current)
Discharging Current: 1.2A(fixed)
Screen: 2.8” TFT screen
Sound Notification: Buzzer, ON/OFF customizable
Max. Output Power: 162W
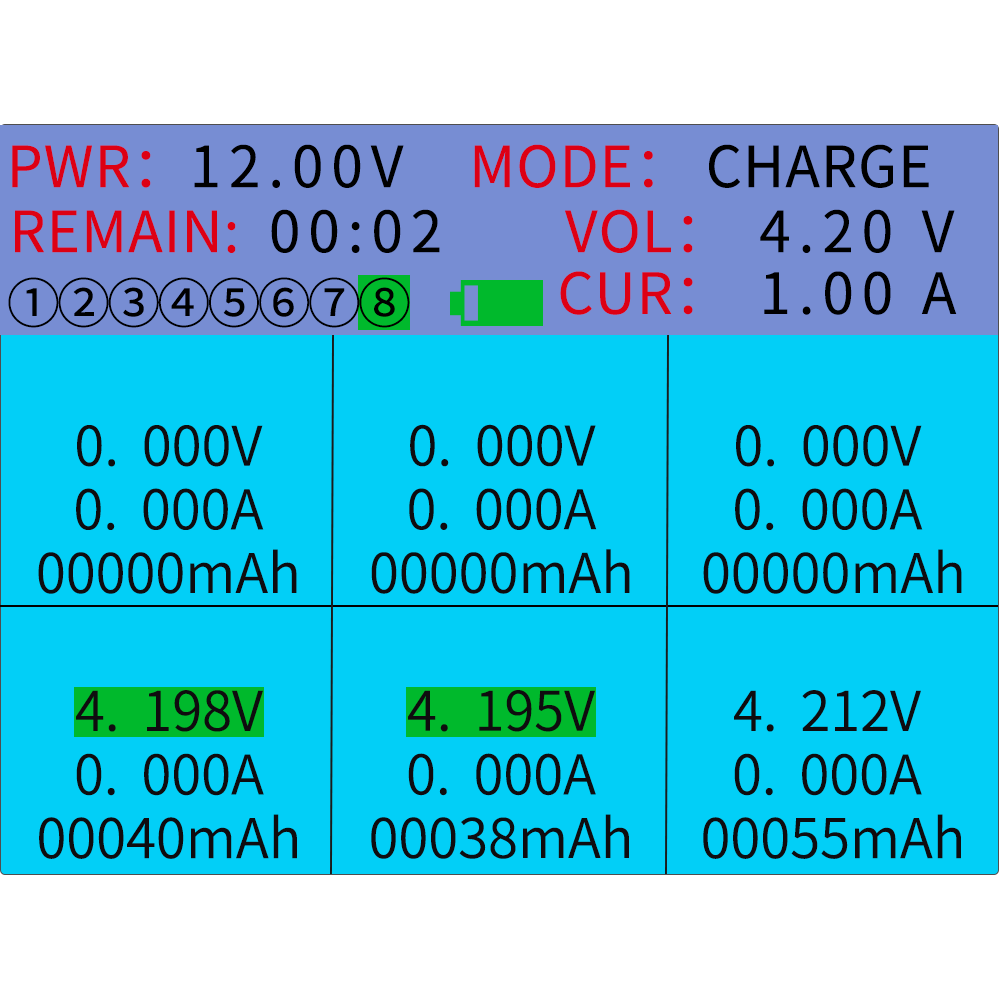
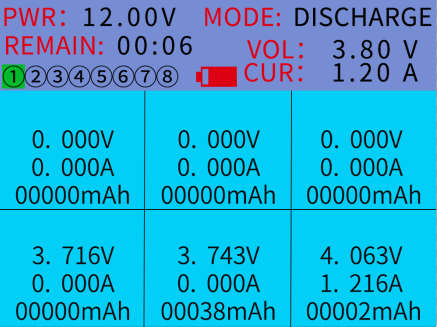
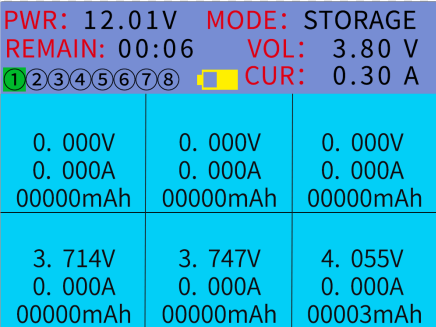
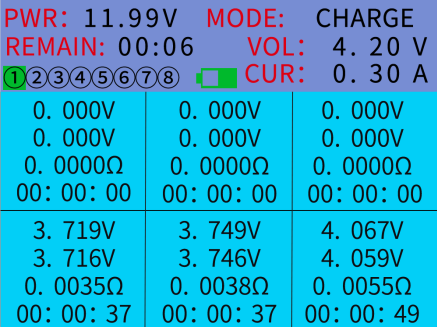
2.3 Home page
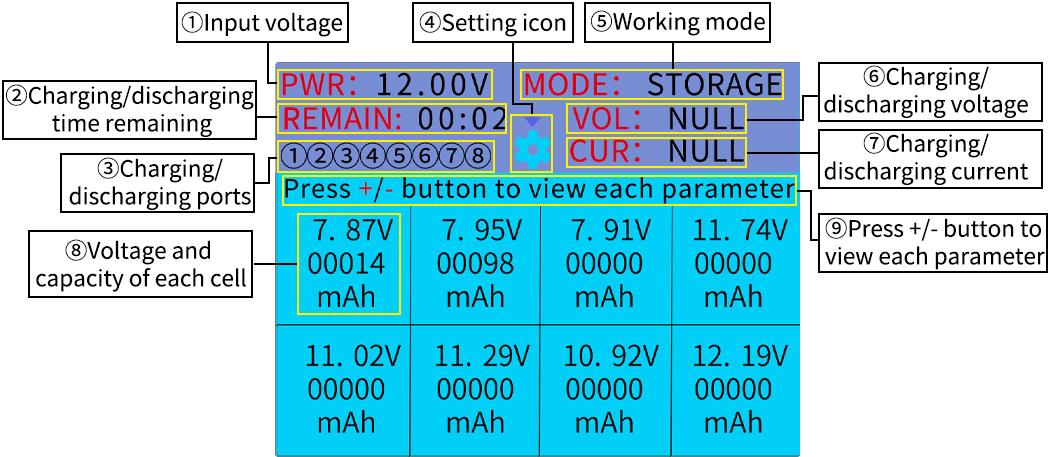
① PWR:Input voltage
② REMAIN:Charging/discharging time remaining
③ Charging/discharging ports
④ Setting icon
⑤ MODE:Working mode
⑥ VOL:Charging/discharging voltage
⑦ CUR:Charging/discharging current
⑧ Voltage and capacity of each cell
⑨ Press +/- button to view each parameter
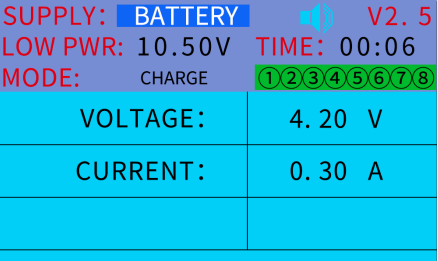
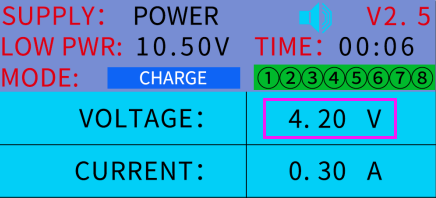
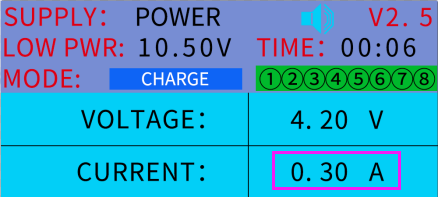
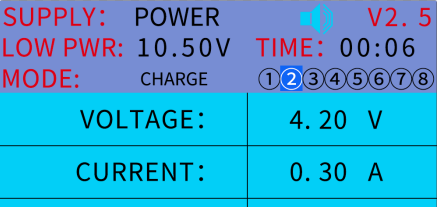
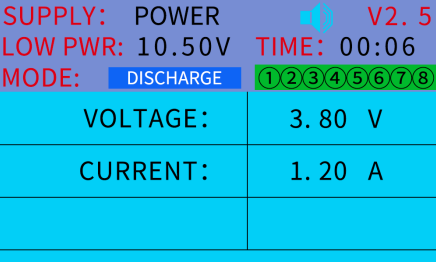
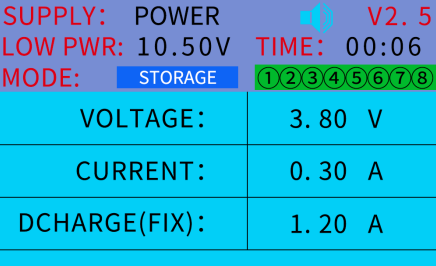
2.4 Setting page
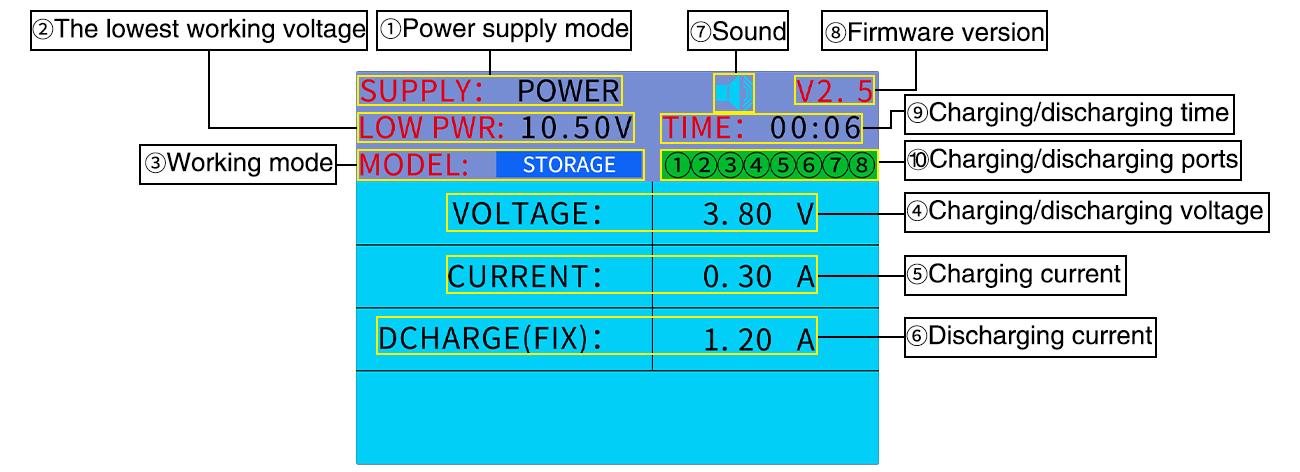
① SUPPLY:Power supply mode, including POWER / BATTERY.
② LOW PWER:The lowest working voltage of the charger. When the input voltage is less than the value, the charger will stop working automatically.
③ MODE:Working mode. Three working modes are optional, including CHARGE/ DISCHARGE/ STORAGE. But when the voltage of any cell connected to the charger is lower than 3.0V, Repair charge will be triggered.
④ VOLTAGE:Charging/discharging voltage. The highest voltage can be set to 4.35V for high voltage battery. Please set 4.2V for standard lithium battery.
⑤ CURRENT:Charging current.
⑥ DCHARGE(FIX):Discharging current. 1.2A.(fixed)
⑦ : : Sound button. It can be set to ON/OFF.
⑧ V2.5:Firmware version.
⑨TIME:Charging/discharging time. Charging/discharging time can be set. When the charging/ discharging time reaches the set time, the charger will automatically stop charging;
⑩ ①②③④⑤⑥⑦⑧: Charging/discharging ports.
2.5 Buttons

START/STOP :
To start or stop the current status, it is available at any time. So it's important to finish all parameters (voltage and current) setting for charging or discharging before pressing this button.
SET :
① When it is on the home page and the charger isn't working, press SET button to enter the setting page.
② When charging, press SET to view internal resistance of the battery being charged.
③ Press SET button to confirm the setting and exit the setting on the setting page. Then press "+/▲" or "-/▼" buttons at the bottom of the screen to change the value that needs to be set, and move to the function that needs to be set.
"+/▲" or "-/▼": To change the value and select the function.
Part 3. Power Supply for CB86-PLUS
3.1 Power supply for CB86-PLUS
Power supply for CB86-PLUS is not provided by default. The charger can only work when it is connected to a DC power supply or battery power supply.
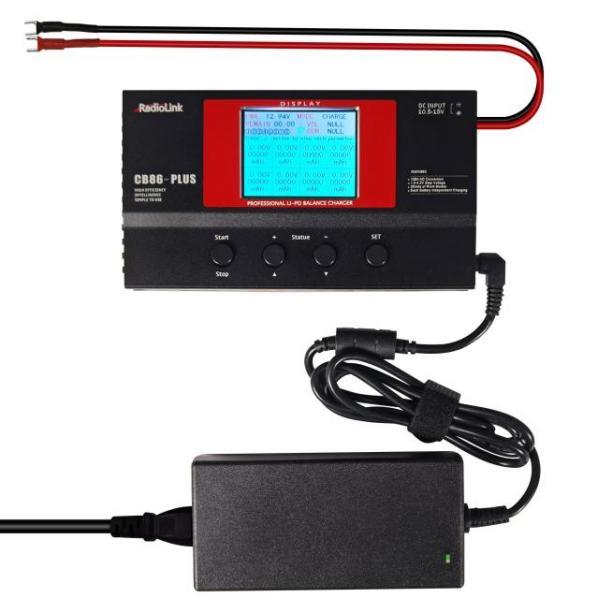
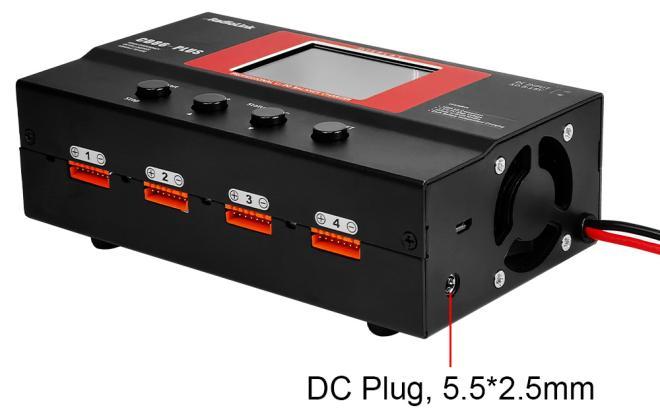
3.1.1 DC power supply
If the charger is connected to a DC power supply, please set SUPPLY in the menu to "POWER".
The DC power supply of the charger must be with an output voltage of 10.5-15V and an output current of not less than 15A. The picture below shows the DC power supply connected to the DC plug of CB86-PLUS for reference.
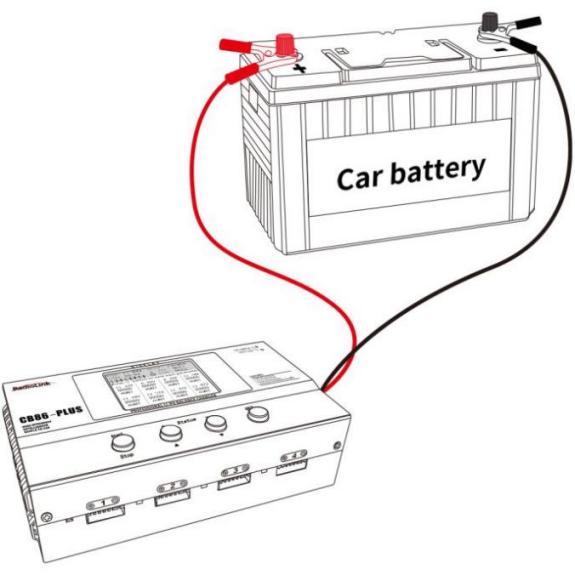
3.1.2 Battery power supply
If the charger is battery powered, please set SUPPLY in the menu to "BATTERY".
The battery power supply of the charger must be with the voltage of 10.5-15V. The following picture uses the car battery power supply as a reference. When the car battery is used for power supply of the charger, the lowest working voltage need to be set on the menu LOW PWR of the charger to prevent the car battery from being unable to start the car due to lack of power.
Make sure that the positive and negative poles of the charger are connected correctly to the positive and negative poles of the power supply. If the positive and negative poles are reversed, the charger will not be damaged, but it will not start. Connect the red cable of the charger to the positive pole of the power supply, and connect the black cable of the charger to the negative pole of the power supply.
Note: Wrong power supply selection will not affect the charger. If battery power supply is selected, there is no automatic current limiting function, which means the battery can be charged at a higher rate.
Setting method: When the charging stops, short press SET button to enter the setting page, and the blue background cursor comes to "POWER". Press SET button, and the cursor starts to flash. Then press "+/▲" or "-/▼" buttons at the bottom of the screen to switch POWER to BATTERY, and then press SET button to confirm the setting. Then press "+/▲" or "-/▼" buttons at the bottom of the screen to set other parameters.
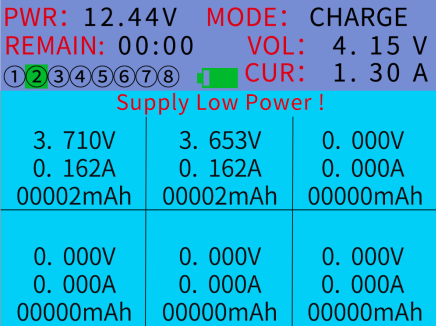
3.2 Supply low power warning
If the power supply to the charger is insufficient, the charger will automatically prompt "Supply Low Power", the charger won't stop charging at this time but will automatically reduce the charging current.
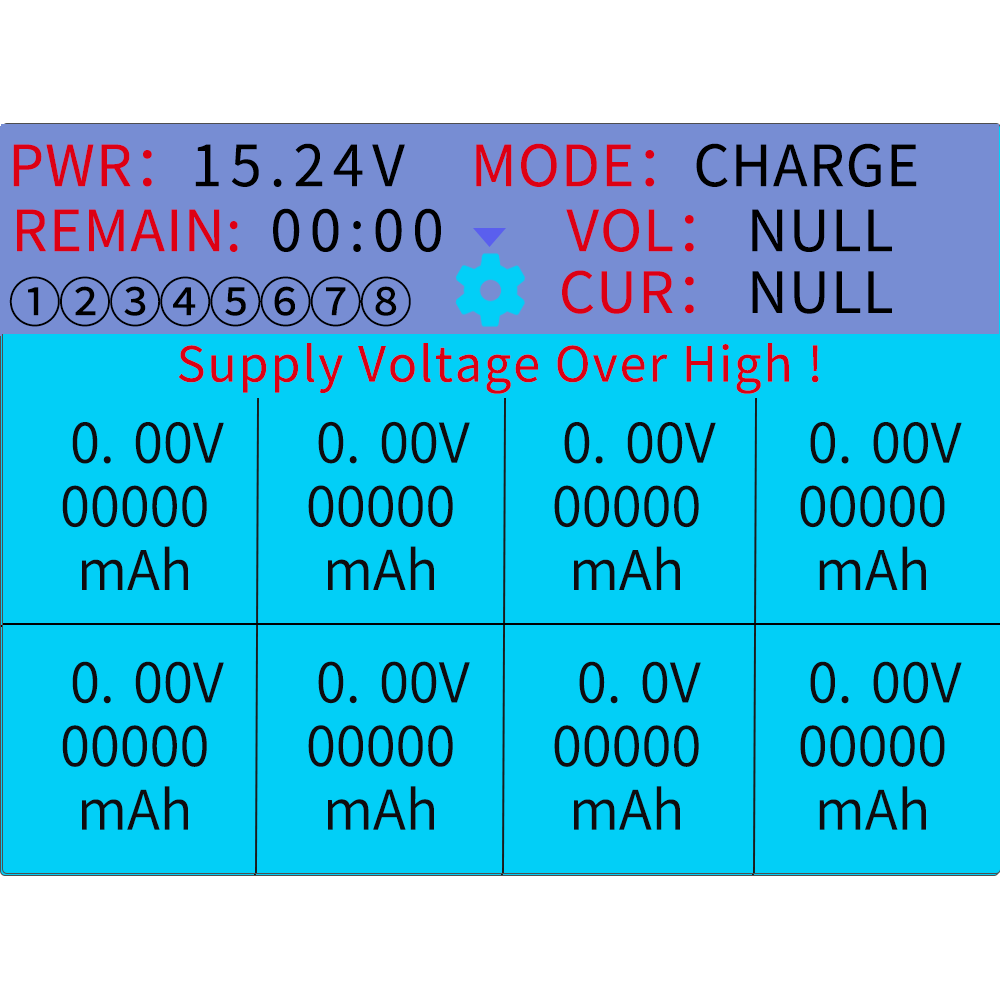
3.3 Supply voltage over high warning
If the input voltage of the power supply to the charger is higher than 15.0V, the charger will automatically prompt "Supply Voltage Over High" and the charger will automatically stop charging.
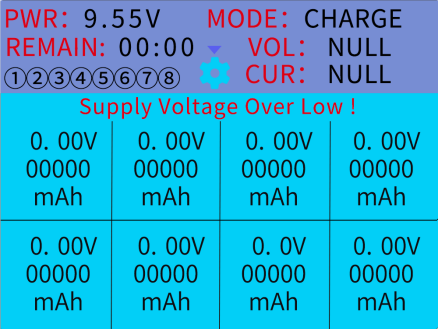
3.4 Supply voltage over low warning
If the input voltage of the power supply to the charger is lower than 10.5V, the charger will automatically prompt "Supply Voltage Over Low" and the charger will automatically stop charging.
3.5 Connection of the battery
CB86-PLUS contains 8 balance ports, which allows connection of max 8 pieces 6 cells lithium battery or lithium polymer battery at the same time. Random connection of 1S-6S cells of battery is also supported. Please refer to the below picture for connection.
Note:
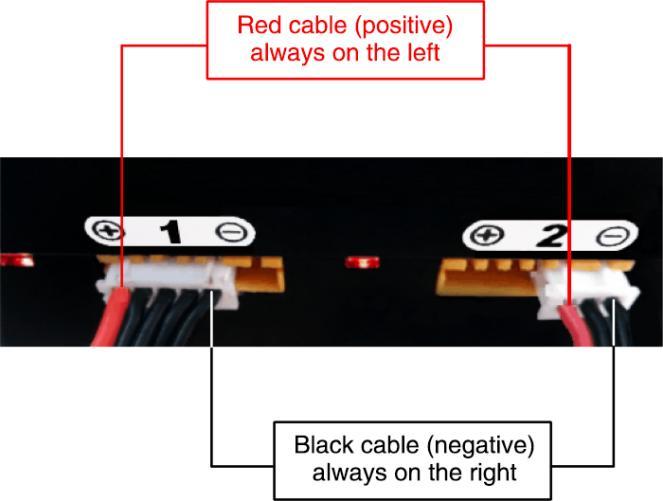
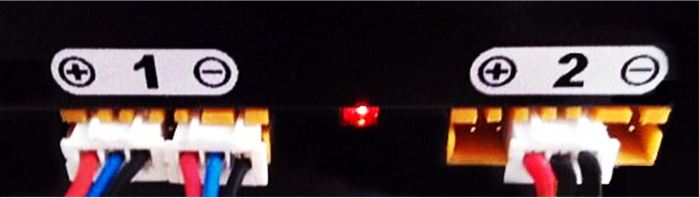
1)Make sure the correct polarity of batteries (The red cable is positive and connects to the left side while the black is negative connecting to the right side.)
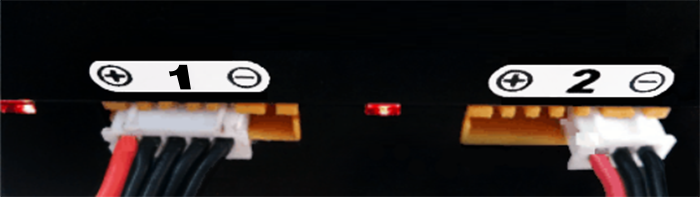
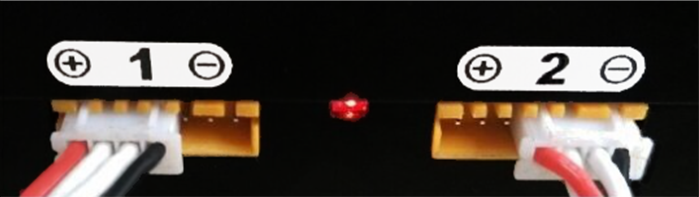
2)Batteries can be connected to the charger easily. But if there is a big obstruction during the process of connecting the battery, please check whether the balance port pin is bent and whether the battery balance port is connected reversely (black cable on the right) to avoid damage to the battery and charger.
3.5.1 Correct connection of the battery
3.5.2 Wrong connection of the battery
 3.5.3 Five Combinations of battery charging/discharging connection
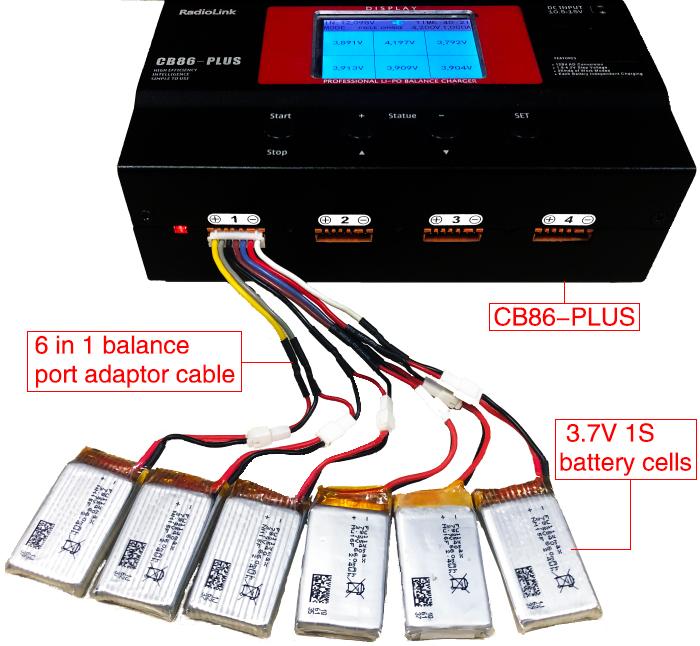
CB86-PLUS has eight charging/discharging ports, supporting max eight combinations of battery charging/discharging connection. There are six independent sources which allow max 6S lithium battery charged/discharged with each port. When charging/discharging the non 6S battery, you can put 6 pieces of 1S OR 1 piece of 4S+1 piece of 2S OR 2 pieces of 3S OR 3 pieces of 2S OR one 6S battery to charge/discharge as picture shown below.
1 piece of 6S

1 piece of 4S + 1 piece of 2S
3 pieces of 2S
2 pieces of 3S
6 pieces of 1S
When you need to charge/discharge 6 pieces of 1S lithium batteries at the same time, the below 6 in 1 balance port adaptor cable is needed.
Part 4. Working Mode of CB86-PLUS
There are three working modes of CB86-PLUS: CHARGE/ DISCHARGE/ STORAGE. But when the voltage of any cell connected to the charger is lower than 3.0V, CB86-PLUS will automatically recognize that the battery has been over-discharged, and automatically trigger Repair charge mode.
4.1 CHARGE
When multiple sets of batteries are connected, the charger will charge all connected batteries in turn according to the sequence of the charging port numbers if there is no designated charging port sequence. You can set the same charging parameters for all ports, or set different charging parameters for each port.
Note: During the charging process, if the input power supply voltage drops by more than 9%, the charger will automatically limit the current to keep the power supply voltage falling within 5%-8% during charging.
4.1.1 Recommended charging voltage
Ordinary lithium battery: The recommended charging voltage for lithium batteries is 4.2V, and the maximum charging current cannot exceed 6.0A. Because CB86-PLUS charger is charged by the balance port of the batteries and the safety current of the silicone wire of the balance port cannot exceed 6.0A. If the current is too high, there is a risk of overload.
High voltage lithium battery: The recommended charging voltage is 4.35V.
Lithium-iron battery: The recommended charging voltage is 3.6V.
4.1.2 Recommended charging current
Under CHARGE mode, the values of voltage and current can be customized. The full voltage of a standard lithium battery is 4.2V per cell. Please set the current according to the battery capacity. Generally, in order to protect the battery, the charging current of the battery is set to 1C according to the battery capacity. For example, 1000mAh lithium battery can be charged with 1A current. 2000mAh lithium battery can be charged with 2A current. If you want to complete the charging as quickly as possible, you can also set a larger charging current.
4.1.3 The method to set the same charging voltage and current for all ports
When charging is stopped, press SET button to enter the setting page, and then press "+/▲" or "-/▼" button to move the blue cursor to MODE. Then press SET button to select and press "+/▲" or "-/▼" button to select CHARGE mode. Press SET button to confirm the option. And then press "+/▲" or "-/▼" button to move the cursor to VOLTAGE, and press SET button to select and set the charging voltage and charging current. After the setting is completed, all ports will perform in the same charging voltage and current.
4.1.4 The method to set different charging voltage and current for each port
When charging is stopped, press SET button to enter the setting page, and then press "+/▲" or "-/▼" button to move the blue cursor to MODE. Then press SET button to select and press "+/▲" or "-/▼" button to select CHARGE mode. Press SET button to confirm the option. And then press "+/▲" or "-/▼" button to move the cursor to ①②③④⑤⑥⑦⑧ and press SET button to confirm. The cursor will blink and press "+/▲" or "-/▼" button to choose the port you want. Press SET button to confirm and press "+/▲" or "-/▼" button to move the cursor to VOLTAGE, and press SET button to select and set the charging voltage and charging current for the port.
Note:
Do not select all ①②③④⑤⑥⑦⑧ numbers if you want to set different charging voltage and current for each port. If you select all of them, ①②③④⑤⑥⑦⑧ will be all in blue or green.
4.1.5 Notice of fully charging
After setting the charging current and voltage, press "START/STOP" button to start charging. The red light on the left of the charging port will light up, and the corresponding port number will also show a green background. The screen will display the battery charging status. The voltage and current data lines will display the current voltage of each cell in the battery packs, the charging current, and the battery capacity charged into it.
1. Every time when a battery cell is fully charged, the charger will give four beeps, and the voltage value of the battery cell will show a green background.
2. During the charging process, if the battery is in poor contact, there will be beep warning tone. Please unplug the battery and then re-plug it.
4.2 DISCHARGE
The discharging current of CB86-PLUS charger is fixed at 1.2A. And the discharging voltage can be set. Start the DISCHARGE mode, the charger will discharge the battery to the voltage you set. Make sure to set an appropriate discharging voltage, because over-low discharging voltage will cause over-discharging, which will damage the battery and shorten its life span. If the discharging voltage exceeds the battery's voltage, it will not be able to discharge. Because of the heat generated during discharge, the charger's cooling fan will work automatically. When the charger discharges the battery to the level equal to the set discharging voltage, the discharging is completed.
If the battery will not be used for a long time, it is recommended to discharge the battery to 3.8V before storing. If the voltage of the battery is too high, long-term storage may damage the battery.
Setting method: The setting method of discharging voltage is the same as that of charging voltage, please refer to Chapter 4.1 charge setting methods.
4.3 STORAGE
Besides (dis)charge mode, STORAGE working mode is also available. If batteries will not be used for a long time, this mode can be used to (dis)charge them to the best storage status. That is, 3.8V for standard 1S battery.
When this mode is enabled, CB86-PLUS will automatically charge or discharge all batteries connected to 3.8V per cell one by one. If the voltage of any battery cell is higher than 3.8V, the charger will automatically discharge it to 3.8V. If the voltage of any battery cell is lower than 3.8V, the charger will automatically charge it to 3.8V. The charging current can be set, but the discharging current is 1.2A by default.
Setting method: The setting method of storage voltage is the same as that of charging voltage, please refer to Chapter 4.1 charge setting methods.
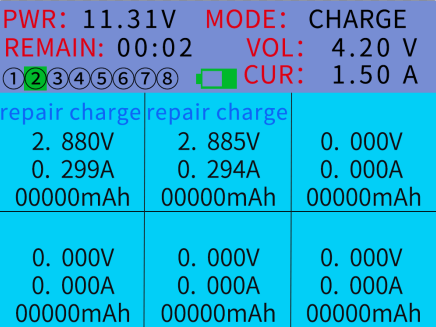
4.4 Repair charge
But when the voltage of any cell connected to the charger is lower than 3.0V, CB86-PLUS will automatically recognize that the battery has been over-discharged, and automatically trigger Repair charge mode. The charger screen will display blue "Repair Charge"at this time, which is also called trickle charge, as shown in the picture below. The current during repair process is 10% of the current battery voltage, and the minimum is 300mA. In the repair mode, no matter how much charging current you set, the charger will repair it according to the small current in the repair mode. It won't start to charge normally according to the charging current you set until the voltage of the over-discharged cell rises above 3.0V.
Note: Repair charge mode will be activated only when the voltage of any cell connected to the charger is lower than 3.0V. If the voltage of all cells is higher than 3.0V, this mode won't be activated.
4.5 Internal resistance
The battery internal resistance data can be viewed when charging.
Method: 10 seconds after charging starts, short press SET button to view all the internal resistance of the battery being charged. Press SET again to return to the charging page.
4.6 Parameter viewing
When the charging stops, press "+/▲" or "-/▼" buttons at the bottom of the screen when it is on the home page to select the battery port that needs to be viewed, and then press SET button to confirm the selection to view the data of each cell of the battery. If you need to view the battery data of other ports, press "+/▲" or "-/▼" buttons at the bottom of the screen to switch ports for data viewing.
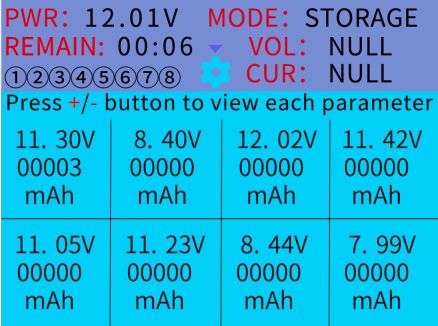

Total voltage data of all batteries Parameters of each cell of 4th por
Part 5. Firmware Update
You can download the latest firmware and view detailed firmware update tutorials on the official website https://www.radiolink.com/cb86plus_firmware.
Firmware update steps are as follows:
Connect CB86-PLUS to the computer with a Micro USB cable
Power on CB86-PLUS and the computer will recognize the disk.
Format the disk. (Note: The operation is only for the firmware. It won't format any other file in your computer. )
Copy the new firmware to U disk
Unplug the USB cable and the firmware update is complete.
Part 6. Voltage Calibration of CB86-PLUS
If your CB86-PLUS charger works well, please do not calibrate the charger, because wrong calibration may cause the battery to be over-discharged or over-charged, even explode.
When the voltage error is within 0.2V, users can calibrate the charger to solve the problem. If the voltage error exceeds 0.2V, such as 0.3V, the charger may be defective. Please contact RadioLink aftersales to troubleshoot the problem before calibration. Otherwise, overcharge will occur after calibration, which will cause the battery to explode.
Note: Please accurately measure the voltage of the battery and power supply and enter the values into the charger calibration page accurately.
The voltage calibration method is as follows:
Use a multi-meter to measure the power supply voltage for the charger and record the measured voltage. The power supply voltage must be within the range of 11V-15V.
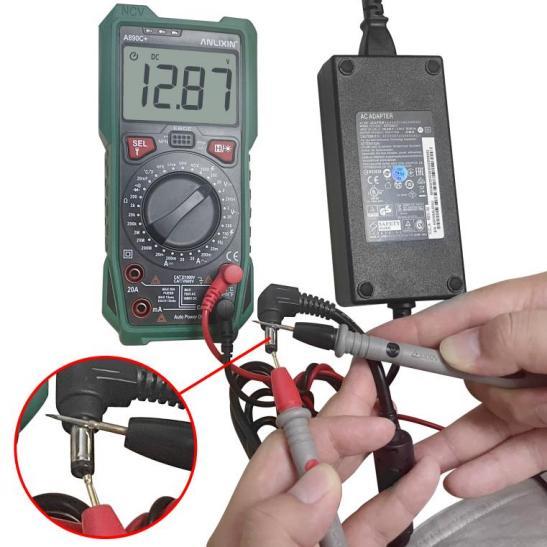
Use a multi-meter to measure the normal battery voltage and record the measured voltage. The measured voltage of the cell must be within the range of 3.8V-4.4V.
Note: If the cells of the battery measured is more than 1 piece, such as 2S or 6S batteries, you must measure the voltage of the first cell next to the black cable of the battery balance port, as shown in the picture below. Connect the black cable of the multi-meter to the black cable of the battery, and connect the red cable of the multi-meter to the cable next to the black cable of the battery.

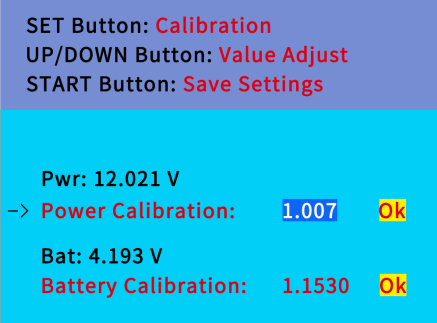
3. Press Start and SET button at the same time. Then power on the charger and enter the calibration setting page, as shown in the picture below:
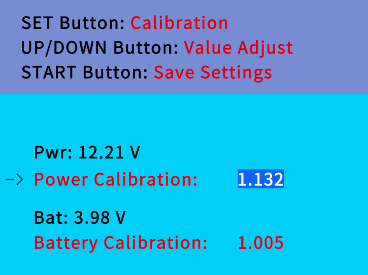
4. The calibration of the CB86-PLUS charger includes power supply voltage calibration and battery voltage calibration. Calibrate the power supply voltage first, and then calibrate the battery voltage. Please refer to the following calibration steps:
① Pwr: power supply voltage calibration
Press SET button to adjust the current power supply voltage automatically. If the value is different from the actual power supply voltage you measured, press "+/▲" or "-/▼" buttons to make fine adjustments until the power supply voltage displayed is the same with the power supply voltage measured.
After the adjustment, press Start button to confirm the calibration. The word OK will appear next to Power Calibration, indicating that the power supply voltage calibration is complete and the battery voltage calibration can be performed.
② Bat: battery voltage calibration
Connect the battery to any port of the charger first, and then press SET button to adjust the current battery voltage automatically. If the value is different from the actual battery voltage you measured, press "+/▲" or "-/▼" buttons to make fine adjustments until the battery voltage displayed is the same with the battery voltage measured.
After the adjustment, press Start button to confirm the calibration. The word OK will appear next to Battery Calibration, indicating that the battery voltage calibration is complete. The charger will go back to home screen.
When the calibration is complete, the word OK will appear next to Power Calibration and Battery Calibration. Then the screen will return to home page.
Part 7. Troubleshooting for Common Problems
7.1 Fault self-detection warning
CHARGER FAILURE! Please contact Radiolink E-mail: after_service@radiolink.com.cn
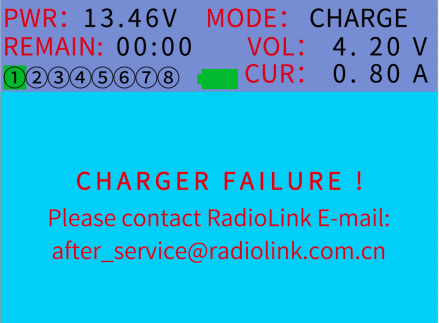
The main reasons for this warning are usually: abnormal input power supply, abnormal battery status, abnormal charger hardware etc.. Power off and restart the charger to exit this warning page, and then perform specific troubleshooting.
1. Power supply troubleshooting: Set the charging current to 0.8A, and then start charging. Normal charging of the battery indicates insufficient or unstable power supply. Reduce the charging current or replace the power supply to solve the problem.
2. Battery troubleshooting: Set the charging current to 0.8A, and then start charging. If the battery cannot be charged normally, replace the battery and recharge it. If it still does not work, it may be a hardware problem with the charger. Please contact RadioLink after-sales service.
7.2 Notice troubleshooting (Beep sound)
During the charging process, when the charging voltage of a single cell is close to 4.2V, the charger will beep to alarm. The specific reasons are as following:
Cable damage troubleshooting: Stop charging first, and then check if the connecting cables of the battery and the power supply are damaged.
Power supply troubleshooting: Stop charging first, and then set the charging current to 1A (set 1A charging current for a 1000mAh battery) If the battery still cannot be charged normally, there is a power supply problem. Replace the power supply or reduce the charging current.
3. Battery troubleshoot: Stop charging first, and then set the charging current to 1A (set 1A charging current for a 1000mAh battery) Normal charging of the battery indicates that the battery has built -in circuit board protection. Set the charging voltage to 4.18V to solve it.
4. If you have tried all the above methods but the battery still cannot be charged normally, it may be a hardware problem with the charger. Please contact RadioLink after-sales service.
5. The beeping during the discharging process is usually caused by damaged cable or abnormal hardware of the charger.